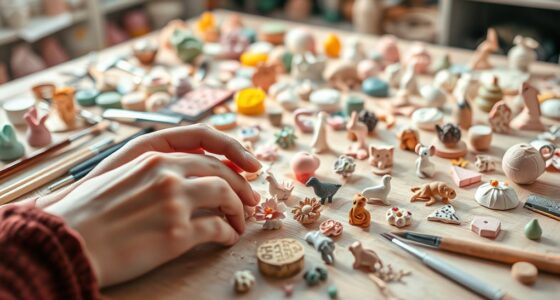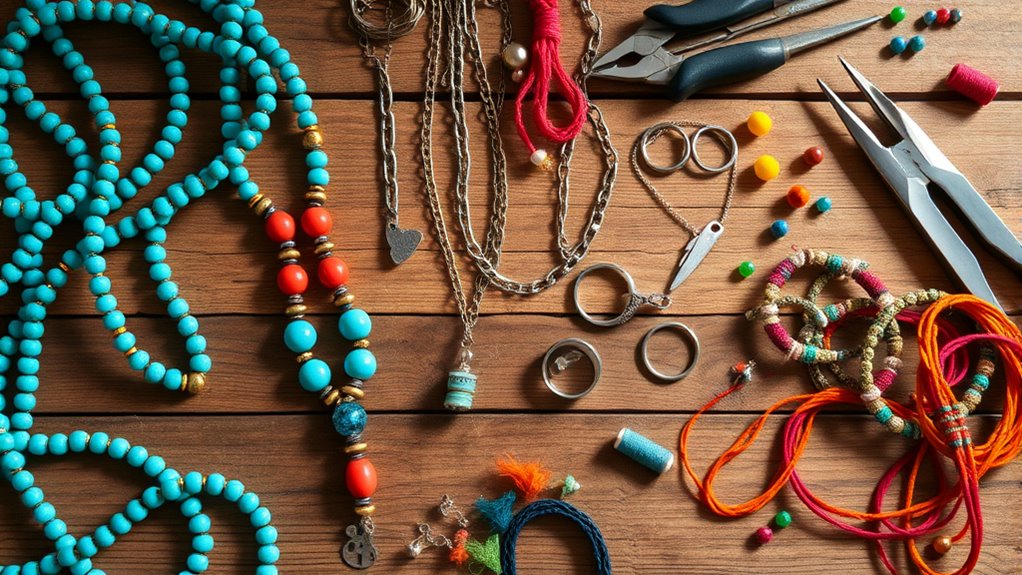

Looking for stunning DIY jewelry ideas? You can create bold statement necklaces with colorful beads, craft boho leather wrap bracelets, or design dazzling resin earrings with personalized charms. Experiment with delicate wire-wrapped rings, colorful friendship bracelets, or feather and charm drop earrings for a unique touch. Consider adjustable anklets, tassel necklaces, or elegant hairpins to add variety. Keep exploring for more inspiring projects that let your creativity shine and help you craft beautiful accessories easily.
Key Takeaways
- Incorporate bold beaded statement necklaces with large, colorful beads for eye-catching accessories.
- Create personalized jewelry like name necklaces or charm-enhanced pieces for meaningful designs.
- Use vintage-inspired components and finishes to craft timeless, nostalgic jewelry with authentic charm.
- Experiment with geometric shapes and nature motifs such as leaves for minimalist and organic styles.
- Design versatile layered pieces, including tassel necklaces and adjustable anklets, for trendy, customizable looks.
Elegant Beaded Statement Necklace
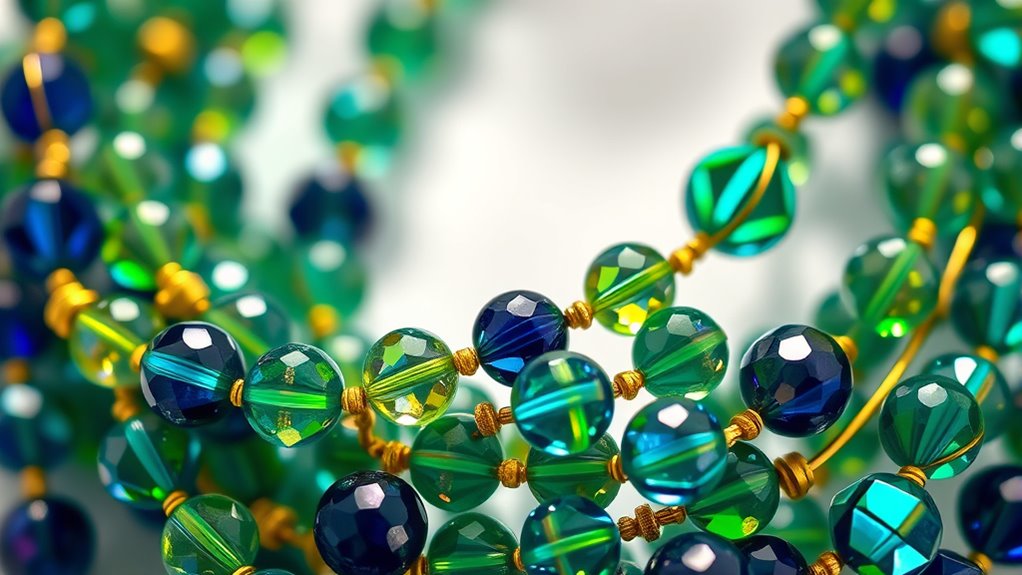
Have you ever wanted to create a bold accessory that instantly elevates your outfit? An elegant beaded statement necklace is perfect for that.
Start by choosing large, eye-catching beads in coordinating colors or contrasting shades for a striking look. String them onto a sturdy wire or strong thread, mixing different shapes and sizes for added texture. Using high-quality beads can enhance the overall appearance and durability of your jewelry.
Don’t forget to add a clasp at the ends for easy wear. Keep your design balanced by placing larger beads in the center and gradually smaller ones towards the ends.
Once assembled, you’ll have a stunning piece that can dress up a simple top or complement a formal dress. This project is fun, customizable, and allows you to showcase your personal style effortlessly.
Additionally, using high-quality beads and durable findings ensures your jewelry remains trustworthy and long-lasting.
Boho Chic Leather Wrap Bracelet
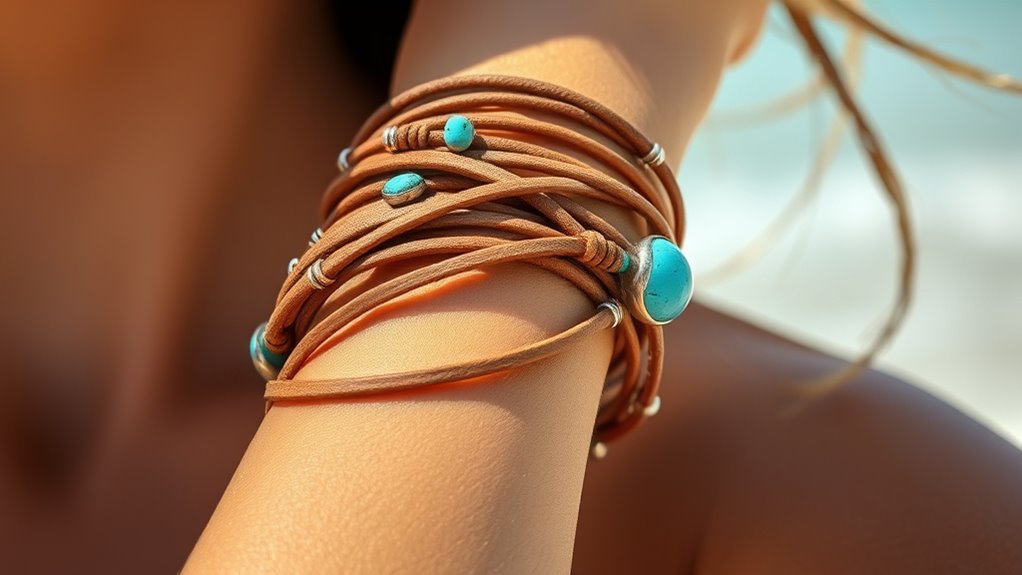
A boho chic leather wrap bracelet is a versatile accessory that adds a relaxed, stylish vibe to any outfit. You can customize it with beads, charms, or knots to match your personal style. Its layered look makes it perfect for casual or festival wear, and it’s easy to make at home with basic supplies. To enhance your design, consider different leather textures or colors, creating a unique piece every time. Here’s a quick guide to some options:
| Material | Style Tip |
|---|---|
| Leather strips | Vary widths for texture |
| Beads | Use natural stones for earthy charm |
| Charms | Add meaningful symbols |
| Closure | Use a simple knot or clasp |
Incorporating different leather textures can further elevate your bracelet’s appearance and make it truly one of a kind. Exploring jewelry making techniques can help you achieve different looks and add extra flair to your handmade jewelry. This bracelet’s versatility makes it a fun, personalized project.
Dazzling Resin Pendant Earrings
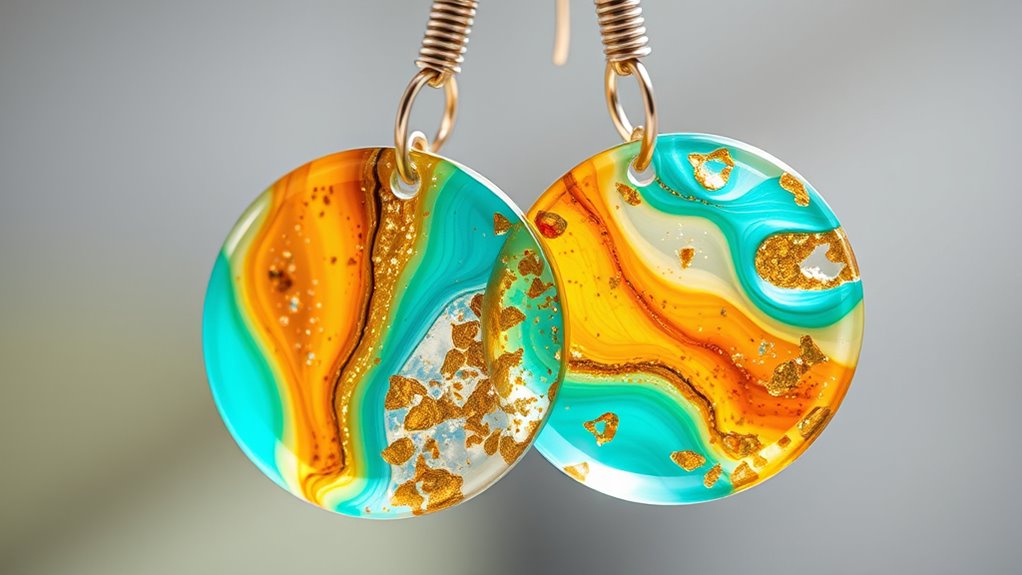
Dazzling resin pendant earrings are a perfect way to elevate your jewelry collection with effortless sparkle. They allow you to customize your look by embedding tiny flowers, glitter, or even small keepsakes inside the resin. Incorporating personalized designs can make your jewelry truly unique and reflective of your style. To create them, start by selecting your desired pendant shape and mixing the resin according to the instructions. Pour the resin into a mold, adding your decorative elements as it begins to set. Once cured, attach the pendant to earring hooks or studs for an elegant finish. These earrings are versatile, combining fun creativity with stylish appeal. Whether you prefer a vibrant, colorful design or a more subtle, clear look, resin pendants let you experiment and craft unique jewelry pieces that reflect your personality.
Delicate Wire-Wrapped Ring
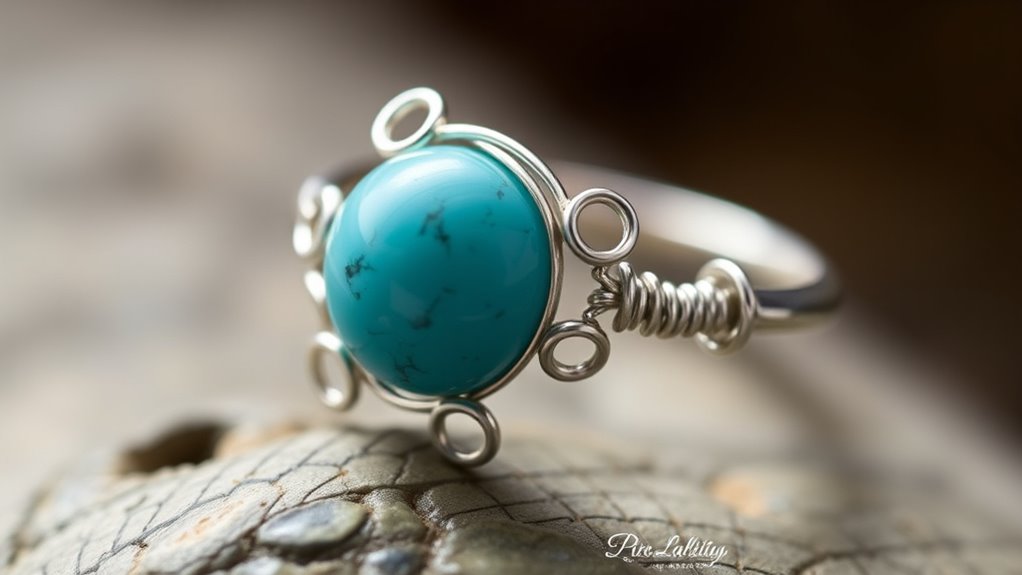
Creating a delicate wire-wrapped ring is a rewarding DIY project that combines simple techniques with elegant results. Start with a thin gauge wire and a small, polished gemstone or bead. Wrap the wire around the stone securely, forming a bezel that holds it in place.
Use pliers to create neat, tight coils at the top and bottom, ensuring the design stays intact. Wrap additional wire around the band to add decorative accents or to strengthen the structure. Keep your wraps tight but even for a professional look.
Once finished, trim any excess wire and tuck in sharp ends. This project is perfect for customizing with various stones and wire colors, allowing you to craft a unique piece that reflects your style.
Colorful Thread Friendship Bracelets
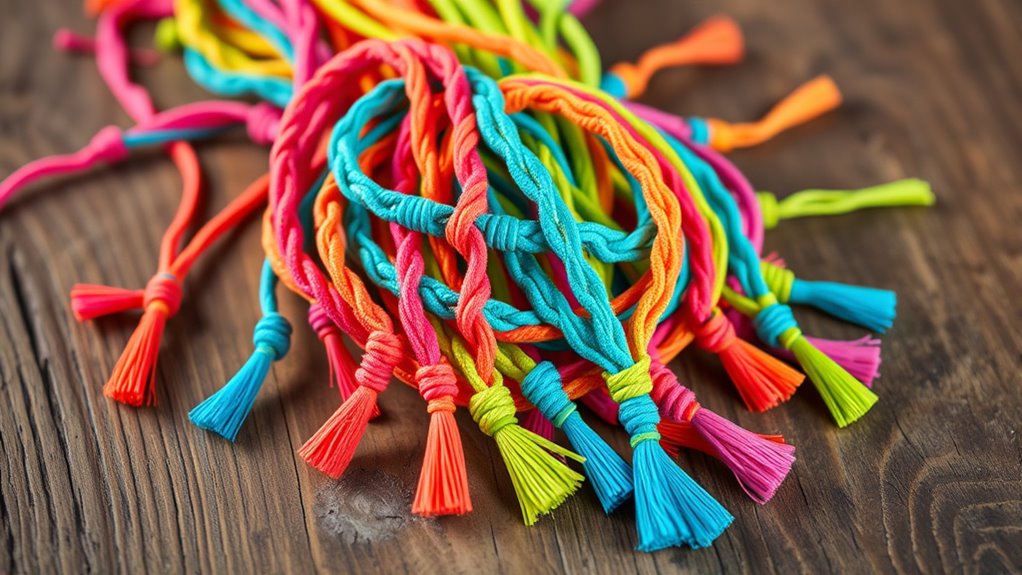
Colorful thread friendship bracelets are a fun and easy way to express your personality and share meaningful gifts with friends. You can customize them with different colors, patterns, and knots to suit any style. These bracelets are perfect for quick projects that look impressive and hold sentimental value. Engaging in this craft also promotes imaginative play, encouraging you to experiment with unique designs and techniques. Making these bracelets is an excellent activity to do with friends, fostering creativity and bonding. Plus, they make thoughtful, handmade gifts that your friends will cherish. With just a few simple materials, you’re set to create memorable accessories that showcase your personal touch. Additionally, creating these bracelets can introduce you to craftsmanship skills, which can be valuable for other creative endeavors. This craft also offers an opportunity to learn about textile techniques that can enhance your overall crafting repertoire. Developing a good understanding of color theory can help you choose harmonious color combinations for your bracelets, elevating your designs even further. Exploring home maintenance tips can also inspire you to keep your crafting space organized and inspiring.
Vintage Charm Dangle Earrings
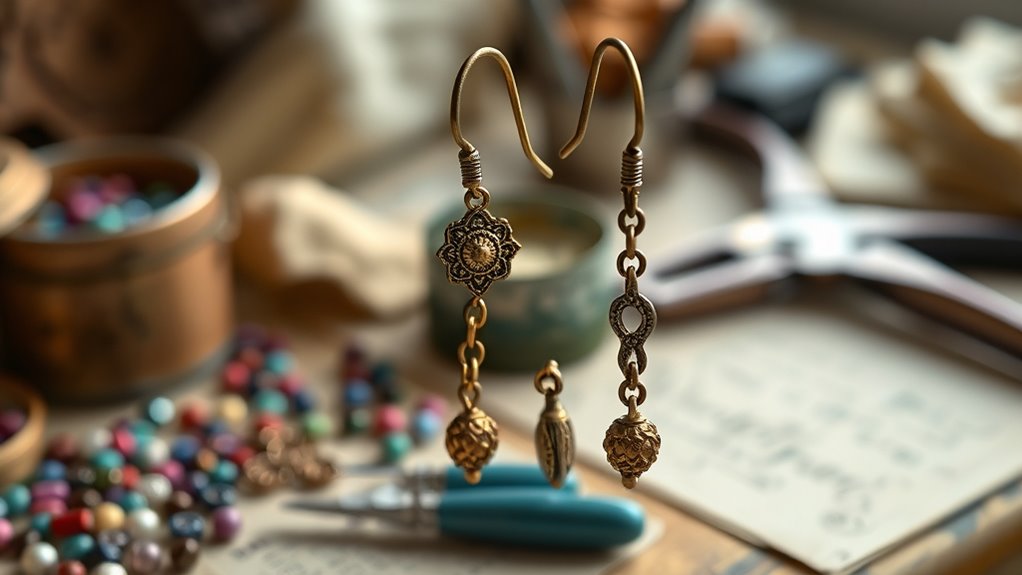
When creating vintage charm dangle earrings, you choose antique components that add authentic character. Incorporating unique charms gives your design a personal touch, making each pair one-of-a-kind. To finish, you’ll aim for a vintage look by applying specific techniques that give your earrings that timeless, aged appeal. Paying attention to payment security measures during your crafting process can help protect your designs and personal information from online threats. Understanding ethical hacking principles can also inform how you safeguard your online sales platforms from potential cybersecurity risks. Additionally, using wicks that are appropriate for your chosen materials ensures your earrings burn evenly if they include small candles or decorative elements. Incorporating mind-body connection techniques can also help enhance your creative process and reduce stress while working on your jewelry projects. Incorporating nutritional value considerations can also guide you in selecting eco-friendly and safe materials for your jewelry, ensuring sustainability and safety for your customers.
Selecting Antique Components
Choosing the right antique components can instantly add a unique and timeless charm to your vintage charm dangle earrings. Focus on pieces that tell a story or feature intricate details, as these will stand out. Look for items with authentic patina or subtle imperfections that highlight their age. Incorporating timeless classics can elevate the overall aesthetic of your jewelry, ensuring it remains stylish for years to come. When selecting components, consider their size and how well they’ll complement each other. Authenticity matters—opt for genuine vintage or antique pieces over reproductions. Additionally, understanding traditional craftsmanship can help you identify high-quality antique components and appreciate their historical significance. Recognizing vintage design elements can guide you in selecting pieces that harmonize well with modern styles. Paying attention to vintage color palettes can also enhance the cohesiveness of your jewelry designs. To guide your choices, keep these in mind:
- Genuine vintage or antique beads and charms
- Components with authentic patina or wear
- Intricately detailed metal findings
- Pieces that match your desired color scheme
- Items with a compelling, story-rich appearance
A new sentence to add: Incorporating organization techniques can help you better assess and select the most meaningful vintage components for your designs.
Incorporating Unique Charms
Incorporating unique charms into your vintage charm dangle earrings instantly adds personality and a one-of-a-kind touch to your designs. Choose charms that reflect your interests or tell a story, like tiny vintage lockets, antique keys, or delicate miniature insects. Mix and match different shapes, sizes, and materials to create visual interest. Use jump rings or small chains to attach your charms securely, allowing them to dangle freely and catch the light. Consider layering charms for a more eclectic look or keeping it minimal with just one statement piece. Adding rustic accents can further enhance the farmhouse-inspired aesthetic of your jewelry pieces. Embracing personal vibration and aligning your energy can also inspire creative confidence in your jewelry designs.
Achieving Vintage Finish
To achieve an authentic vintage finish on your charm dangle earrings, start by selecting aged or antiqued metal components, such as brass or bronze, which naturally develop a patina over time.
You can enhance this look by applying additional treatments or patinas to deepen the aged effect. Consider using heat or chemical solutions carefully to accentuate wear and tear.
Distress your metal with fine sandpaper for a subtle, worn appearance.
Incorporate vintage-inspired beads or charms to complement the finish.
Seal your work with a matte varnish for a subtle, aged look that lasts.
- Use an antiquing solution for instant patina
- Lightly sand edges for a distressed look
- Add patina with specialized paint or wax
- Incorporate vintage-style beads or accents
- Seal with matte finish for durability
Minimalist Geometric Necklace
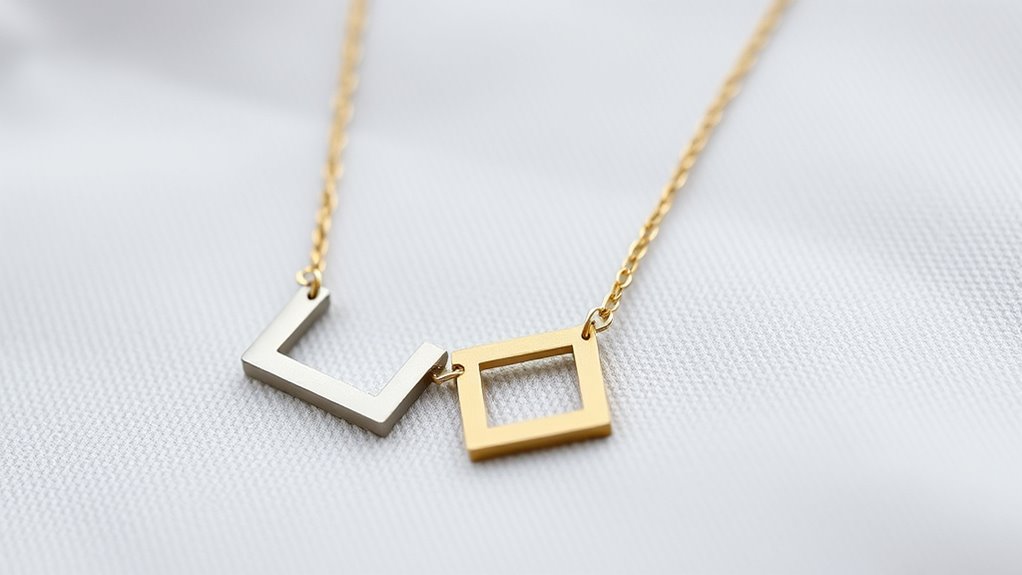
A minimalist geometric necklace adds a sleek, modern touch to any outfit, making it a perfect DIY project for beginners. You can craft clean lines with simple shapes like triangles, circles, or squares using basic jewelry supplies. The key is balancing symmetry and simplicity, creating a versatile accessory that complements any style. To deepen your understanding, consider this table:
| Shape | Meaning | Style Tip |
|---|---|---|
| Triangle | Stability, strength | Pair with angular earrings |
| Circle | Unity, eternity | Keep design balanced |
| Square | Structure, order | Use contrasting materials |
This approach emphasizes minimalism while adding symbolic depth, making your necklace meaningful and stylish.
Nature-Inspired Leaf Brooch
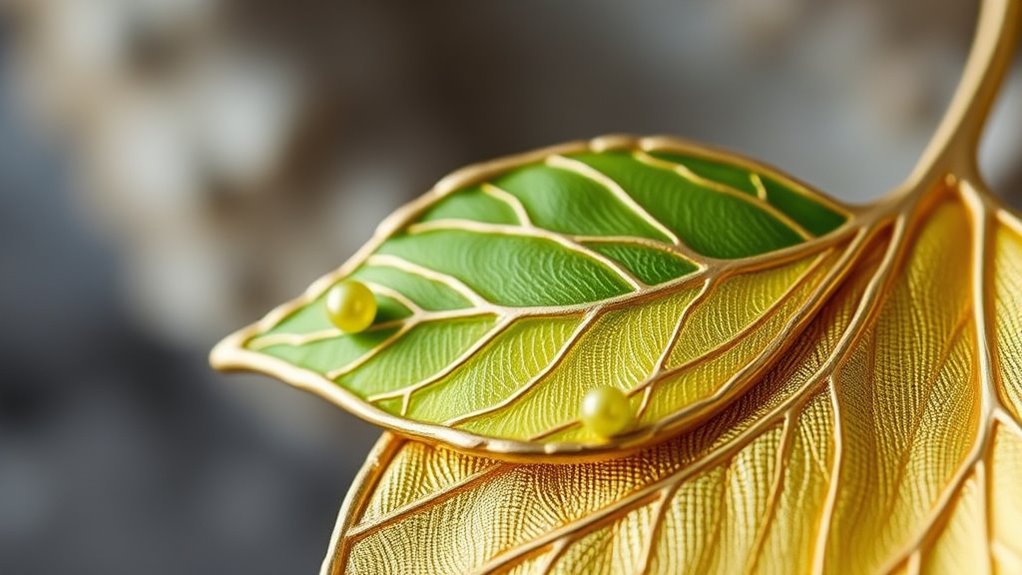
Creating a nature-inspired leaf brooch lets you bring a touch of the outdoors into your wardrobe with a simple yet elegant accessory. You can craft a unique piece that captures the delicate beauty of leaves, perfect for adding a natural vibe to any outfit.
To start, choose eco-friendly materials like pressed leaves, polymer clay, or metal. Use fine wire to shape and secure the leaf’s veins, adding realistic detail. Incorporate textured beads or gemstones for extra flair.
Consider painting or patinating for color variation. You can also experiment with different leaf shapes or sizes for variety.
This project allows you to combine artistry with nature’s charm, resulting in a one-of-a-kind brooch that celebrates the outdoors in a sophisticated way.
Layered Chain Anklet
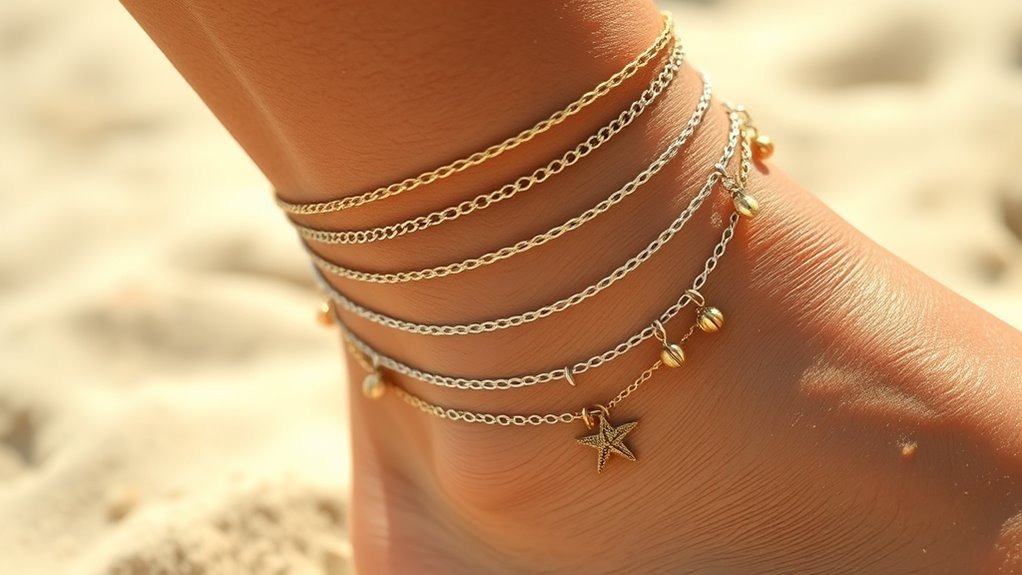
When creating a layered chain anklet, start by choosing the right chains that match your style and comfort.
Use layering tips and tricks to balance different lengths and textures for a chic look.
Don’t forget to personalize it with charms that reflect your personality and make your anklet unique.
Choosing the Right Chains
Choosing the right chains for a layered chain anklet involves considering both style and comfort. You want chains that complement each other without feeling heavy or uncomfortable. Thin, delicate chains create a subtle, elegant look, while thicker links add boldness. Mix metals like silver and gold for contrast or stick to one for a cohesive vibe.
Pay attention to clasp types—lobster clasps are secure, but toggle clasps add a decorative touch. Length matters: choose chains that sit comfortably around your ankle, with some layering shorter and longer pieces for depth.
- Use different chain textures for visual interest
- Opt for hypoallergenic metals if you have sensitive skin
- Consider adjustable chains for a perfect fit
- Mix chain widths to add dimension
- Select lightweight options to prevent discomfort
Layering Tips & Tricks
Layering a chain anklet effortlessly elevates your style by combining different lengths, textures, and metals. To create a balanced look, start with a shorter, delicate chain close to your ankle bone, then add slightly longer pieces with varied textures or finishes.
Mix metals—gold, silver, or rose gold—to add visual interest, but keep the overall vibe cohesive. Play with different chain styles, like cable, Figaro, or box chains, for contrast. Avoid overcrowding; leave some skin visible for a clean, chic appearance.
Secure each chain with a simple clasp, and consider using jump rings to link chains of different lengths seamlessly. Remember, less is often more—layer thoughtfully to highlight your personal style without overwhelming your look.
Personalizing With Charms
Adding charms to your layered chain anklet transforms a simple accessory into a highly personal statement. You can choose charms that reflect your personality, memories, or interests, making your anklet truly unique. Incorporate meaningful symbols, tiny photo charms, or travel-inspired pieces for a customized look.
Mixing different textures and metals adds visual interest and depth to your design. Consider the size and placement of each charm to guarantee they don’t tangle or fall off easily. Personal touches like initial charms, birthstones, or tiny meaningful charms elevate your anklet’s significance.
Experiment with different combinations until you find a style that resonates with you. This DIY approach turns an ordinary accessory into a wearable story that showcases your personality and style.
Glittery Glitter Resin Ring

Ever wondered how to create a stunning piece of jewelry that catches the light with every movement? A glittery resin ring is the perfect project.
Start by mixing clear resin with fine glitter, choosing colors that match your style. Pour the mixture into a ring mold, ensuring you distribute the glitter evenly.
For extra sparkle, layer additional glitter on top before the resin fully sets. Once cured, remove the ring from the mold and smooth any rough edges with fine sandpaper.
You can add a glossy top coat for extra shine. This DIY project allows you to customize your ring with different glitter styles and colors, making it uniquely yours.
It’s simple, fun, and results in a dazzling accessory that’s sure to turn heads.
Personalized Name Necklace
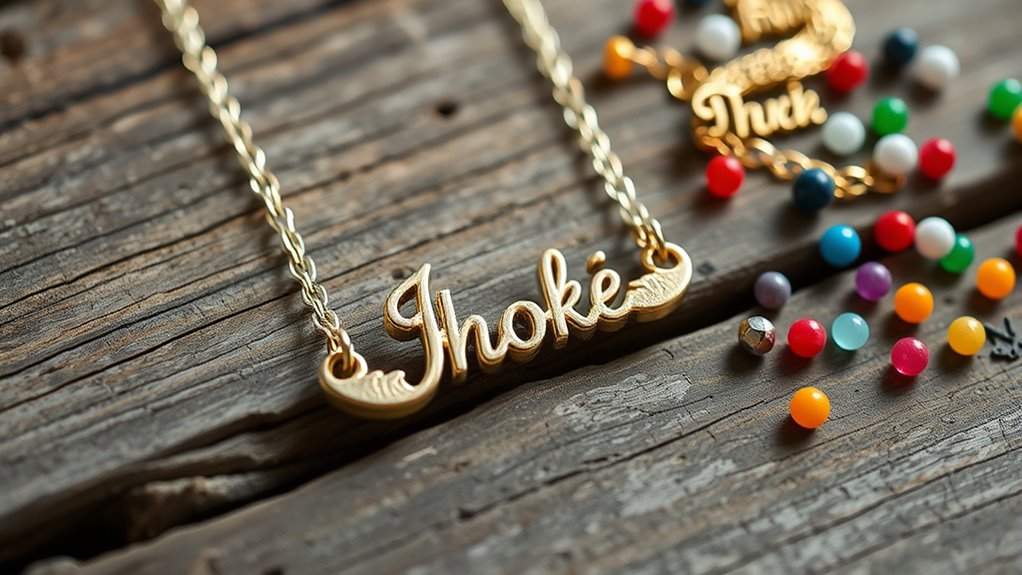
Creating a personalized name necklace is a fun way to make jewelry that truly reflects your style. You can customize it with your name, a loved one’s, or a meaningful word. This project allows you to choose your preferred font, material, and chain style, making it uniquely yours.
Plus, crafting your own necklace adds a personal touch that store-bought pieces can’t match. To get started, consider these key points:
- Select a font that matches your personality
- Use different metals like gold, silver, or rose gold
- Incorporate embellishments like tiny charms or crystals
- Experiment with chain lengths for a perfect fit
- Add a protective seal or coating for durability
Creating a personalized name necklace is simple, fun, and a great way to showcase your individuality.
Feather and Charm Drop Earrings
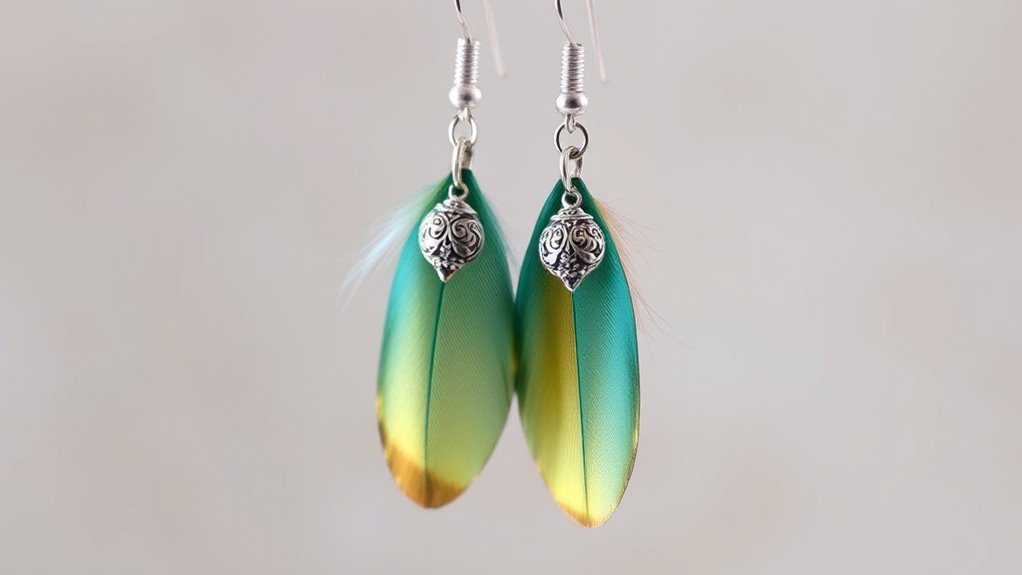
Start by choosing elegant feathers that match your style, whether bold or subtle.
Then, pick meaningful charms that add personal significance to your earrings.
Once you’ve gathered your materials, focus on assembling and finishing your design with care to create a beautiful, polished piece.
Choosing Elegant Feathers
Are you looking to add a touch of elegance to your jewelry collection? Choosing the right feathers can elevate your DIY earrings instantly. Look for feathers with soft, even coloring and smooth texture to guarantee a refined appearance.
Opt for feathers that are lightweight, so they hang gracefully without weighing down your earrings. Consider the size—smaller feathers create a delicate look, while larger ones make a bold statement.
Think about the shape and pattern, choosing ones with subtle markings or a sleek silhouette. Finally, select feathers that match your overall style, whether classic, bohemian, or modern.
Selecting Meaningful Charms
When selecting charms for your feather and charm drop earrings, it’s important to choose pieces that hold personal significance or complement your style. Think about symbols that inspire or represent your personality—like a tiny heart, star, or meaningful charm from a special trip.
Consider the overall vibe you want your earrings to convey, whether boho, elegant, or whimsical. Choose charms in colors and materials that match your wardrobe, making sure they blend seamlessly with your feathers.
Keep in mind the size and weight of each charm so they don’t overpower the delicate feathers or feel uncomfortable to wear. The right charms won’t only enhance your earrings’ look but also make them uniquely yours.
Assembly and Finishing
Once you’ve selected your charms and feathers, it’s time to assemble and finish your earrings to guarantee they’re secure and polished. Begin by attaching the charms and feathers to your earring hooks with small jump rings, ensuring they move freely and are securely closed. Double-check all connections to prevent any accidental openings.
To add a professional touch, consider using pliers to tighten any loose links. You can also add a bead or spacer for extra flair. Finally, trim any excess wire or thread, and give your earrings a gentle polish with a soft cloth for a shiny finish.
- Use quality findings for durability
- Secure all jump rings tightly
- Add a protective layer to prevent tarnish
- Ensure feather alignment for symmetry
- Test earrings for comfort and balance
Adjustable Charm Anklet
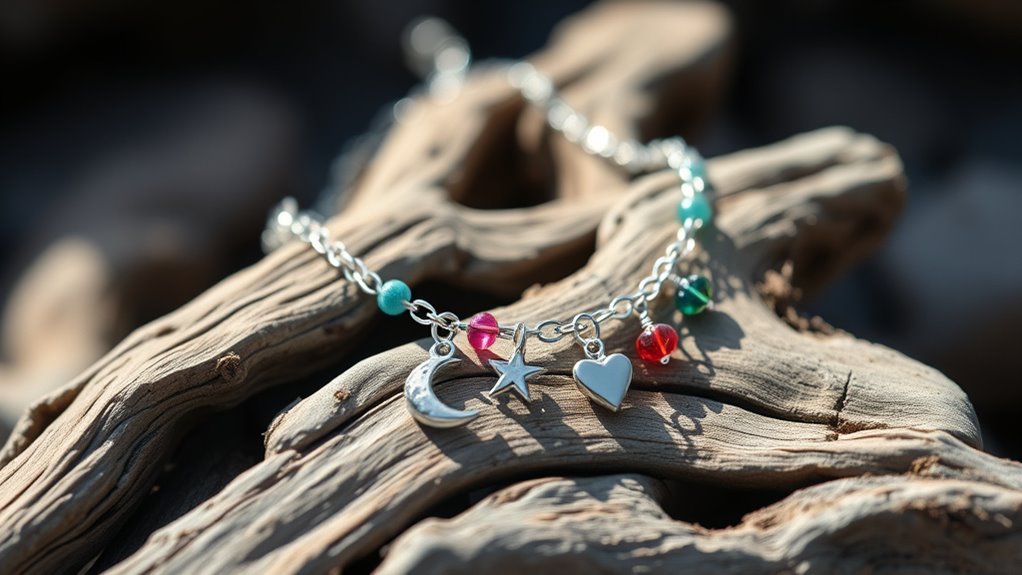
An adjustable charm anklet offers a stylish way to personalize your summer accessories while ensuring a comfortable fit. You can choose charms that reflect your personality or favorite symbols, making each piece uniquely yours.
Create a personalized, adjustable charm anklet to add summer style and comfort to your accessories.
To create one, start with a flexible chain or cord that’s easy to adjust. Add charms using jump rings or small clasps, ensuring they’re securely attached.
Incorporate a sliding closure or extender chain to make the anklet adjustable, so it fits perfectly on different ankle sizes. Keep the design simple or add layered charms for extra flair.
This DIY project allows you to experiment with colors, materials, and charms, resulting in a piece that’s both meaningful and fashionable. Plus, it’s quick to assemble and perfect for customizing your summer wardrobe.
Bohemian Tassel Pendant Necklace
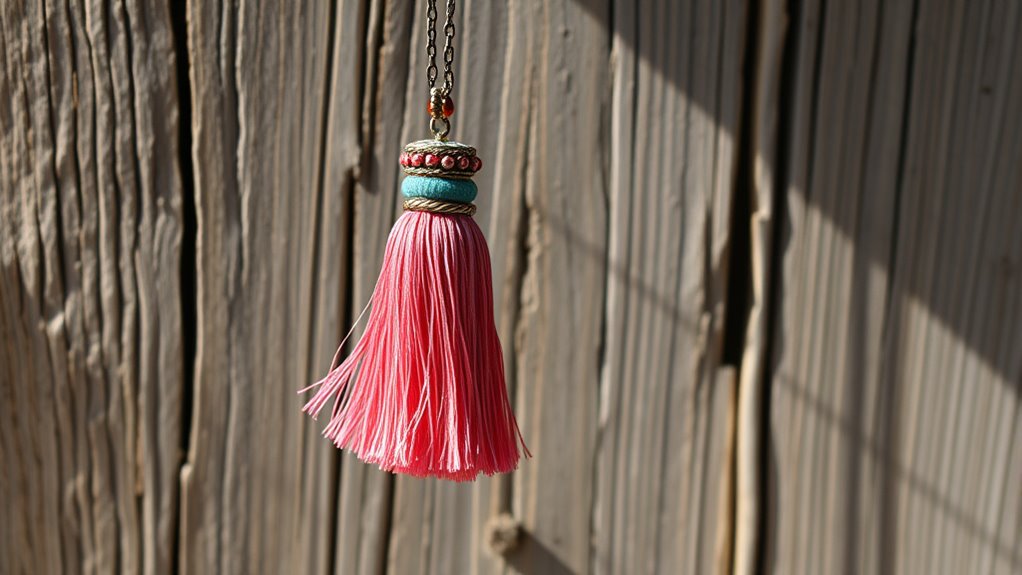
When creating your bohemian tassel pendant necklace, choosing vibrant, colorful tassels can make your design pop.
You can also customize the pendant length to suit your style, whether you prefer a shorter, choker-like look or a longer, boho vibe.
Experimenting with these elements helps you craft a truly unique, eye-catching piece.
Choosing Colorful Tassels
Are you unsure how to select the perfect colorful tassels for your bohemian necklace? Think about the vibe you want to create. Bright, bold colors add energy, while softer hues lend a subtle charm.
Consider the following to make your choice easier:
- Color harmony with your outfit or other jewelry pieces
- Contrast to make tassels pop against your clothing
- Material texture for a tactile, layered look
- Size and length to balance your neckline and overall style
- Personal preference—trust your instincts and favorite shades
Mixing and matching these elements helps craft a unique, eye-catching piece. Remember, tassels are the focal point, so choose colors that reflect your personality and mood.
Let your creativity run wild!
Adjusting Pendant Length
Adjusting the length of your bohemian tassel pendant necklace allows you to customize its look and guarantee it complements your outfit perfectly. To change the length, simply slide the clasp along the chain or adjust the cord if it’s adjustable. You can make it longer for a boho-chic vibe or shorten it for a more subtle look. Consider the neckline of your outfit when adjusting, ensuring the pendant sits at the right spot. Here’s a quick visual guide:
| Style | Ideal Length | Occasion |
|---|---|---|
| Choker | 14-16 inches | Casual, trendy |
| Princess | 17-19 inches | Everyday wear |
| Matinee | 20-24 inches | Formal, layered |
| Opera | 28-36 inches | Elegant, layered |
Elegant Pearl Hairpin
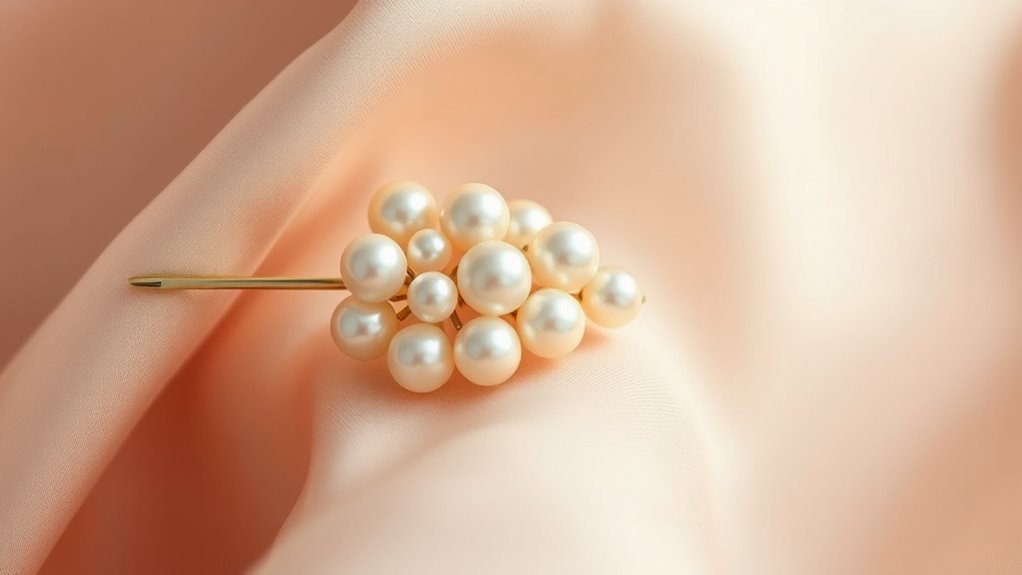
Adding an elegant pearl hairpin to your hairstyle instantly elevates your look with a touch of sophistication. This simple accessory can transform a casual outfit into a polished ensemble.
To craft your own, select high-quality faux or real pearls and a sturdy hairpin base. Use strong adhesive or wire to secure the pearls, creating a sleek, uniform design or a clustered pattern. Personalize your hairpin with charms or metallic accents for extra flair.
This DIY project is quick and versatile—perfect for everyday wear or special occasions.
- Choose pearls in different sizes for visual interest
- Add metallic beads for a modern touch
- Incorporate colorful accents for a playful vibe
- Experiment with different pin shapes and lengths
- Use a protective sealant for durability
Frequently Asked Questions
What Are the Best Tools for Beginners in Jewelry Making?
When starting jewelry making, you want tools that are simple and versatile. A pair of round-nose pliers helps shape wires, while chain-nose pliers are great for gripping and bending.
You’ll also need wire cutters for trimming and a bead mat to keep your beads organized. Don’t forget a measuring tape or ruler for accuracy.
These basics will set you up for success and make your projects enjoyable and straightforward.
How Can I Ensure My DIY Jewelry Lasts Long?
Oh, sure, because your jewelry’s lifespan depends solely on the magic of fairy dust, right? In reality, you should use quality materials, like corrosion-resistant clasps and durable cords. Seal your pieces with a protective coating, and store them properly to avoid unnecessary wear.
Regular cleaning keeps your creations shining, and handling them gently prevents breakage. Follow these tips, and your DIY jewelry will stay fabulous for ages!
Which Materials Are Eco-Friendly for Jewelry Projects?
When choosing eco-friendly materials for your jewelry projects, you should look for options like recycled metals, sustainable wood, and plant-based resins. These materials reduce environmental impact and are safe to work with.
You can also consider organic beads made from seeds or shells. By selecting these eco-friendly materials, you help protect the planet while creating beautiful, sustainable jewelry pieces that you can be proud of.
How Do I Choose the Right Jewelry for Different Occasions?
You might think choosing jewelry for different occasions is tricky, but it’s really about understanding the vibe of each event.
For formal events, go for classic pieces like pearls or diamonds that add elegance.
Casual outings call for fun, colorful accessories that showcase your personality.
Remember, comfort matters too—opt for lightweight jewelry when you’ll be on your feet or active.
Trust your instincts, and you’ll always pick the perfect piece.
What Are Some Tips for Customizing Jewelry Designs?
When customizing jewelry designs, you want to reflect your personal style and the occasion. Start by selecting meaningful charms, beads, or gemstones that resonate with you.
Mix different textures and colors to create a unique piece. Don’t be afraid to experiment with various settings or add personalized engravings.
Keep your design balanced, and always consider comfort. With these tips, your jewelry will be both special and expressive.
Conclusion
Now that you’ve explored these stunning DIY jewelry ideas, it’s time to let your creativity shine like a star. Whether you’re crafting a bold statement piece or delicate accessories, each project is a chance to express your unique style. Think of your jewelry as a canvas—paint it with colors, textures, and charms that tell your story. So, grab your supplies and turn your jewelry dreams into sparkling reality!