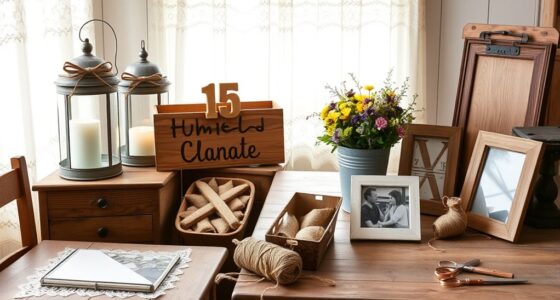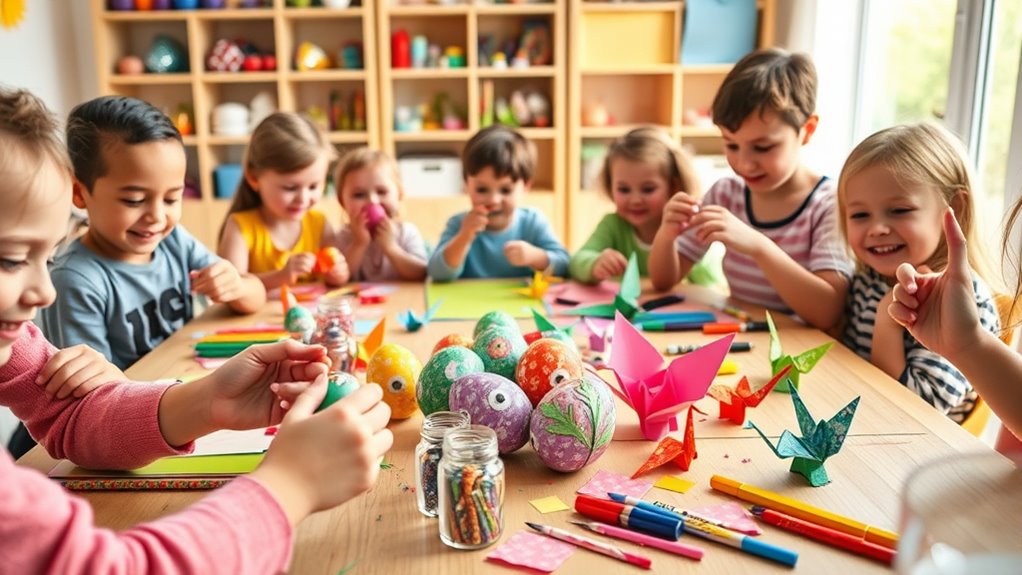

Looking for quick and easy DIY crafts for kids? You can make colorful paper plate masks, fun sock puppets, painted rock animals, and vibrant pasta jewelry—all with common household supplies. These projects are simple, creative, and perfect for little hands. You can also create paper chain garlands, bubble wrap stamp art, and wind chimes in just a few steps. Keep exploring, and you’ll discover even more fun crafts to enjoy together!
Key Takeaways
- The crafts are simple, requiring minimal supplies like paper, recycled items, fabric, and basic tools, making them quick to set up.
- Activities such as paper masks, friendship bracelets, painted rocks, and pom-pom animals are easy for kids of various ages.
- Many crafts involve common household or craft store materials, allowing for immediate, hassle-free creation.
- The projects focus on creativity and fun, with minimal preparation and quick completion times.
- These ideas are perfect for busy parents or teachers seeking engaging, fast-paced activities for kids.

Rug Tufting Gun Kit with Carpet Trimmer, 2 in 1 Cut & Loop Pile Tufting Gun with Tufting Cloth, Rug Making kit for Beginners
【Rug Tufting kit】: Tufting gun kit includes a tufting gun, a carpet trimmer kit, 20 rolls of yarn,...
As an affiliate, we earn on qualifying purchases.
Colorful Paper Plate Masks
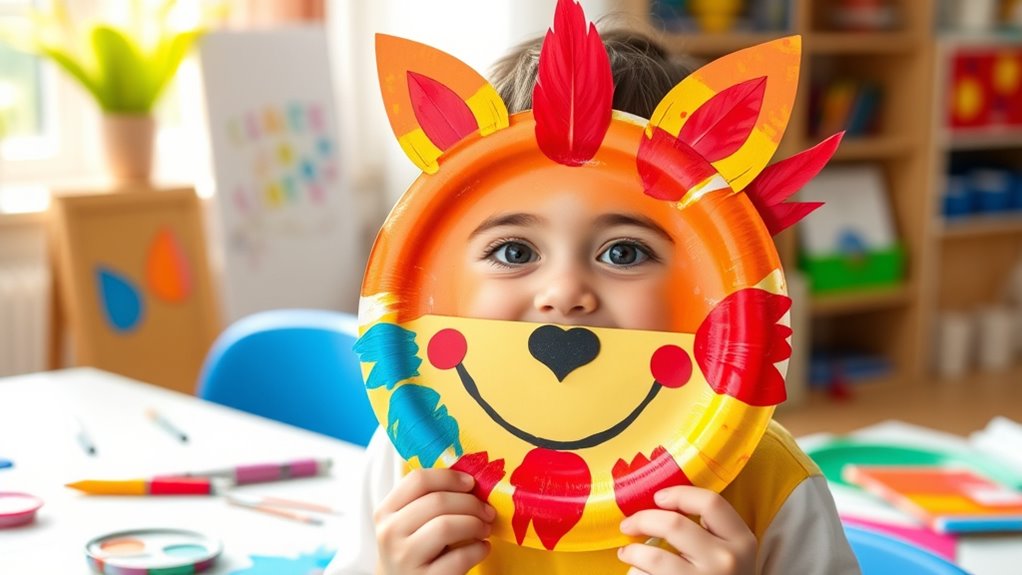
Creating colorful paper plate masks is a fun and easy craft that kids will love. You start by choosing a paper plate and drawing the mask shape you want, like a superhero, animal, or fantasy character. Cut out eye holes carefully.
Then let your child decorate the mask with paints, markers, or crayons. Add fun details like feathers, glitter, or stickers to make it unique. You can also attach a string or elastic band so they can wear it comfortably.
This craft encourages creativity and helps develop fine motor skills. Plus, it’s simple enough for kids of all ages. Once finished, they’ll have a vibrant mask perfect for playtime, dress-up, or a themed party.
It’s a colorful project that sparks imagination and fun.

Dabline Rug Tufting Gun Kit – Complete Tufting Supplies Including 2 in 1 Cut & Loop Pile Rug Tufting Gun, Carpet Trimmer, Tufting Cloth, Backing Cloth, 20 Color Yarns, Tools & Accessories
ALL IN ONE STARTER KIT: Your complete rug tufting kit includes a full beginners course, 2-in-1 cut &...
As an affiliate, we earn on qualifying purchases.
Easy Sock Puppets
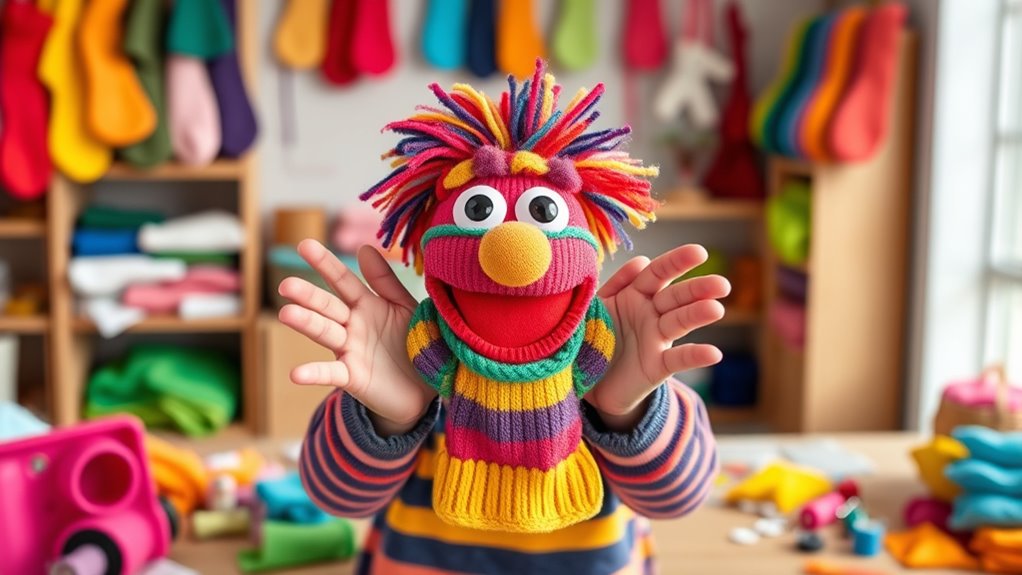
Ever thought about turning an ordinary sock into a lively puppet? It’s simple and fun! Start by choosing a clean sock, preferably one with fun colors or patterns.
Transform a plain sock into a fun, lively puppet with simple craft supplies and creativity!
Next, gather some basic craft supplies like buttons, felt, glue, and markers. You can glue buttons for eyes, cut felt into shapes for a mouth or nose, and draw details with markers.
Slip the sock onto your hand, and you’ll see your puppet come alive. Add hair with yarn, or decorate it with tiny accessories for extra personality.
This activity is perfect for kids to get creative and make their own characters. Plus, it’s easy to do with stuff you already have around the house.
Incorporating time management skills can help you organize craft activities efficiently, making the process more enjoyable for everyone involved.
Have fun bringing your sock puppet to life!

Riiai Tufting Gun Starter Kit, Tufting Gun with Carpet Trimmer Rug Making Kit, Rug Gun Cut & Loop Pile for Making Rugs, Carpet Trimmer Tufting for Sculpting (Black Tufting Gun with Trimmer and Case)
Tufting Gun Starter Kit: Tufting gun with carpet trimmer bundle set, comes with all the tufting suppliers you...
As an affiliate, we earn on qualifying purchases.
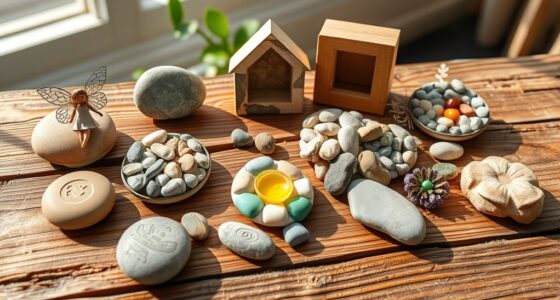
Painted Rock Animals
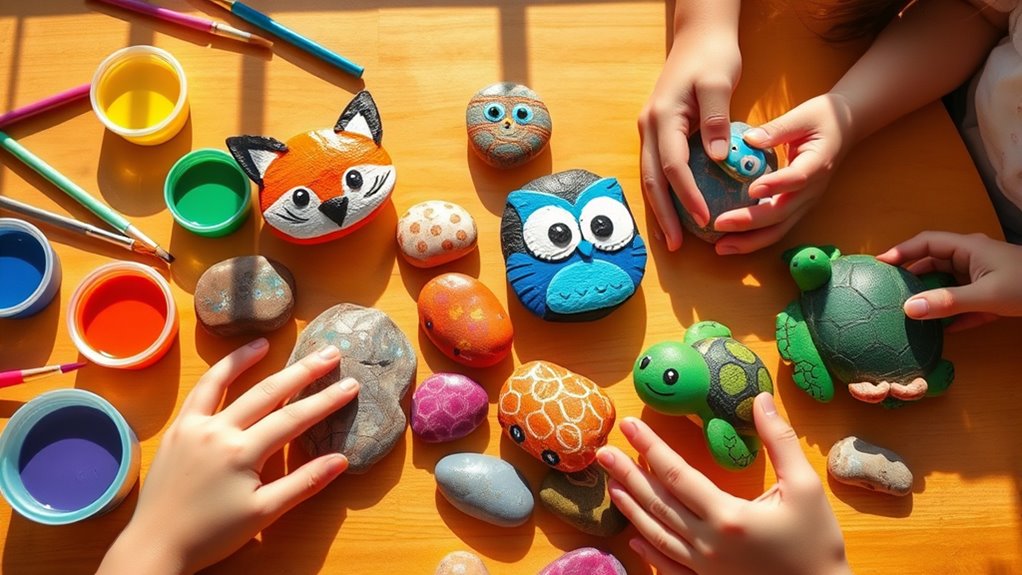
Start by selecting smooth, interesting rocks that will become your animal canvases. You can also consider choosing rocks from different regions to add diversity to your collection. Next, use bright paints to add details that bring your creatures to life, like eyes and fur patterns. Incorporating vintage and antique furnishings can make your painted rocks even more unique and eye-catching. Using compact designs ensures your painted rocks are easy to display and transport. To enhance your artwork, consider exploring digital creativity techniques to plan your designs before painting. Finally, seal your artwork to protect it and find a special spot to display your finished painted rock animals.
Choosing the Perfect Rocks
How do you pick the perfect rock to turn into a charming painted animal? First, look for smooth, flat stones with an even surface—these make painting easier. Avoid rocks with jagged edges or rough textures, which can be hard to work with. Sound vibrations are believed to enhance cellular regeneration and overall health, making it beneficial to select rocks that are sturdy and well-formed. Choosing rocks with a consistent composition can also help ensure they hold paint well and last over time. Understanding the art and interiors trends among celebrities can inspire creative decorating ideas for your painted rocks. Size matters too: choose a rock that fits comfortably in your hand but isn’t too small to paint details on. Brightly colored or uniquely patterned rocks can add character to your animal. Check that the rock is clean and dry before starting. You can gather these from your yard, a park, or a beach, but always pick ones that are sturdy and intact. Selecting the right rock involves understanding its composition, which affects how well it will hold paint and last over time. Additionally, considering the protective qualities of certain rocks can help ensure your painted creations remain vibrant longer.
Painting Animal Details
Once you’ve chosen the perfect rock, it’s time to bring your animal to life by adding details. Use small brushes and vibrant paint colors to carefully outline features like eyes, noses, and mouths.
For a more realistic look, add tiny strokes to create fur or feather textures. Don’t forget to paint distinctive markings or patterns that match your chosen animal—like spots on a leopard or stripes on a tiger.
Use a fine-tip brush for fine details and a thicker one for broader areas. If you make a mistake, gently wipe it away with a damp cloth before it dries.
Let each layer dry completely before adding new details to keep your design neat. This step transforms your painted rock into a charming, recognizable animal.
Sealing and Displaying
Thinking about how to preserve your painted rock animal and showcase it beautifully? Sealing your creation protects the paint and adds a polished finish. Use a clear acrylic spray or brush-on sealant, applying thin coats for even coverage. Once dry, your rock will be more durable and resistant to scratches or water damage. Incorporating proper sealing techniques into your craft projects can inspire innovative display ideas and enhance your creative process. Staying informed about DIY craft tips can help you improve your techniques and achieve better results.
To display your art, consider:
- Placing it on a shelf or windowsill
- Creating a mini display stand
- Using a small shadow box
- Arranging it with other painted rocks
- Adding a decorative label or tag
These options allow your painted rock to become a charming decor piece or gift. Sealing not only preserves your craft but also makes it easier to handle and enjoy every day.

Twotrees TTS-55 Pro Laser Engraver 5500mW Laser Engraving Machine,Laser Cutter,30000mm/min Speed,0.08mm Laser Spot Engraver Machine for DIY,Wood,Metal,Acrylic,Glass,Stainless Steel
【Upgraded Laser Power with Air Assist Support】The TTS-55 PRO features a powerful 5500 mW (5.5W) laser (Class II)...
As an affiliate, we earn on qualifying purchases.
Handprint Art Creations
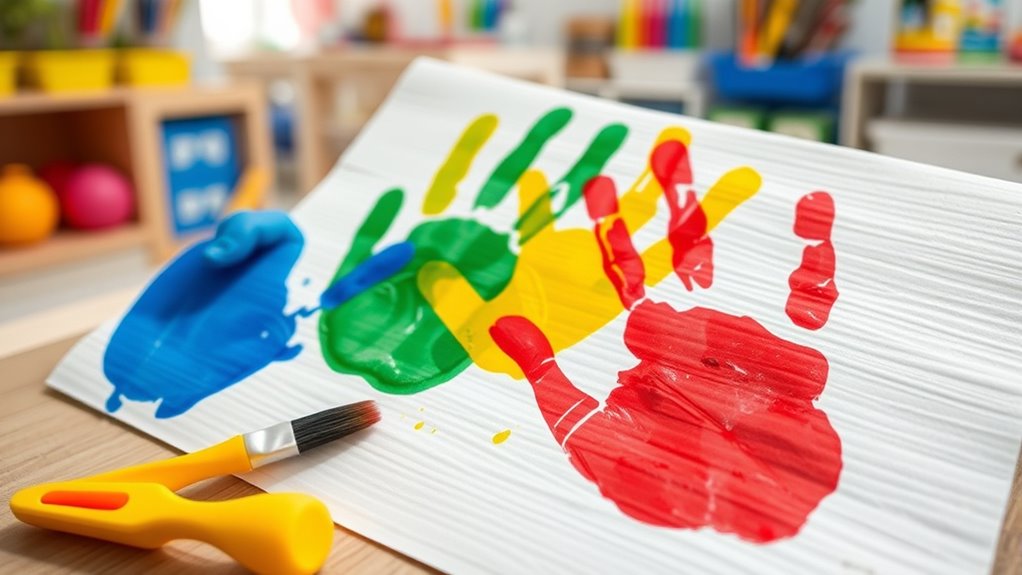
Have you ever considered turning your child’s handprints into charming works of art? Handprint art is a fun, simple activity that captures a moment in time. You can create personalized keepsakes or decorate your home with these memorable pieces. To make it, dip your child’s hand in non-toxic paint and press onto paper or canvas. Use different colors and add details like faces or scenery for extra creativity. To give your project more depth, consider this table:
| Craft Idea | Materials Needed |
|---|---|
| Handprint Flower | Paint, paper, marker |
| Handprint Animal | Paint, paper, googly eyes |
| Handprint Tree | Paint, paper, brown marker |
These projects are quick, meaningful, and perfect for kids of all ages. Additionally, incorporating safe, non-toxic paints ensures a fun and secure crafting experience. Remember to choose child-friendly paints that meet safety standards for young children to prevent any health concerns. To enhance your child’s creative skills, experimenting with different painting techniques can make each piece even more special. Using appropriate brushes and tools can also help achieve various textures and effects. Also, being aware of dog-safe foods can help prevent accidental ingestion of harmful substances during craft time.
DIY Friendship Bracelets
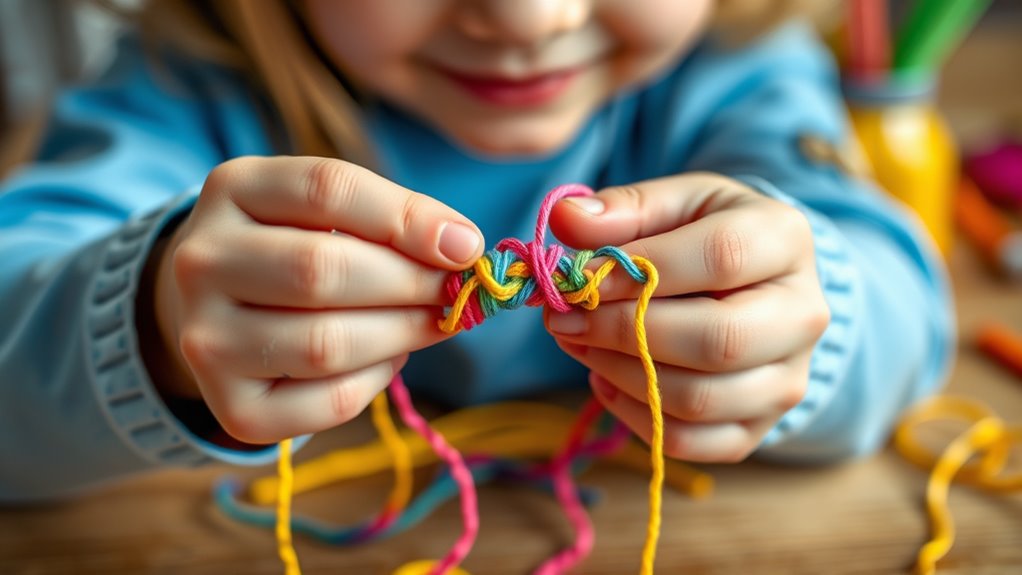
Creating DIY friendship bracelets is a fun way to express your style and share with friends. You get to choose from a variety of colorful threads, learn simple knot techniques, and add personal touches like charms or beads. Using colorful threads allows for endless customization options and helps develop fine motor skills. These ideas make your bracelets unique and meaningful, perfect for any occasion. You can also experiment with different knotting techniques to create textured patterns and intricate designs that stand out. Incorporating skincare patches into your craft routines can also inspire fun, themed accessories or decorative elements for your bracelets.
Colorful Thread Choices
Choosing the right threads is key to making vibrant and durable friendship bracelets. Bright, colorful threads instantly boost your bracelet’s visual appeal and guarantee it lasts through plenty of fun.
When selecting threads, consider these options:
- Embroidery floss in various shades for smooth, shiny finishes
- Paracord for extra strength and a rugged look
- Satin cords for a soft, glossy texture
- Nylon threads for flexibility and durability
- Metallic threads to add sparkle and eye-catching accents
Mixing different types can create unique textures and styles.
Pick colors that reflect your personality or match your friends’ favorites. The right thread choice makes your bracelet stand out and holds together through all your adventures.
Simple Knot Techniques
Are you ready to master the basic knots that form the foundation of friendship bracelets? First, learn the simple overhand knot: create a loop, then pull the end through, tightening to secure.
Next, try the square knot, which involves crossing the left strand over the middle, then the right strand over the new middle, repeating until tight.
The sliding knot allows you to adjust bracelet size easily; just make a loop and tie a knot that slides along the thread.
Practice these knots to build confidence before moving on to more complex patterns. Keep your threads taut, and don’t rush—accuracy makes your bracelet neater.
With these basic techniques, you’ll be able to create beautiful, sturdy friendship bracelets everyone will love.
Personalization Ideas
Personalizing your friendship bracelets adds a special touch that shows your creativity and makes each piece unique. You can customize them in many fun ways to reflect your style or the personality of your friend.
For example, try adding charms that symbolize shared memories or interests. Use different colored beads to represent favorite colors or meaningful themes. Incorporate initial beads to spell out names or special messages.
Experiment with different knot styles or add tiny pendants for extra flair. Personal touches turn simple bracelets into meaningful keepsakes that friends will cherish forever.
- Add charms or pendants for a personal touch
- Use beads that represent favorite colors or symbols
- Incorporate initials or meaningful words
- Mix different textures and materials
- Attach small charms that symbolize shared memories
Paper Cup Birdhouses
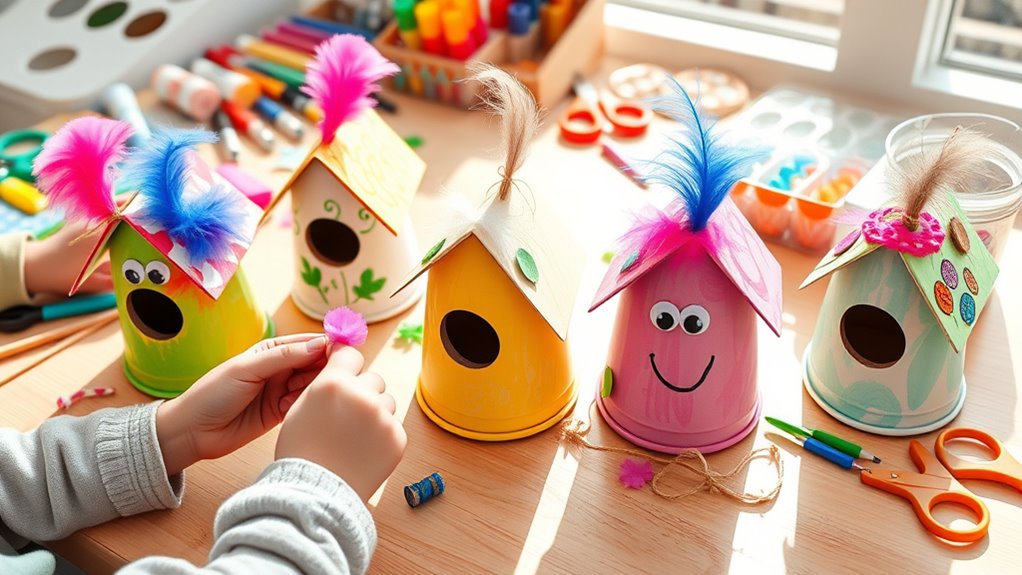
Creating a paper cup birdhouse is a fun and simple craft that kids can easily do at home. Start by decorating a paper cup with paint, markers, or stickers to add personality. Cut a small hole in the side of the cup for the bird to enter. Use a piece of string or a paperclip to create a hanger. Then, attach a small perch below the entrance with glue or tape. Here’s a quick visual:
| Step | Material | Action |
|---|---|---|
| 1 | Paper cup | Decorate and cut hole |
| 2 | String or paperclip | Make hanger |
| 3 | Glue or tape | Attach perch |
This project is easy, creative, and helps kids learn about birds while having fun.
Magic Wands With Wrapping Paper
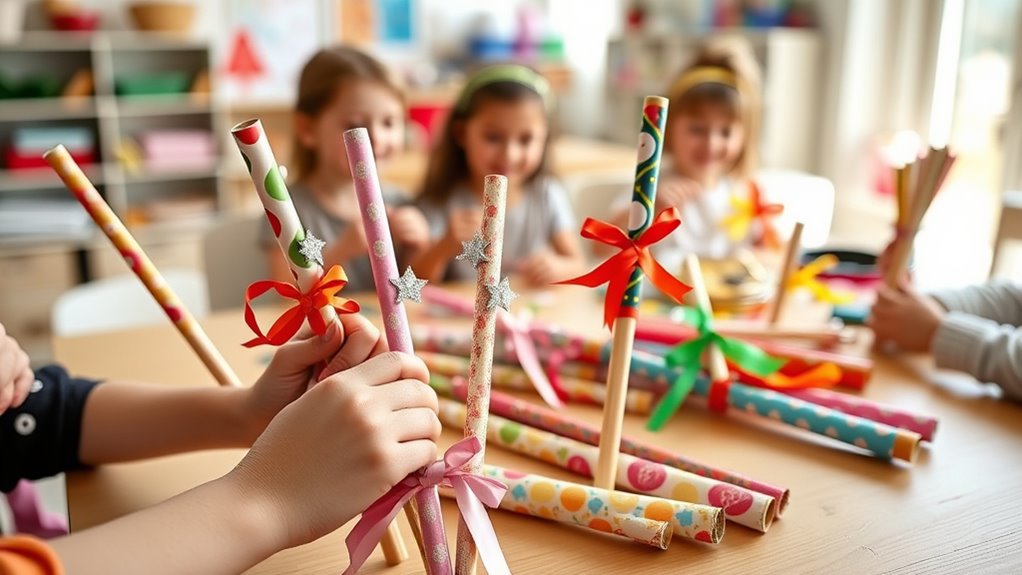
To make magic wands with wrapping paper, gather materials like craft sticks, glue, and colorful wrapping paper.
You can choose from various designs to match your child’s favorite colors or patterns.
Try creative decoration tips like adding glitter, ribbons, or stickers to make each wand unique and magical.
Materials Needed
Have you gathered all the materials you need to make magic wands with wrapping paper? You’ll need just a few simple supplies to get started. First, grab a sturdy wooden dowel or chopstick as your wand base.
Next, choose colorful wrapping paper that sparks your imagination. You’ll also want some glue or double-sided tape to attach the paper securely. Have scissors ready to trim the paper to the right size.
Finally, keep some decorative accessories nearby, like ribbon, stickers, or glitter, to personalize your wand. With these items, you’ll be ready to craft your own magical wand in no time.
Gathering these supplies beforehand makes the process quick, fun, and stress-free. Now you’re all set to create a unique wand that’s perfect for any pretend magic adventure!
Wrapping Paper Designs
Choosing the right wrapping paper design can make your magic wand truly stand out. Bright colors, glittery patterns, or fun prints add personality and charm. Select wrapping paper that matches your child’s favorite themes, like stars, animals, or rainbows. To deepen the magic, consider how the design complements the wand’s shape and purpose.
| Design Type | Effect | Suitable For |
|---|---|---|
| Glittery | Adds sparkle and excitement | Birthday gifts |
| Themed Prints | Creates storytelling vibe | Costume accessories |
| Bright Colors | Boosts energy and fun | Playtime props |
Mix and match these elements to craft a wand that’s both magical and uniquely yours, making craft time even more special.
Creative Decoration Tips
Adding creative decorations to your magic wand with wrapping paper can turn a simple craft into a dazzling masterpiece. To make your wand truly stand out, try these tips:
- Use shimmering or metallic wrapping paper for a magical glow.
- Cut out star or moon shapes to glue onto the wand for extra sparkle.
- Wrap the paper tightly, then add a colorful ribbon or bow at the handle.
- Create layered patterns by combining different wrapping paper textures and colors.
- Finish with glitter or stickers to add fun details.
These simple ideas help you personalize your wand and boost its magical appeal.
With a little imagination, your decorated wand will look enchanting and ready for any pretend adventure!
Tissue Paper Stained Glass Windows

Creating tissue paper stained glass windows is a fun and simple craft that lets kids experiment with colors and designs. Start by cutting tissue paper into various shapes and colors.
Next, cut a piece of clear contact paper or contact paper with a sticky side. Peel off the backing and stick it to a window or a piece of cardboard.
Then, press the tissue paper onto the sticky surface, arranging it into patterns or images. Overlap different colors for a vibrant effect.
Once finished, cover the design with another piece of contact paper and smooth out any bubbles. The result is a beautiful, translucent window decoration that filters sunlight and brightens any room.
Kids will love creating their own colorful stained glass art.
Recycled Bottle Binoculars
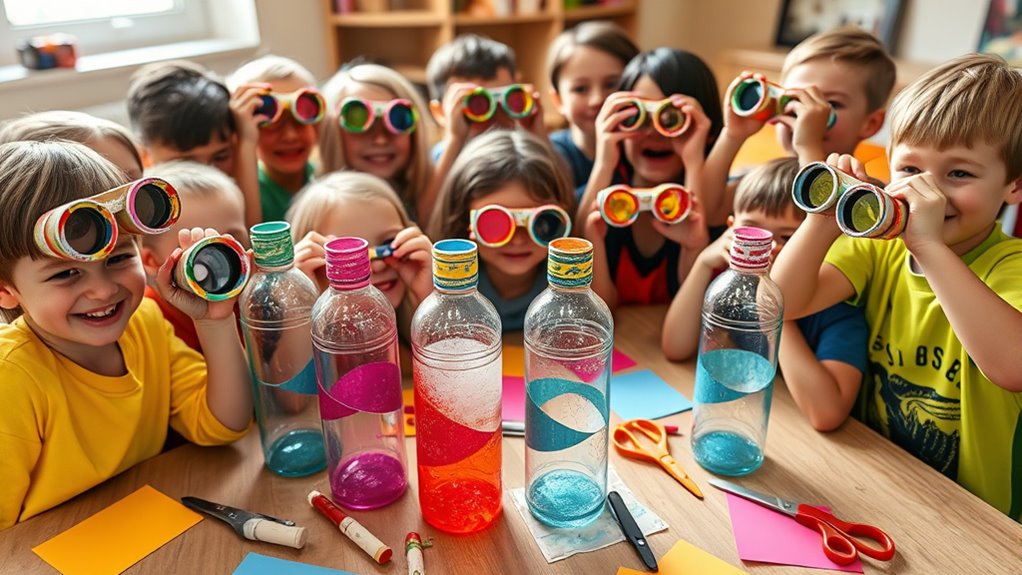
Start by gathering clean, empty plastic bottles and any decorations you want to add. Then, cut and assemble the bottles to create your binoculars, making sure they fit comfortably in your hands.
Finally, decorate your binoculars with paint, stickers, or other craft supplies to make them unique.
Collect and Prepare Materials
Before you begin assembling your recycled bottle binoculars, gather all the necessary materials. Having everything ready makes the craft smoother and more enjoyable. Start by collecting clean, empty plastic bottles—preferably two of the same size. You’ll also need:
- Cardboard tubes or toilet paper rolls
- String or yarn for a strap
- Scissors and glue
- Paints or markers for decorating
- Clear tape or rubber bands
Make sure your bottles are rinsed and dried thoroughly. Cut the bottles if needed to fit your design. Prepare your cardboard tubes as the eyepieces. Keep your supplies organized in one spot so you can work efficiently.
Once everything is ready, you’ll be set to start creating your homemade binoculars.
Assemble and Decorate
Now that your materials are ready, it’s time to assemble and decorate your recycled bottle binoculars. Begin by attaching the two bottles side by side with glue or tape, aligning the openings to form the telescopes. Secure them firmly and let the adhesive dry. Next, decorate the binoculars with paint, stickers, or markers to personalize your design. You can add handles, extra lenses, or fun patterns to make them unique.
| Decoration Ideas | Structural Tips | Accessories |
|---|---|---|
| Paint colorful designs | Use strong glue | Attach a strap for carrying |
| Stick on stickers | Reinforce with tape | Add faux buttons or dials |
| Draw with markers | Ensure dry before use | Attach a small compass |
Egg Carton Caterpillars
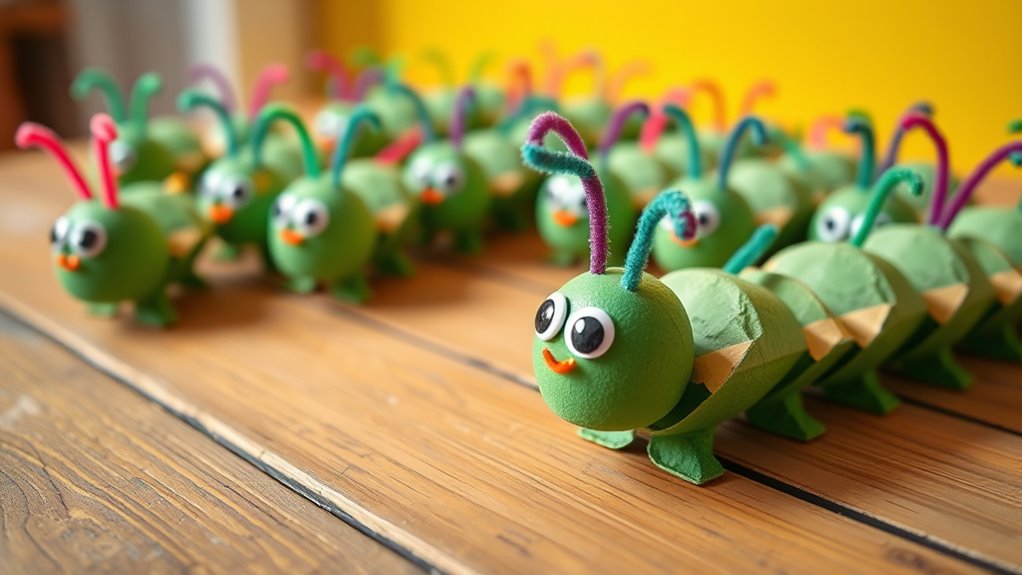
Have you ever thought about turning an everyday item into a fun craft? Egg cartons are perfect for creating adorable caterpillars that kids will love.
To start, cut a section of an egg carton into individual cups. Paint or color each cup to add vibrant details. Use pipe cleaners or toothpicks to attach googly eyes on the front cup for the face.
String the cups together with a pipe cleaner to form the caterpillar’s body. You can add extra features like antennae or legs using pipe cleaners or paper.
This project encourages creativity and fine motor skills. Plus, it’s simple, inexpensive, and a great way to recycle.
With just a few supplies, you’ll have a cute, colorful caterpillar ready for display or playtime!
Salt Dough Ornaments
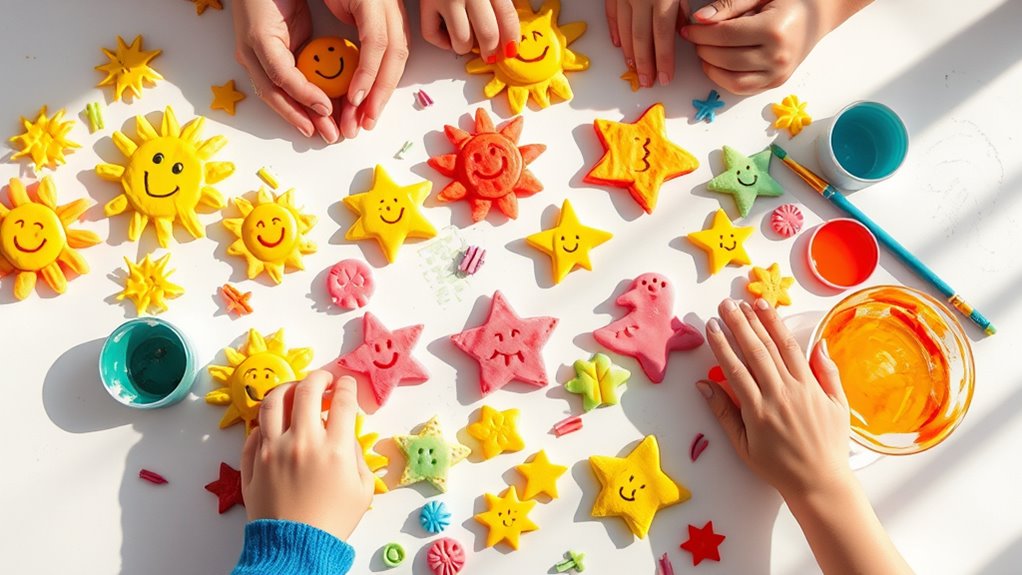
You can make your salt dough ornaments truly unique by adding your favorite colors during mixing. Once shaped and baked, decorating with paints, glitter, or markers is simple and fun.
These easy decoration ideas let you personalize each ornament to match your style or holiday theme.
Personalize With Colors
Adding colors to salt dough ornaments is a fun way to make each piece uniquely yours. You can use various methods to add vibrant details:
- Paint with acrylics for bold, lasting colors
- Use food coloring mixed into the dough for a uniform hue
- Apply watercolor or tempera paints for softer shades
- Add glitter or metallic paint for extra sparkle
- Incorporate markers or fine brushes for intricate designs
Coloring your ornaments not only personalizes them but also allows your creativity to shine. Let kids experiment with blending shades or creating patterns, making each ornament a one-of-a-kind keepsake.
Remember to let painted ornaments dry completely before handling or hanging. This step guarantees colors stay bright and your ornaments remain beautiful for years to come.
Easy Decoration Ideas
Decorating salt dough ornaments is an enjoyable and straightforward way to add personality and charm to your creations. Once you’ve baked your ornaments, you can get creative with simple decorations.
Use acrylic paints to add vibrant colors or create detailed designs. Glitter or metallic markers make your ornaments sparkle and stand out. You can also glue on small embellishments like buttons, beads, or sequins for extra texture.
If you prefer a more natural look, try pressing leaves, shells, or small flowers into the dough before baking. Seal your finished pieces with a clear varnish or Mod Podge to protect your artwork and give it a glossy finish.
These easy decoration ideas help turn plain salt dough into special keepsakes or thoughtful handmade gifts.
Paper Bag Puppets
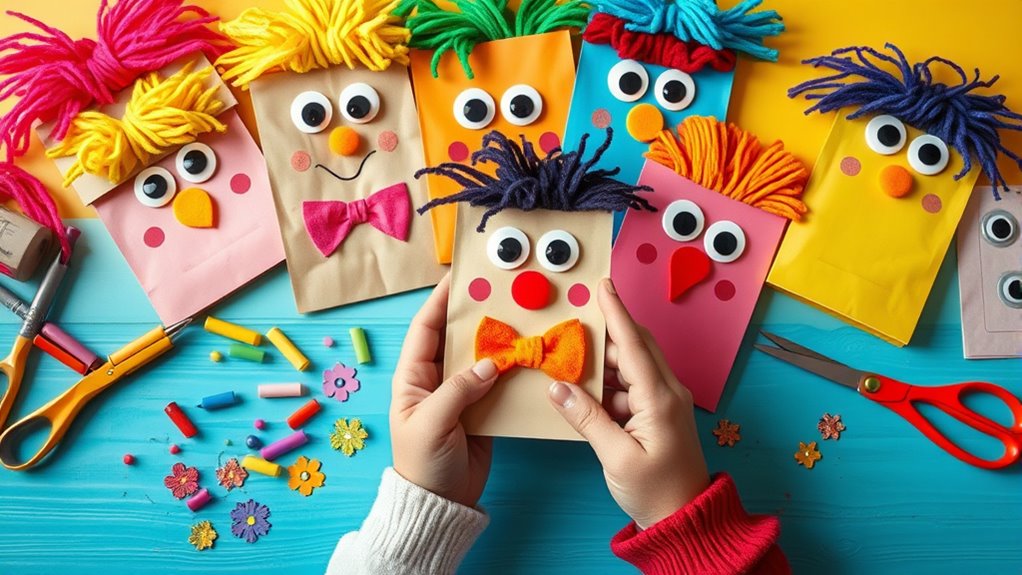
Creating paper bag puppets is a simple and fun craft that sparks kids’ imaginations. You can turn a plain bag into a character with just a few supplies and a little creativity. Start by choosing a paper bag in any size, then add facial features, hair, and accessories to bring your puppet to life.
Here are some ideas to inspire you:
- Use markers or paint to draw expressive eyes and a mouth
- Glue on googly eyes or fabric for added texture
- Attach yarn for hair or beards
- Decorate with colorful paper or felt clothing
- Add small props, like hats or glasses, for extra personality
With these simple steps, your kids can create unique puppets perfect for storytelling or playtime.
Glittery Mason Jar Lanterns

Have you ever wanted to make your own charming outdoor lanterns that sparkle at night? Glittery Mason Jar Lanterns are perfect for that! Fill a jar with fairy lights or small candles, then coat the outside with glue and sprinkle glitter all over. Shake off the excess and let it dry. To add a personal touch, you can decorate the lid or paint patterns on the jar. Here’s a quick guide:
| Step | Materials Needed | Tips |
|---|---|---|
| Prepare jar | Mason jar, glue, glitter | Use fine glitter for a shimmering effect |
| Decorate surface | Paint, stickers, or additional glitter | Be creative with colors and patterns |
| Add lighting | Fairy lights or small candles | Ensure safety when lighting candles |
Button Art Pictures
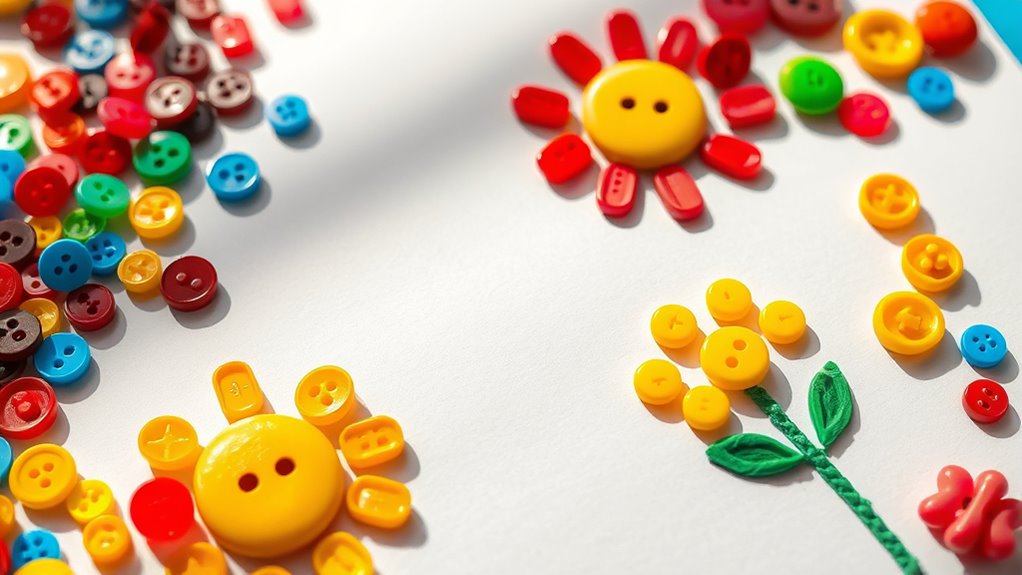
After finishing your glittery Mason jar lanterns, why not try turning everyday buttons into colorful, textured artwork? Creating button art pictures is simple and fun. You can design anything from animals to abstract shapes by arranging buttons on paper or canvas. Use different sizes, colors, and textures to add depth and interest. Glue the buttons carefully, and watch your artwork come to life.
Create colorful button art by arranging and gluing buttons on paper or canvas for fun, textured designs.
This craft encourages creativity and fine motor skills while recycling materials you already have. Plus, it’s mess-free and quick to do. To get started, consider:
- Choosing a theme or picture as your guide
- Sorting buttons by color or size beforehand
- Using a sturdy base like cardboard or thick paper
- Experimenting with different button arrangements
- Adding a frame or background for a polished look
Yarn Wrapped Letters
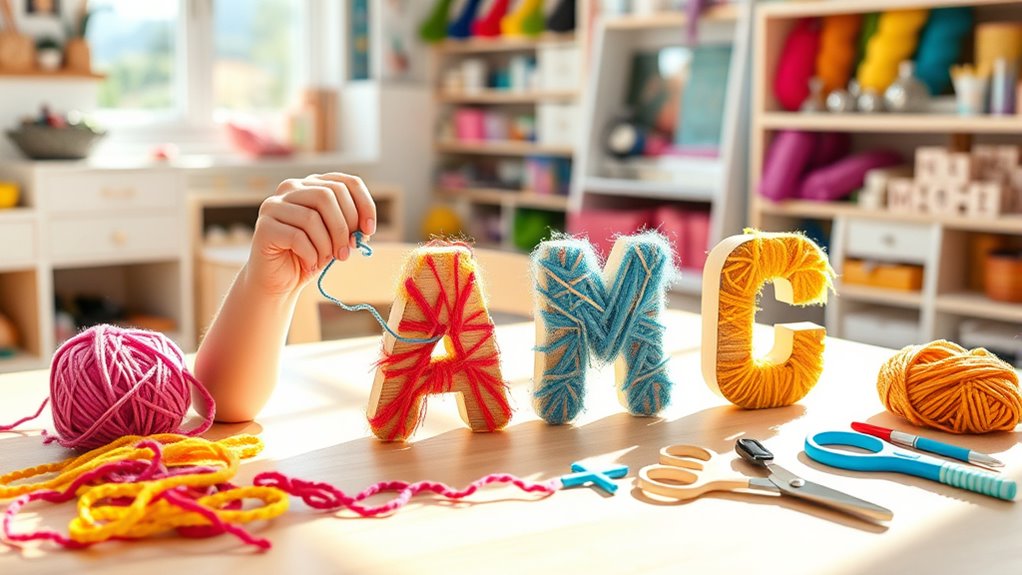
Ever wondered how to turn simple letters into charming, textured decorations? Yarn wrapped letters are a fun and easy craft that does just that.
First, choose cardboard or wooden letters and cover a workspace with newspaper or a plastic sheet. Pick your favorite yarn colors and secure the end with a dab of glue. Wrap the yarn tightly around each letter, covering every inch.
If you run out of yarn, glue the end and start with a new piece, wrapping seamlessly. Once fully covered, trim any excess yarn and secure loose ends with glue.
You can personalize your letters by adding glitter, ribbons, or small embellishments. Hang your finished yarn letters on the wall or use them as a cute gift decoration.
Pom-Pom Animals
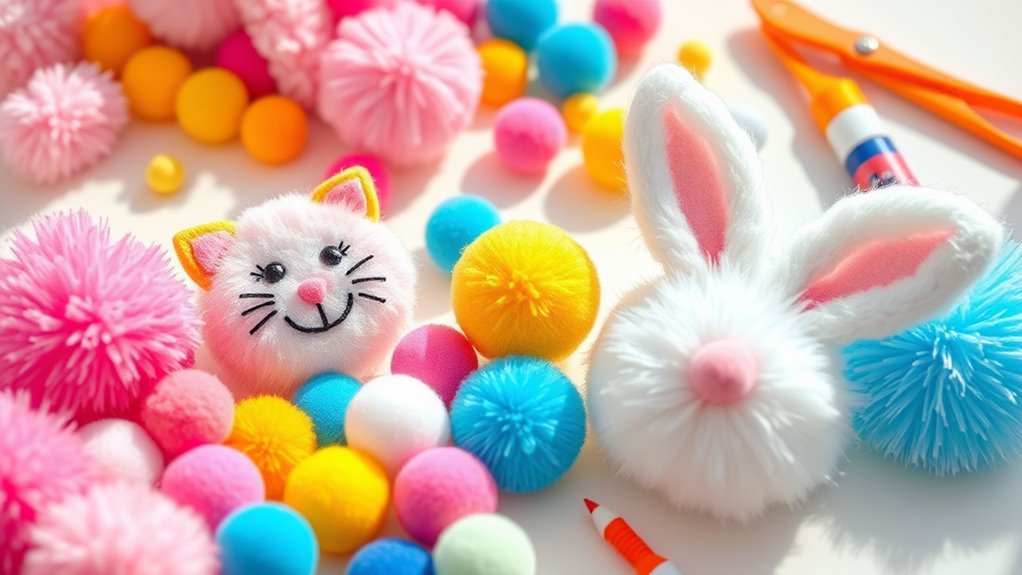
Would you like to create adorable, fluffy animals using just colorful pom-poms? It’s easy and fun! Start by choosing the animal you want to make—like a bunny, bear, or cat. Gather different-sized pom-poms, glue, and small accessories like googly eyes or felt pieces.
To bring your creature to life, consider these tips:
- Pick matching colors for a realistic look
- Use small pom-poms for tiny details
- Attach googly eyes for personality
- Add felt ears or paws for extra flair
- Secure everything with strong craft glue
With a little creativity, you’ll craft charming animals in no time. These pom-pom creatures make perfect decorations, toys, or gifts.
Ready to get fluffy? Let’s start creating your own adorable pom-pom animals!
Tin Can Wind Chimes
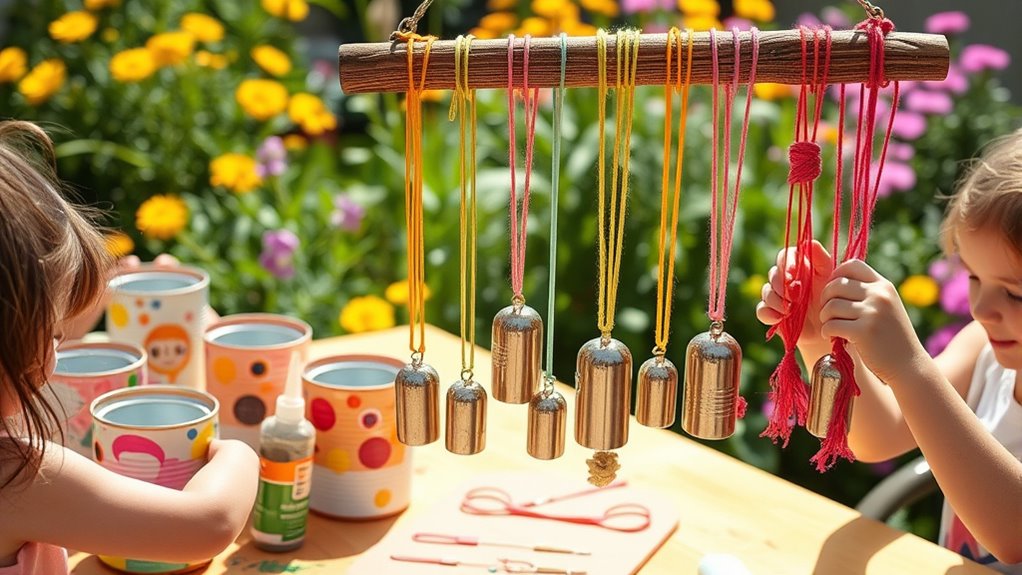
Creating your own tin can wind chimes is a fun and eco-friendly craft that transforms recycled materials into beautiful outdoor decorations. You’ll start by collecting empty cans, cleaning them thoroughly, and painting or decorating as you like. Then, punch holes in the cans and string them together with sturdy wire or twine. When hung outdoors, the wind will create soothing sounds as the cans gently clang against each other. This project encourages creativity and sustainability, showing how everyday objects can become art.
| Recycled Material | Creative Potential |
|---|---|
| Empty Tin Cans | Unique musical decorations |
| String or Wire | Personal touch and stability |
| Paint & Decorations | Express your style |
| Outdoor Placement | Nature’s symphony |
Bubble Wrap Stamp Art
Bubble wrap stamp art is a simple and exciting way to turn everyday packaging material into colorful, textured masterpieces. To get started, cut a piece of bubble wrap to size and dip it into your favorite paint. Then, press it onto paper or canvas to create unique patterns.
Transform packaging into vibrant, textured art with bubble wrap stamping—fun for all ages!
You can experiment with different bubble sizes for varied textures or layer colors for vibrant effects. For added fun, try using multiple colors or stamping on different surfaces like fabric or cardboard.
- Use different bubble sizes for varied textures
- Combine multiple colors for a vibrant look
- Create patterns by stamping in a grid or random design
- Make greeting cards or wall art
- Let kids explore and develop their creativity
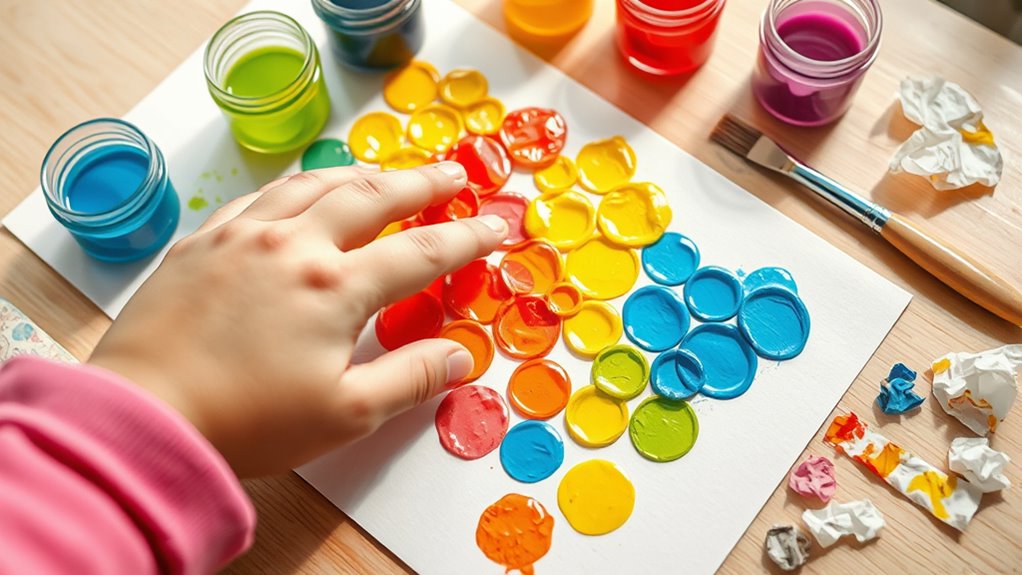
Painted Pasta Jewelry
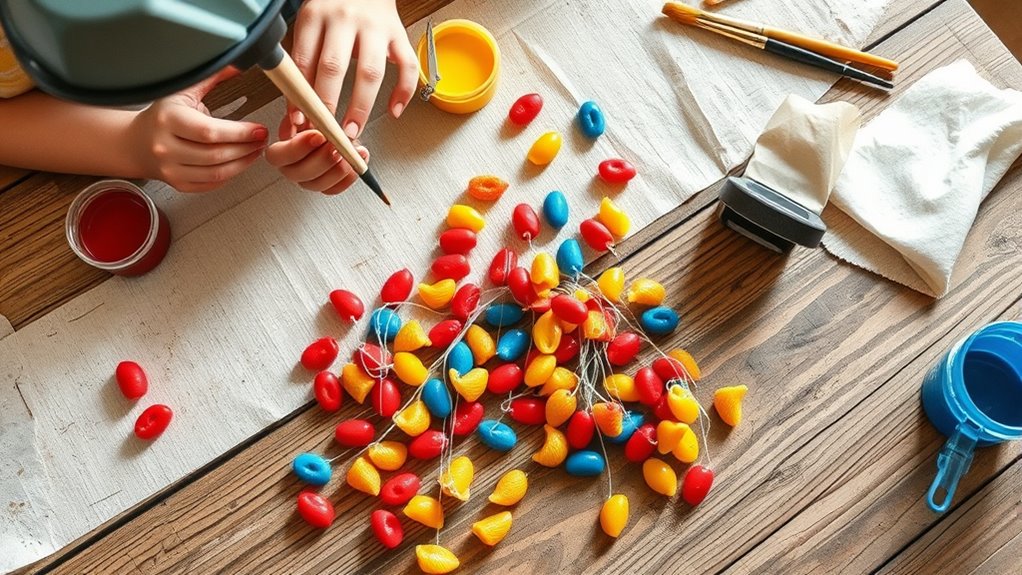
After exploring bubble wrap stamps, you can switch gears and turn simple pasta shapes into colorful, wearable art by making painted pasta jewelry.
Start by boiling pasta like penne, rotini, or shells, then let it cool. Once cooled, provide your kids with non-toxic craft paint and brushes. They can paint each piece with vibrant colors or fun patterns, encouraging creativity.
After painting, set the pasta aside to dry completely. Once dry, thread the pasta onto elastic cords or string to create necklaces, bracelets, or anklets. You can add beads or charms for extra flair.
This activity is quick, inexpensive, and perfect for sparking kids’ imagination while making charming, personalized jewelry they’ll love to wear.
Paper Chain Garlands
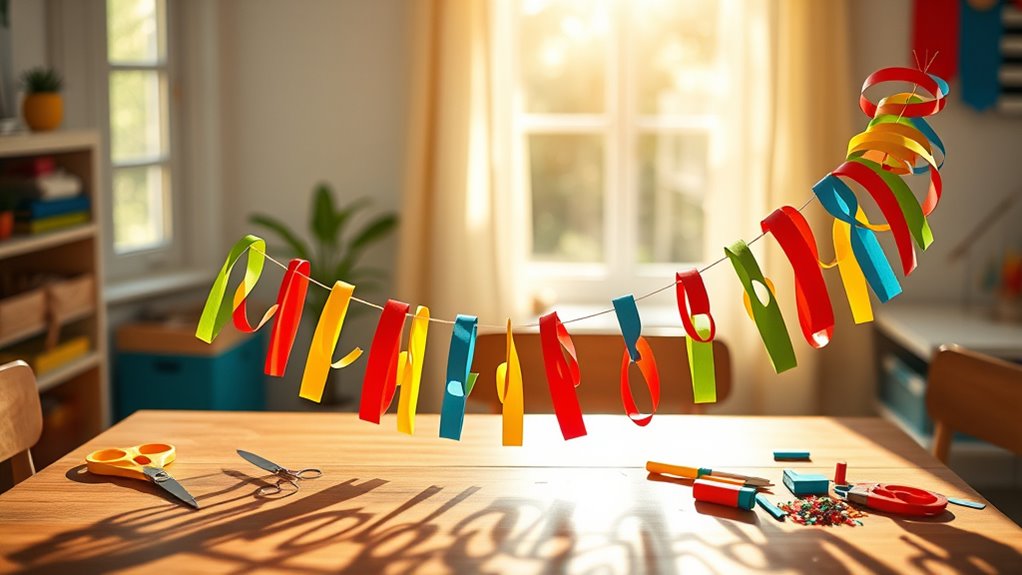
Paper chain garlands are a simple and cheerful craft that kids can easily make to decorate their rooms or for special occasions. All you need are colorful strips of paper, scissors, and glue or tape.
To start, cut strips of paper about 1 inch wide and 6 inches long. Loop each strip into a circle and link it through the previous one before securing it. This creates a chain that can stretch across a wall or ceiling.
You can customize your garland by:
- Using themed paper for holidays or parties
- Incorporating glitter or stickers for extra sparkle
- Varying strip sizes for a textured look
- Adding paper characters or shapes in between links
- Combining different colors for a vibrant display
Making paper chain garlands is quick, fun, and perfect for sparking creativity!
Frequently Asked Questions
What Safety Tips Should I Follow for DIY Crafts With Young Children?
When doing DIY crafts with young children, you should always prioritize safety. Keep sharp tools, hot glue, and small objects out of reach to prevent injuries and choking hazards. Supervise them closely, and choose age-appropriate materials.
Encourage proper handling of scissors and craft supplies. Guarantee the workspace is clean and organized, and teach kids to wash their hands afterward. These precautions help make craft time safe and fun for everyone.
How Can I Adapt Crafts for Children With Special Needs?
When adapting crafts for children with special needs, you should consider their individual abilities and preferences. Use sensory-friendly materials, simplify instructions, and provide visual cues.
Offer extra support or modify tools to guarantee comfort and safety. Break tasks into smaller steps and allow plenty of time.
Most importantly, foster a positive, encouraging environment that boosts confidence and enjoyment, making craft time inclusive and fun for everyone.
What Are Budget-Friendly Materials for Quick Craft Projects?
Imagine colorful paper, glue bottles, and shiny buttons lining your workspace, ready to transform into fun creations. You’ll find budget-friendly materials like recycled cardboard, pasta, and old magazines perfect for quick projects.
Craft stores often have inexpensive supplies like markers and stickers on sale, making it easy to gather everything you need without overspending. With a little creativity, you turn simple items into delightful masterpieces for your kids to enjoy.
How Do I Properly Store Leftover Craft Supplies?
To store leftover craft supplies properly, you should start by sorting items by type, like beads, glue, or fabric.
Use clear containers or small zip-top bags for easy identification. Label each container clearly so you can find what you need quickly.
Keep everything in a designated craft area, away from direct sunlight and moisture, to prevent damage.
Regularly check and tidy your supplies to stay organized and ready for your next project.
How Can I Encourage Creativity in Kids During Craft Activities?
Think of encouraging creativity in kids during craft activities as planting a garden. You provide the sunlight, water, and space, but the blooming ideas come from them.
Offer open-ended supplies, praise their efforts, and let them explore freely. Avoid strict rules, and instead, ask questions that inspire imagination.
With patience and encouragement, you’ll help their ideas blossom into something truly unique and wonderful.
Conclusion
With these fun and simple crafts, you’re turning everyday materials into a vibrant playground of imagination. Each project is like a tiny spark igniting your child’s creativity, transforming ordinary objects into magical masterpieces. So, grab your supplies and jump right in—watch as your little one’s eyes light up with joy and pride. These crafts aren’t just activities; they’re the seeds of endless wonder blooming right in your own home. Happy creating!