To start carving linoleum or rubber blocks for block printing, sketch your design lightly onto the surface. Use sharp carving tools to carefully remove areas you want to stay uninked, leaving the design raised. Consider how ink color and paper texture will affect your final print. Applying ink evenly with a brayer and pressing firmly onto textured or smooth paper can bring out different effects. Keep exploring these techniques to refine your printmaking skills.
Key Takeaways
- Begin with a clear, lightly sketched design on the block to guide carving.
- Use sharp tools to carve away areas that should remain uninked, leaving the design raised.
- Vary carving depth to control ink transfer and line boldness, with deeper cuts holding more ink.
- Test print on scrap paper to check details and make adjustments before final printing.
- Choose appropriate ink colors and paper textures to achieve desired artistic effects.

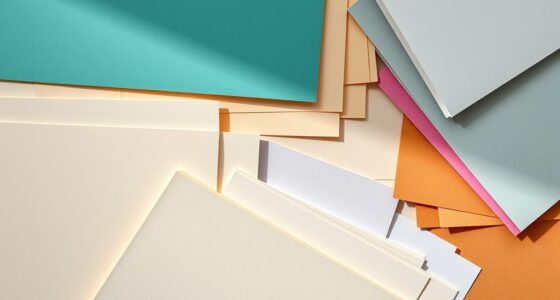
Block printing is a traditional technique that allows you to create detailed and repeatable patterns on fabric or paper. When you begin, one of the first steps is selecting the right ink color, which can dramatically influence the overall look of your print. Bright, bold colors make a statement, while softer, muted tones lend a more subtle, vintage feel. Think about the mood you want to evoke and choose your ink accordingly. Next, consider the paper textures you’ll be working with; smooth surfaces like matte or glossy paper will show fine details clearly, whereas textured papers, such as handmade or rough-textured varieties, add an extra layer of depth and character to your prints. The texture can either enhance or obscure the intricacies of your carved design, so pick your paper based on the effect you’re aiming for.
Once you’ve chosen your paper and ink, you can focus on carving your block. Carving is the process of removing material from linoleum or rubber blocks to create your design. You’ll want to start with a clear image in mind, sketching it lightly onto the surface if needed. Use sharp carving tools to carefully cut away the areas you want to remain uninked, leaving the design raised for printing. Precision here is key, especially if you’re working with intricate details or fine lines. The better your carving, the cleaner your final print will be. Keep in mind that the depth of your cut affects ink transfer—deeper cuts hold more ink and create bolder lines, while shallower ones are more delicate.
When it’s time to print, apply the ink evenly onto your carved block using a brayer or roller. Distribute the ink thoroughly, ensuring an even coating across the raised surface. The ink color you choose will influence how the design appears once transferred onto your paper. Roll the ink smoothly to avoid uneven spots or excess buildup. When pressing the block onto your chosen paper, use consistent pressure to achieve uniform results, especially if you’re making multiple prints. Remember, the paper’s texture plays a vital role; smoother papers will give you crisp, sharp images, while textured papers can produce a more organic, artistic effect. Experimenting with different combinations of ink colors and paper textures will help you discover unique styles and develop your own signature look in block printing. Additionally, understanding tuning techniques can help you refine your carving and printing process for more precise and vibrant results.
Frequently Asked Questions
What Tools Are Best for Detailed Linoleum Carving?
For detailed linoleum carving, you want precision tools like fine gouges, linoleum knives, and micro chisels. These allow you to execute intricate carving techniques with accuracy. Use sharp, small tools to achieve fine lines and delicate details, and switch between different gouge shapes as needed. Keep your tools sharp to prevent tearing and guarantee clean cuts. Practice steady hand movements to maintain control and achieve professional-looking results in your printmaking.
How Do I Prevent Ink From Bleeding in My Prints?
Did you know that over 60% of printmakers struggle with ink bleeding? To prevent this, focus on controlling ink absorption by using the right paper—preferably smooth, heavy-weight paper designed for block printing. Apply a thin, even layer of ink, and avoid over-inking your block. Proper paper choice and careful ink application guarantee crisp, clean prints without unwanted bleeding, giving your artwork a professional finish.
Can Rubber Blocks Be Used for Fabric Printing?
Yes, you can use rubber blocks for fabric printing. Before you start, guarantee proper textile preparation by washing and drying your fabric to remove any finishes. Use fabric dyeing techniques compatible with rubber stamps and apply fabric ink or dye suitable for textiles. This helps achieve vibrant, long-lasting prints. Rubber blocks are flexible and easy to carve, making them ideal for detailed fabric designs, provided you follow proper preparation and printing methods.
What’s the Best Way to Store Carved Blocks?
To store carved blocks and guarantee proper block preservation, you should keep them in a cool, dry place away from direct sunlight. Use storage solutions like flat drawers or sturdy boxes lined with tissue paper or bubble wrap to prevent damage. Avoid stacking heavy objects on top. Proper storage helps maintain your carved blocks’ integrity, making sure they stay in good condition for future printing projects.
How Do I Clean and Maintain My Carving Tools?
Imagine your carving tools as tiny swords that need sharpening and care. To clean them, dip a soft cloth in gentle cleaning solutions, wiping away ink and debris. For maintenance, regularly sharpen your tools to keep edges precise. Store them in a dry, protected space to prevent rust. By taking these steps, your tools stay sharp, clean, and ready for intricate cuts, ensuring your block printing stays flawless and enjoyable.
Conclusion
Now that you’ve carved your blocks, you hold the key to opening endless creative stories. Each print is a ripple in a pond, spreading your passion and vision outward. Your carved linoleum and rubber blocks become symbols of your dedication—tiny seeds of artistry that bloom into vibrant expressions. Keep carving, pressing, and dreaming; your art is a quiet revolution, a whisper of your soul. Let each print remind you that your unique voice can leave a lasting impression.