To design a block-printed notebook cover, start by selecting a vibrant or muted color palette that matches the mood you want to create. Use carving tools to craft your design onto rubber or linoleum blocks, then ink them evenly with a roller or brayer. Experiment with layering colors or combining different print techniques to add depth and interest. Paying attention to ink application and color harmony will help produce a polished final piece—continue exploring to perfect your unique design.
Key Takeaways
- Choose a harmonious color palette to set the mood and enhance visual impact.
- Select printing techniques like carving or layering to add texture and depth.
- Use eco-friendly water-based inks for an even application and vibrant results.
- Experiment with complementary or monochromatic color schemes for cohesive designs.
- Practice on scrap material to perfect ink application and carving details before final printing.
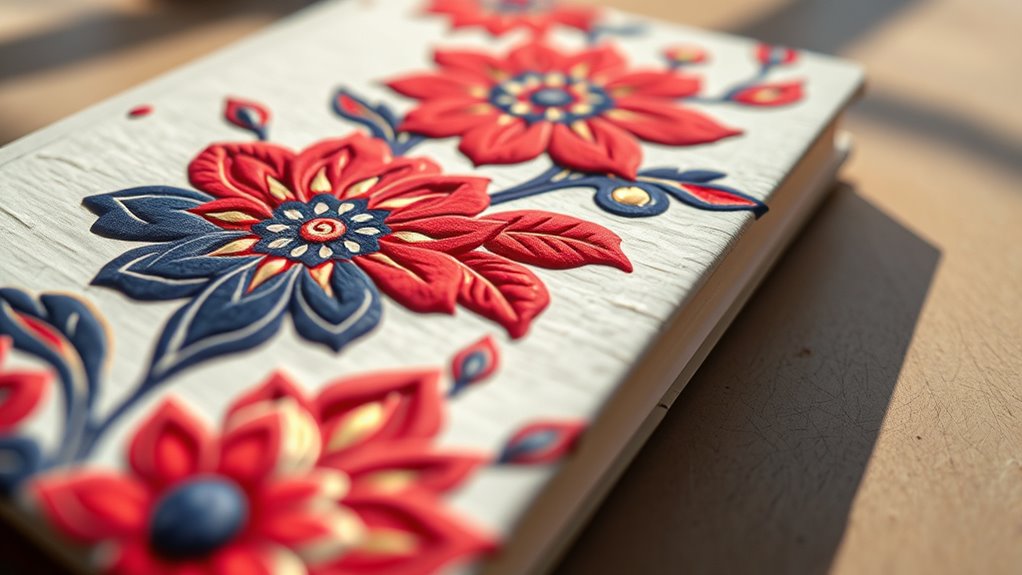
Creating a custom block-printed notebook cover is a rewarding way to add personal flair to your stationery. When you begin designing, one of the first decisions you’ll face is choosing a color palette. Your color choices set the tone and mood of your design—vibrant hues create an energetic vibe, while softer, muted tones lend a more subtle, calming effect. Think about what feelings you want your notebook to evoke and select colors accordingly. Combining complementary colors can make your design pop, while monochromatic schemes offer a cohesive, elegant look. Remember, the color palette guides the entire printing process, so take your time experimenting with different shades and combinations before committing to your final choices.
Choose your color palette carefully to set the mood and make your notebook design stand out.
Once you’ve settled on your colors, you’ll want to explore various printing techniques to bring your design to life. Block printing involves carving your chosen design into a rubber or linoleum block, which acts as your stamp. This process gives you the flexibility to craft intricate patterns or bold, simple motifs. When it comes to printing techniques, you can opt for hand-pressing the block directly onto the notebook cover for a textured, artisanal finish, or use a roller to apply ink evenly for a smoother look. Some artists prefer to layer colors by using separate blocks or by carefully aligning multiple prints, creating depth and visual interest. The key is to practice your technique on scrap material first, to guarantee consistent ink coverage and clean lines.
In addition to traditional hand-printing methods, you might experiment with different ink types and textures to enhance your design. Water-based inks are eco-friendly and easy to clean, making them a popular choice for beginners. If you want a more vibrant or glossy finish, oil-based inks could be suitable, but they require careful handling. Applying ink evenly is vital—too much can cause smudging, while too little might produce faint impressions. Using a brayer or roller helps distribute ink uniformly across your block, ensuring crisp, clear images every time.
Ultimately, combining your carefully chosen color palette with thoughtful printing techniques allows you to craft a truly unique notebook cover. Each step, from selecting colors to mastering your printing method, offers room for experimentation and personal expression. With patience and practice, you’ll develop your skills and create a cover that reflects your personality and artistic vision. When finished, your custom block-printed notebook will stand out as a one-of-a-kind piece, perfect for journaling, sketching, or gifting to someone special.
Frequently Asked Questions
What Types of Fabric Are Best for Block Printing?
You should choose fabrics like cotton or linen for block printing, as their smooth texture allows for clear designs and easy ink application. These fabrics also tend to have good colorfastness, ensuring your vibrant prints last longer without fading. Avoid coarse or stretchy fabrics, which can distort the design. Opt for tightly woven, natural fibers to achieve the best results, making your notebook cover both beautiful and durable.
How Long Does the Ink Take to Dry?
The ink usually takes about 15 to 30 minutes to dry, but it depends on the type of ink and fabric. To speed up the process, use drying techniques like air drying in a well-ventilated area or gently blotting with a dry cloth. Avoid touching the design until it’s fully dry to prevent smudging. Patience guarantees your block-printed notebook cover looks crisp and professional.
Can I Reuse the Same Block for Multiple Designs?
Did you know that with proper care, you can reuse printing blocks over 50 times? Yes, you can absolutely reuse the same block for multiple designs, making customizing repeated patterns easier and more cost-effective. Just clean the block thoroughly after each use, and you’ll be able to create consistent, beautiful patterns on your notebook cover every time. Reusing blocks saves time and adds a charming uniformity to your designs.
What Tools Are Essential for Detailed Block Printing?
You’ll need essential tools like carving tools for detailed block printing techniques and a brayer or roller for even ink application methods. A variety of carving blades helps create intricate designs, while a clean palette guarantees smooth ink application. Using a baren or printing spoon aids in pressing the block firmly onto your paper. These tools make your detailed printing process efficient and precise, helping you achieve professional-looking results every time.
How Do I Prevent Ink Smudging During Printing?
Think of your print as a delicate butterfly landing on paper; you want it to rest peacefully without smudging. To prevent ink smudging, make sure your ink absorbs into the paper properly by choosing the right paper and ink. Create a drying environment that’s warm, dust-free, and well-ventilated, giving your print time to dry completely. Patience is your best tool—don’t rush, and your design will stay sharp and vibrant.
Conclusion
As you step back to admire your block-printed notebook cover, you realize it’s more than just a design—it’s a story waiting to unfold. The intricate patterns seem to whisper secrets, inviting curiosity and wonder. Will this cover inspire your next masterpiece or hide a secret message? With each glance, you feel the anticipation grow, knowing that beneath its vibrant surface, endless possibilities are just waiting to be discovered. The journey has only just begun.