
To create a cement leaf casting, start by selecting a flat leaf with clear veining and no tears. Press the leaf into soft, pliable material like clay to capture fine details, then gently remove it, leaving a detailed imprint. Mix cement smoothly and pour it carefully into the mold, ensuring all tiny crevices are filled. Let the cement set, then carefully remove the mold for a durable, realistic leaf sculpture. Keep exploring to learn more tips and techniques.
Key Takeaways
- Select a flat, undamaged leaf with clear veins for detailed imprinting.
- Press the leaf into soft clay or modeling compound to create an accurate mold.
- Pour mixed cement into the mold, ensuring all details are filled and air bubbles are removed.
- Allow the cement to set fully before carefully demolding to reveal the detailed leaf cast.
- Finish the sculpture with painting or sealing for enhanced appearance and durability.

Have you ever wanted to preserve the delicate beauty of a leaf forever? Creating a cement leaf casting allows you to do just that, capturing the intricate details of nature in a durable cement sculpture. The process begins with selecting the perfect leaf—one that’s flat, with clear veining and no tears, so you can replicate its intricate design accurately. Once you’ve chosen your leaf, you’ll need to create a leaf imprint by pressing it into a soft, pliable material like clay or thick modeling compound. This step is vital because it transfers the fine details of the leaf’s surface into your mold, which will serve as the template for your cement sculpture.
After pressing the leaf into the clay or modeling compound and removing it carefully, you’ll have a detailed impression of the leaf’s veins and edges. To cast this imprint in cement, prepare your cement mixture according to the package instructions, ensuring it’s smooth and free of lumps. Pour the cement gently into the mold, making sure to fill all the tiny crevices of the leaf imprint. You might want to tap the mold lightly or shake it slightly to remove air bubbles, which could mar the final surface of your cement sculpture. Once filled, let the cement set for the recommended time, which usually ranges from a few hours to overnight, depending on the type of cement you’re using.
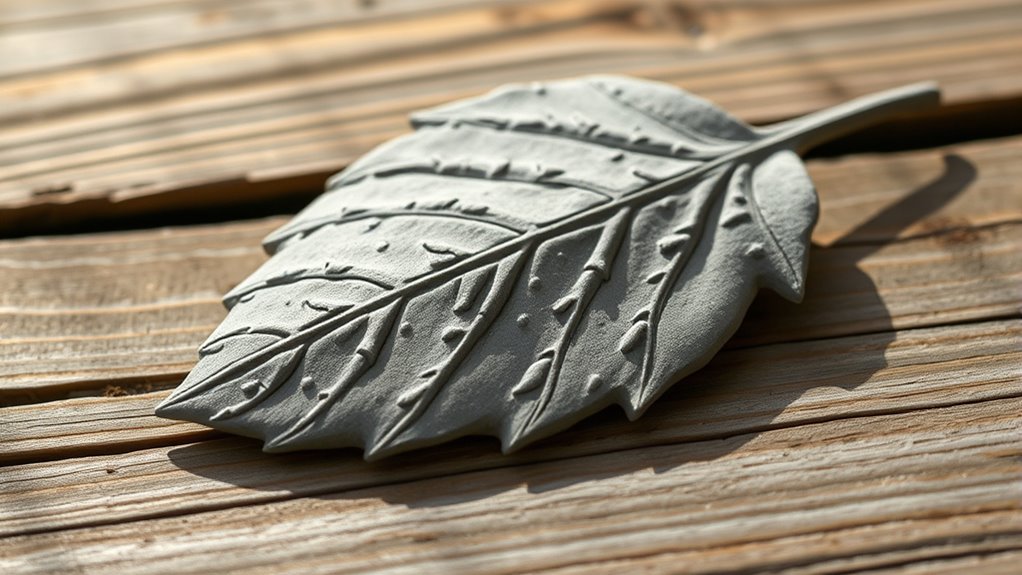
When your cement has hardened, carefully remove the mold to reveal your cement sculpture—an exact replica of the leaf’s delicate details. You now have a beautiful, durable piece that can be displayed in your garden, used as a decorative element in a flower arrangement, or even painted to add a splash of color. Creating a cement leaf casting is a gratifying project because it captures nature’s fleeting beauty in a lasting form. With patience and attention to detail, your leaf imprint becomes a work of art that celebrates the intricate patterns found in nature. Over time, you can experiment with different leaves, colors, or finishes to enhance your cement sculpture further. Whether you’re a beginner or an experienced crafter, this process offers a simple yet rewarding way to create unique, handcrafted decor inspired by the natural world. Additionally, understanding the digital literacy aspect involved in crafting and sharing your creations can help you connect with a wider community of artisans and enthusiasts.
Frequently Asked Questions
How Long Does Cement Leaf Casting Typically Last Outdoors?
Your cement leaf casting typically lasts 10 to 20 years outdoors, depending on durability factors like weather exposure, sealant quality, and material thickness. Properly sealed and finished castings resist moisture, freezing, and UV damage, extending outdoor longevity. Regular maintenance, such as cleaning and resealing, can also help prolong its life. Keep in mind that harsher climates may shorten its durability, so choose appropriate protection for lasting outdoor beauty.
Can I Use Any Type of Cement for Leaf Casting?
You can use various types of cement for leaf casting, but not all are ideal. Portland cement is the most common choice because it’s durable and easy to work with. However, if you want alternatives, consider using concrete mixes or specialty cements designed for outdoor use, which offer better weather resistance. Always check the manufacturer’s instructions to guarantee your chosen material suits your project’s needs.
What Safety Precautions Should I Take During the Process?
Imagine you’re working on a leaf casting project and want to stay safe. Always wear protective gear like gloves and a mask to avoid cement dust and fumes. Make certain your workspace is well-ventilated to prevent inhaling harmful particles. Keep all tools away from children, and work in a clean, organized area. If you follow these precautions, you’ll minimize health risks and enjoy your creative process safely.
How Do I Prevent Air Bubbles in the Casting?
To prevent air bubbles in your cement leaf casting, you should use proper casting techniques like vibrational or tapping methods to release trapped air. Additionally, pour the cement slowly and steadily, allowing it to settle naturally. You can also lightly tap the sides of the mold to encourage bubbles to rise and escape. Using a fine cement mix helps minimize air pockets, resulting in a smoother, more detailed cast.
Is Special Equipment Necessary for Detailed Leaf Impressions?
You don’t need special equipment for detailed leaf impressions, but using a flexible mold enhances leaf texture accuracy. Flexible molds, like silicone, conform better to intricate details and prevent air bubbles from trapping, ensuring a crisp impression. Regular molds might work, but they’re less effective for fine textures. So, investing in a flexible mold helps capture the leaf’s delicate veins and surface details, making your casting truly lifelike.
Conclusion
Once you’ve finished your cement leaf casting, you’ll have a beautiful piece that captures nature’s delicate grace. Think of it as holding a tiny, frozen whisper of the outdoors, a reminder of the simple beauty surrounding us. Your craftsmanship brings the leaf’s intricate details to life, creating a lasting keepsake. With patience and care, your cast will stand as a tribute to nature’s artistry—delicate as a butterfly’s wing, yet strong enough to last a lifetime.