
Looking to celebrate Independence Day with fun DIY crafts? You can create patriotic Mason jar lanterns, paper plate wreaths, and colorful tie-dye T-shirts to showcase your red, white, and blue spirit. Add firework-themed canvas art and personalized banners for extra flair. Decorate with star and flag motifs on flower pots or make sparkling sparkler art. Keep exploring for simple step-by-step ideas to make your celebration extra special and festive.
Key Takeaways
- Create patriotic mason jar lanterns, centerpieces, and decorative jars using paint, star stencils, and LED lights for festive displays.
- Make paper plate wreaths and garlands with painted, cut-out stars, pom-poms, and firework art to adorn indoors or outdoors.
- Design tie-dye T-shirts in red, white, and blue using various folding techniques for wearable patriotic fashion.
- Craft firework-inspired canvas art with vibrant colors, glitter, and stencils to capture the explosive energy of Independence Day.
- Personalize banners, signs, and candles with handprints, family names, or patriotic symbols for customized celebrations.

Acellegic 24 Sets 4th of July DIY Craft Kits Patriotic Plastic Mason Jar Making Craft Gifts Bulk American Flag Table Centerpieces 250th Independence Day Decoration for Anniversary Classroom Activities
Patriotic 4th of July Kit: there are 24 plastic Mason jars, 24 flag stickers, 2 strings and 1…
As an affiliate, we earn on qualifying purchases.
As an affiliate, we earn on qualifying purchases.
Star-Spangled Banner Mason Jar Lanterns
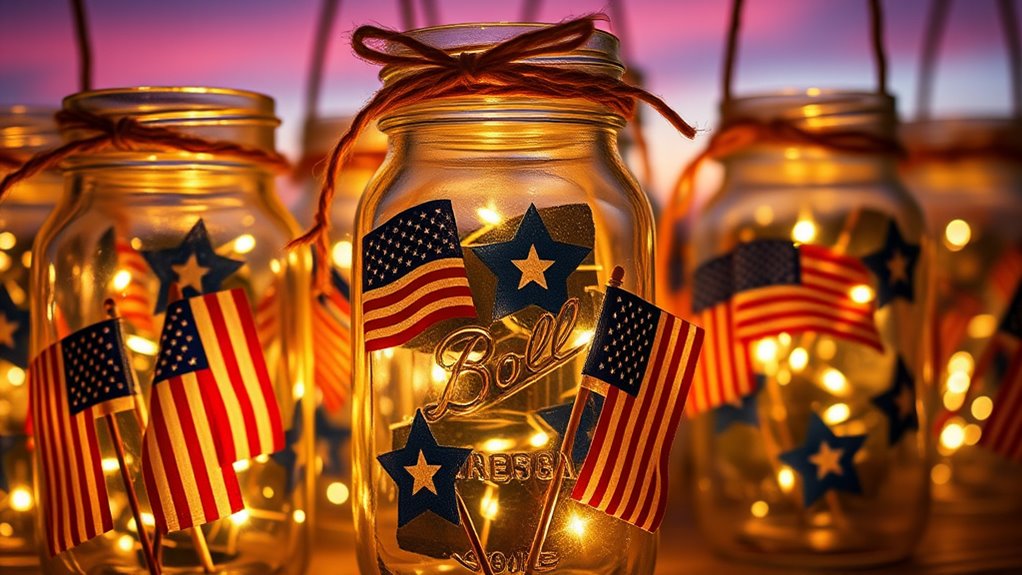
Creating your own Star-Spangled Banner Mason Jar Lanterns is a fun and easy way to add patriotic flair to your Independence Day celebrations. Start by gathering mason jars, red, white, and blue paint, and star-shaped stencils. Paint the jars with stripes or solid colors, letting each coat dry completely. Use the star stencils to add white stars to the blue sections of the jars, creating a flag-inspired look. Incorporating patriotic themes into your craft can enhance the festive atmosphere. For added charm, you can insert battery-operated candles or fairy lights inside the jars to make them glow beautifully at night. Incorporating festive decorations can further elevate your display and create a cohesive holiday look. Arrange your lanterns along your porch, table, or walkway for an eye-catching display. This craft is simple yet impactful, allowing you to showcase your patriotism with a personalized touch.

QOUBAI 36 Set Patriotic Wreath Craft Kit for DIY 4th of July Paper Crafts American Flag Stickers Hanging Ornament for Memorial Independence Day Art Activity Home Decor Supplies
Packing includes: Our patriotic wreath arts crafts stickers kit includes everything needed to create beautiful patriotic crafts: 36…
As an affiliate, we earn on qualifying purchases.
As an affiliate, we earn on qualifying purchases.
Patriotic Paper Plate Wreath
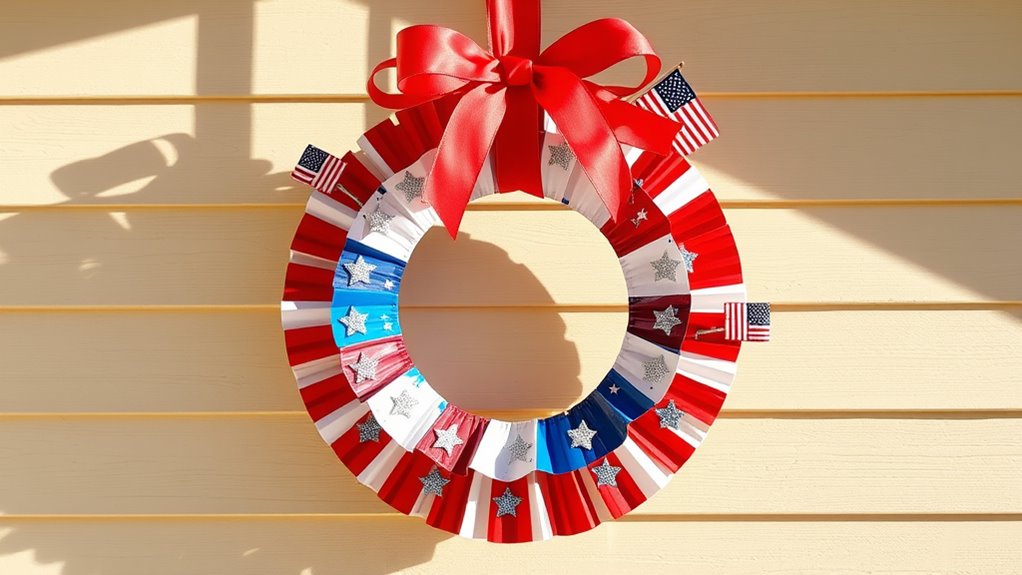
A patriotic paper plate wreath is a simple and festive decoration that instantly enhances your Independence Day decor. To make it, start by painting paper plates with red, white, and blue stripes or stars. Painting techniques can help achieve a vibrant look. Cut out the center of each plate to form rings. Arrange these rings in a circular pattern on a sturdy base, like cardboard or a wire wreath form. Attach the rings with glue or tape, layering for a full look. You can add small embellishments like star cutouts or mini flags for extra flair. This craft is quick, affordable, and perfect for involving kids. Below is a helpful comparison:
| Step | Tip |
|---|---|
| Painting paper plates | Use vibrant colors for a bold look |
| Attaching rings | Overlap slightly for fullness |
| Adding embellishments | Stick with patriotic symbols for impact |
Adding a variety of patriotic symbols can make your wreath more eye-catching and personalized.

Tulip One-Step Tie-Dye Kit Americana, Fun Party Activity, USA Red & Blue, Make Patriotic Shirts, Permanent Fabric Dye, Easy Techniques, Iron-On Transfers & Rhinestones Included, 5 Vibrant Colors
COMPLETE PATRIOTIC TIE DYE KIT — Everything included in one box: 5 squeeze bottles of One-Step fabric dye…
As an affiliate, we earn on qualifying purchases.
As an affiliate, we earn on qualifying purchases.
Red, White, and Blue Tie-Dye T-Shirts
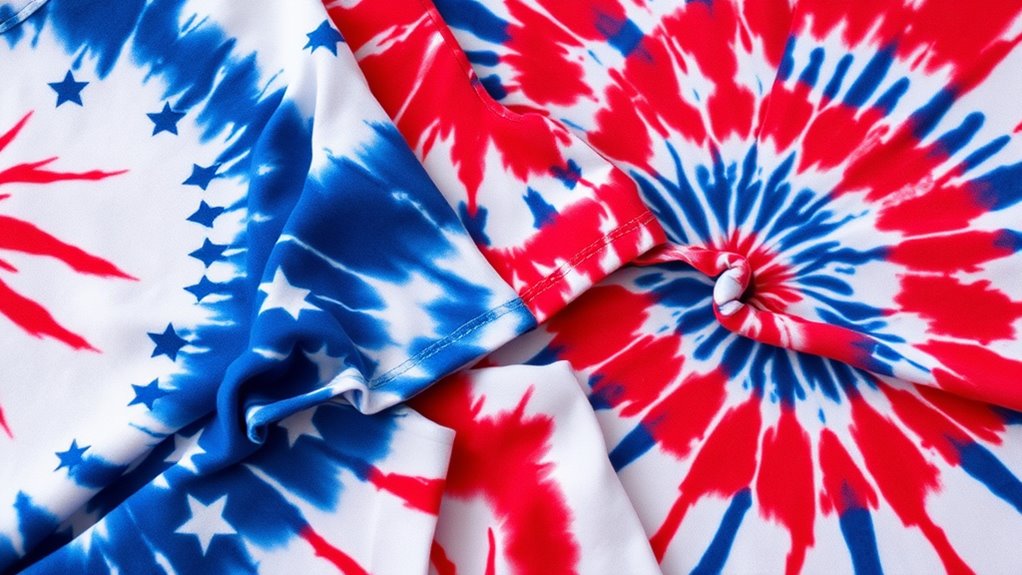
To create eye-catching Red, White, and Blue Tie-Dye T-Shirts, start by selecting the right fabric and colors that pop. Next, try different tying techniques to make fun patterns, and then follow the dyeing and rinsing steps carefully. With these tips, you’ll craft festive shirts perfect for Independence Day celebrations. Incorporating color contrast can make your designs stand out even more and create a striking patriotic look. Additionally, understanding fabric selection ensures your shirts will hold the dye well and last through many celebrations. Preparing your fabric by pre-washing can also help achieve vibrant and long-lasting colors, especially when using high-quality dyes designed for fabric types. Recognizing the importance of dyeing techniques can further enhance the vibrancy and durability of your finished shirts.
Choosing Fabric and Colors
Choosing the right fabric and colors is essential for vibrant and lasting tie-dye shirts. Opt for 100% cotton because it absorbs dye well and produces bright, bold colors. Avoid synthetic fabrics like polyester, which resist dye penetration and result in dull hues. Smart toilet features such as high-quality dyes and proper fabric selection can help ensure your designs are both vivid and durable. When selecting colors, stick to classic red, white, and blue to capture the Independence Day spirit. Use fabric dye or specialized tie-dye kits designed for cotton; these provide vibrant, long-lasting results. To guarantee the colors stay vivid, wash the finished shirts in cold water and avoid harsh detergents. Choosing high-quality dye and natural fabric helps your design pop and remains durable through multiple wears and washes. Proper dye fixation techniques also play a crucial role in maintaining the brightness of your colors. Additionally, investing in quality supplies can enhance your crafting experience and ensure better results. With the right fabric and colors, your patriotic shirts will look fantastic and last for many celebrations.
Tying Techniques for Patterns
Tying techniques are essential for creating eye-catching patterns on your red, white, and blue tie-dye shirts. Different methods produce unique designs, so choose the one that best fits your patriotic theme. You can spiral, accordion fold, or crumple your fabric to achieve various effects. For example, spirals create vibrant circular patterns, while crumpling offers a more random, textured look. To help you decide, here’s a quick comparison:
| Technique | Pattern Style |
|---|---|
| Spiral Folding | Circular, radiating designs |
| Accordion Fold | Stripes and linear patterns |
| Crumpling | Random, textured effects |
Experiment with these methods to make your DIY project truly stand out and celebrate Independence Day in style! Arcade machines often use different folding and tying techniques to create distinctive visual effects.
Dyeing and Rinsing Steps
Once you’ve applied your chosen tying technique, it’s time to dye your fabric. Start by preparing your dye baths in red, white (leave some fabric undyed), and blue.
Submerge the tied fabric carefully into each color, ensuring full coverage where needed. Let it sit for 15-30 minutes, depending on how vibrant you want the colors. Using a color fixation agent can help enhance the vibrancy and longevity of your dye. Additionally, choosing dyes with high color accuracy ensures more precise and vibrant results.
After dyeing, rinse the fabric under cold water until the water runs clear, removing excess dye.
Gently untie your fabric to reveal your pattern.
Then, wash the shirt separately in mild detergent and cold water.
Hang it to dry away from direct sunlight to preserve the colors.

YKW 7Pcs 4th of July Stencils American Flag Star Stencil Set Reusable Fireworks Templates Independence Day Stencils for Painting on Wood Fabric Paper DIY Crafts Patriotic Decorations
Versatile 7-Piece Set: Complete Independence Day stencil collection featuring American flag star patterns fireworks designs and 4th of…
As an affiliate, we earn on qualifying purchases.
As an affiliate, we earn on qualifying purchases.
Firework-Inspired Canvas Art
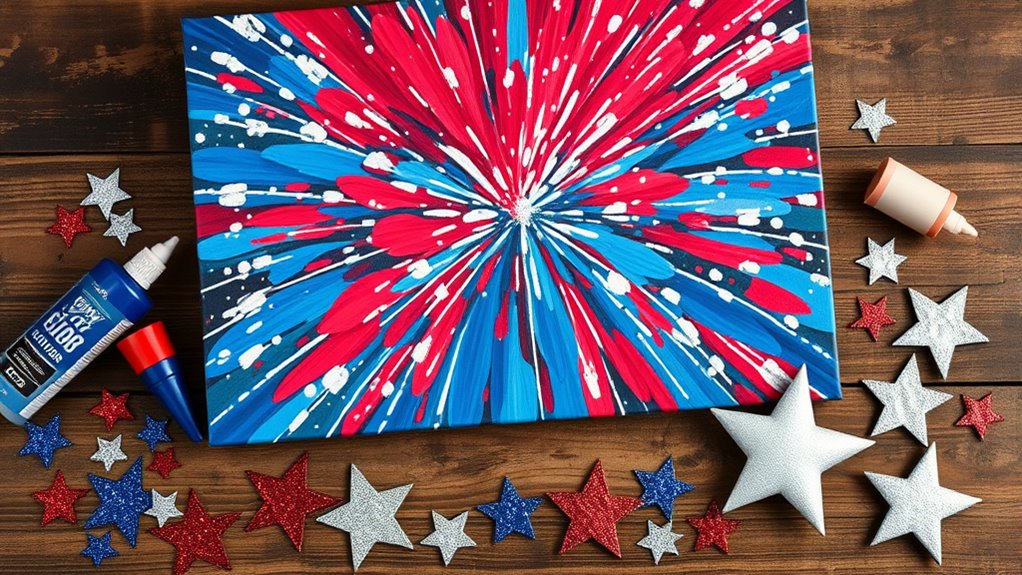
To create stunning firework-inspired canvas art, start by selecting vibrant colors that capture the excitement of fireworks. Use stencil techniques to shape your bursts and add glitter accents for extra sparkle. Incorporating elements of biodiversity into your art can also promote awareness of the importance of protecting our natural world. Understanding fetal development can inspire you to include detailed and accurate representations of natural scenes in your artwork. Exploring celebrity transformations can provide inspiration for adding unique and innovative touches to your designs. With these tips, your artwork will shine bright on Independence Day!
Choose Vibrant Colors
Vibrant colors are essential for capturing the explosive energy of fireworks in your canvas art. Bright reds, blues, and whites reflect the patriotic spirit and make your display pop. Use bold shades to mimic the dazzling bursts and trails seen in real fireworks. Incorporating color contrast techniques helps to emphasize different elements of your design, making it more visually engaging. Combining contrasting colors helps create depth and movement, making your artwork dynamic. Don’t be afraid to experiment with different hues — layering and blending can produce striking effects. Remember, the goal is to evoke excitement and celebration through color choices. To guide your palette, consider these ideas:
- Bright red and white for classic fireworks
- Electric blue and silver for shimmer
- Gold accents for sparkle
- Deep navy for background contrast
- Vibrant orange and yellow for explosive bursts
Color theory can also assist in selecting harmonious and eye-catching color combinations to enhance your fireworks-inspired canvas art. Understanding emotional impact of colors can help you choose hues that amplify the festive mood of your artwork.
Use Stencil Techniques
Stencil techniques are an excellent way to add precise firework shapes and patterns to your canvas, creating a striking visual effect. First, select a stencil with firework designs or create your own using sturdy cardboard or acetate sheets. Secure the stencil onto your canvas with painter’s tape to prevent any shifting.
Using a sponge or brush, dab on your chosen colors—reds, whites, and blues work well for Independence Day. Apply the paint gently to avoid bleeding under the stencil edges. Lift the stencil carefully once the paint is dry to reveal crisp, vibrant fireworks.
Repeat the process with different stencils or colors to build a dynamic, layered display. This technique allows you to easily craft detailed, professional-looking firework patterns that stand out on your canvas.
Add Glitter Accents
Adding glitter accents can instantly elevate your firework-inspired canvas art by introducing sparkle and dimension. It transforms a simple design into a dazzling centerpiece for your Independence Day celebration.
To achieve this, select glitter in red, white, and blue to match your color scheme. Use a fine-tipped brush or glue applicator to add glitter along the explosion lines, or sprinkle it over wet paint for a shimmering effect.
For more control, apply glitter to specific sections, like bursts or sparks, creating contrast and visual interest. Remember to seal your artwork with a clear spray to prevent glitter fallout.
This simple addition makes your canvas stand out and adds a festive touch to your patriotic décor.
- Apply glitter along painted explosion lines
- Use different glitter sizes for variety
- Highlight sparks or small details
- Seal with a clear spray for durability
- Combine glitter with metallic paints
USA Flag Mason Jar Centerpieces
Creating USA flag mason jar centerpieces is a simple yet eye-catching way to celebrate Independence Day. To start, clean your mason jars thoroughly.
Create festive Independence Day decor with simple, patriotic mason jar centerpieces.
Next, paint the jars with a white base coat and let them dry.
Using painter’s tape, create stripes on the jars to mimic the American flag.
For the flag’s stars, cut out star shapes from craft foam or paper, then glue them onto a blue section near the jar’s rim.
Fill the jars with red, white, and blue flowers, such as daisies or carnations, for added patriotic flair.
You can also add small flags or LED lights inside for extra sparkle.
These centerpieces are versatile, budget-friendly, and perfect for bringing a festive touch to your July 4th celebration.
Red, White, and Blue Pom-Pom Garland
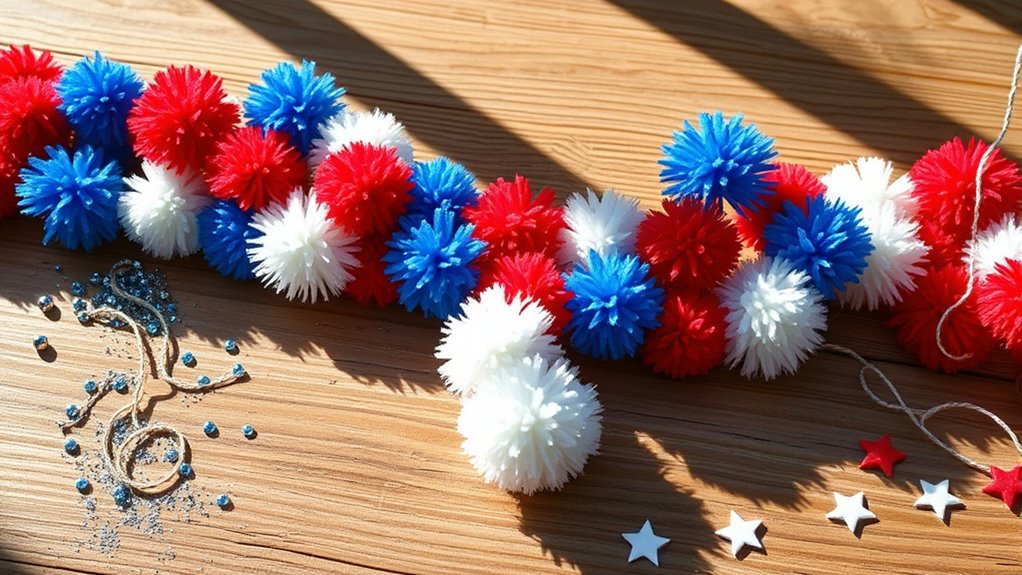
Looking for a fun and festive way to decorate your space for Independence Day? A Red, White, and Blue Pom-Pom Garland is perfect for adding a cheerful, patriotic touch. You can make it easily with colorful yarn, scissors, and a hot glue gun. Create small pom-poms in each color and string them together on a sturdy thread or ribbon.
Drape the garland across your mantel, windows, or outdoor porch for an eye-catching display. Personalize it by varying pom-pom sizes or adding star-shaped embellishments. This craft is simple, affordable, and customizable for any space.
Plus, it’s a great activity to do with family or friends. Brighten up your celebration with this lively, handmade decoration that captures the spirit of Independence Day.
- Colorful yarn in red, white, and blue
- Scissors for cutting yarn
- Hot glue gun for securing pom-poms
- String or ribbon for hanging
- Optional star-shaped embellishments
DIY Firework Sparkler Art

Ever thought about turning simple materials into dazzling Independence Day decorations? DIY Firework Sparkler Art is a fun way to celebrate the holiday creatively. You’ll need a few basic supplies: colored paper, glitter, glue, scissors, and a black or dark backdrop.
Start by cutting out sparkler shapes from your colored paper, then decorate them with glitter to mimic the sparkling firework effect. Arrange the sparkler cutouts on your background to create a dynamic display. Use glue to secure everything in place.
Once dry, you can hang your firework art on the wall or display it as a festive centerpiece. This project is easy, inexpensive, and perfect for adding a burst of patriotic sparkle to your Independence Day celebration.
Independence Day Banner With Handprints
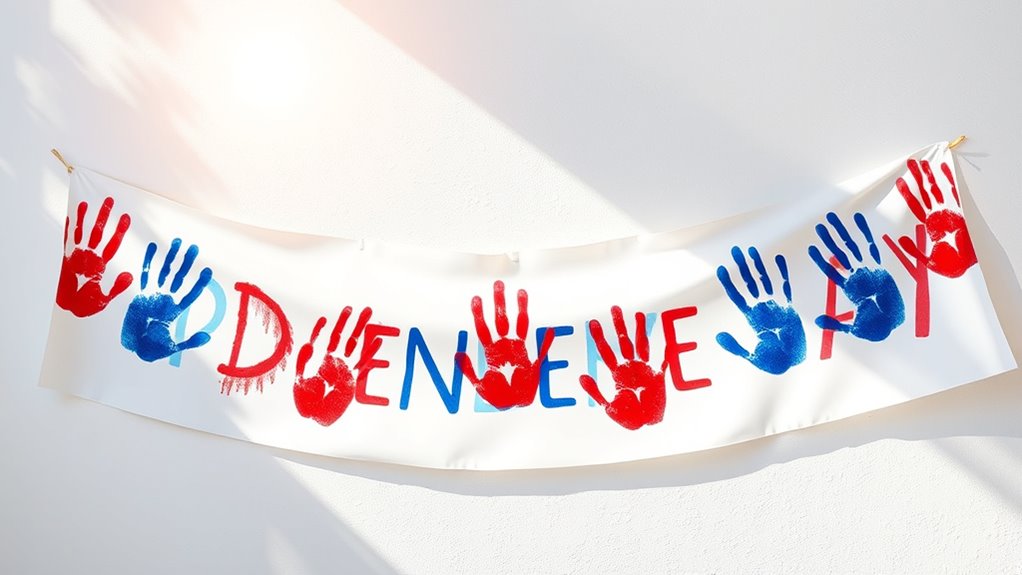
Building on your colorful firework art, making an Independence Day banner with handprints adds a personal and patriotic touch to your celebration. To create it, gather paper, paints, and string. Have everyone dip their hands in red, white, and blue paint, then press them onto the paper to form handprint shapes. Write patriotic messages like “Freedom” or “USA” around the handprints.
Cut the banners into flag or star shapes for extra flair. Attach the banners to a wall or porch for a festive look. This craft is perfect for involving kids and making lasting memories. It’s simple, fun, and adds a heartfelt, colorful element to your decor.
Your personalized banner will surely be a highlight of your Independence Day celebration.
- Handprint placement and design ideas
- Using different colors for a vibrant effect
- Adding glitter or stickers for sparkle
- Incorporating family names or dates
- Creating a layered or multi-banner display
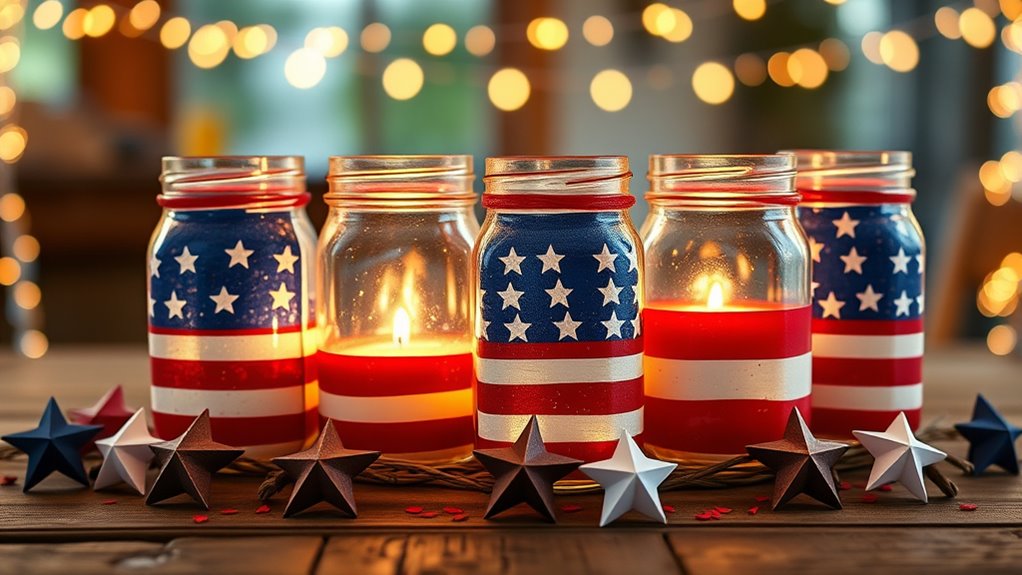
Patriotic Mason Jar Candle Holders
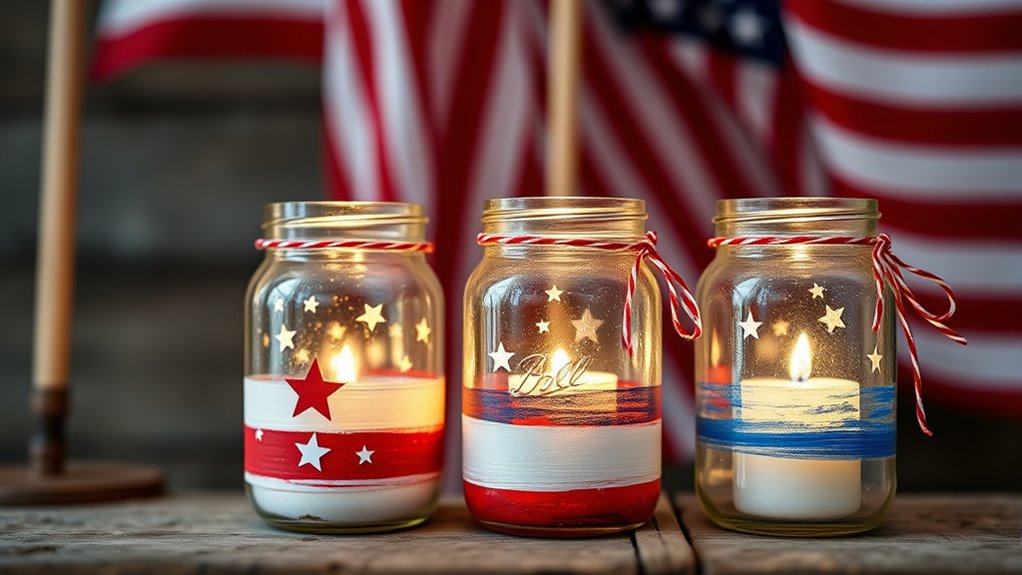
Patriotic Mason jar candle holders are a simple way to add a festive glow to your celebration. You can customize the jars with paint, ribbon, or stickers to match your decor.
Plus, adding a few candles or string lights instantly creates a warm, inviting atmosphere.
Decorative Glass Customization
Transforming plain mason jars into festive candle holders is a simple yet impactful way to add patriotism to your Independence Day celebration. You can customize your jars with various decorations to reflect the holiday’s spirit.
Use red, white, and blue paint to create stripes or stars, or apply patriotic-themed stickers for quick embellishments. Adding glitter or metallic accents can make your jars sparkle.
Consider wrapping the jars with twine or ribbon in red, white, and blue for a rustic look. You can also stencil inspiring messages or symbols onto the glass for a personalized touch.
These small modifications turn ordinary jars into eye-catching centerpieces or outdoor décor. Get creative and match your designs to your overall patriotic theme for a cohesive celebration.
- Red, white, and blue paint designs
- Star or flag stickers
- Glitter accents
- Twine or ribbon wraps
- Stenciled patriotic messages
Easy Lighting Enhancements
Adding lighting to your mason jars can instantly elevate your Independence Day decor with minimal effort. Fill each jar with battery-operated fairy lights or small LED candles to create a warm, patriotic glow. You can also insert star-shaped cutouts or red, white, and blue tissue paper for a festive touch. To make your jars stand out, consider layering different light colors or adding glitter for extra sparkle. Here’s a simple guide to enhance your jars:
| Step | Action |
|---|---|
| 1 | Choose your lighting source |
| 2 | Decorate with patriotic elements |
| 3 | Secure decorations inside |
| 4 | Place jars in strategic spots |
| 5 | Turn on lights for effect |
This quick upgrade adds charm and ambiance, making your celebration unforgettable.
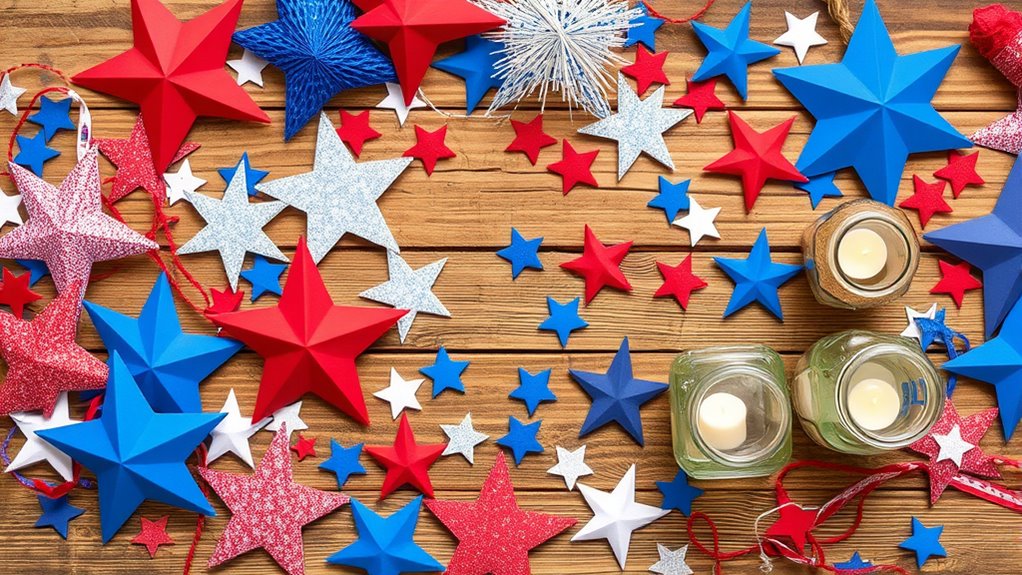
Stars and Stripes Painted Flower Pots

Creating stars and stripes painted flower pots is a fun way to celebrate Independence Day and add a festive touch to your garden. You can easily transform plain pots into patriotic masterpieces using simple supplies.
Start by cleaning your pots thoroughly, then paint them with a base coat of white or blue. Use painter’s tape to create stripes or sections for stars. Add red and white stripes, or paint stars directly onto the pot’s surface for extra flair.
Finish with a clear sealant to protect your design. These pots become eye-catching decorations or thoughtful gifts. Plus, they’re customizable to fit your style and garden theme.
Get creative and enjoy showing off your patriotic spirit with these charming, handmade flower pots.
- Red, white, and blue paint
- Painter’s tape for stripes
- Star stencils or freehand stars
- Clear sealant spray
- Bright, colorful flowers
Frequently Asked Questions
What Safety Tips Should I Follow When Making Firework-Inspired Crafts?
When making firework-inspired crafts, you should prioritize safety to prevent accidents. Always work in a well-ventilated area and keep a fire extinguisher nearby.
Wear protective gloves and goggles to avoid burns or eye injuries. Keep flammable materials away from open flames, and never use real fireworks or explosive materials.
Follow all instructions carefully, and supervise children closely to guarantee they stay safe during the crafting process.
Can These Crafts Be Adapted for Outdoor or Indoor Use?
Ever wonder if you can adapt crafts for different spaces? You can definitely modify them for indoor or outdoor use, but think about safety first.
For outdoor displays, you might add weather-resistant materials, while indoors, opt for non-flammable options. Will your space handle the craft’s size and effects? Always consider ventilation and safety precautions.
With a little creativity, you’ll enjoy celebrating safely and beautifully wherever you choose!
Are There Eco-Friendly or Recyclable Materials Suitable for These Projects?
You can definitely make your crafts more eco-friendly by choosing recyclable or sustainable materials. Look for items like recycled paper, biodegradable glitter, or natural fibers.
Using reusable decorations, like fabric bunting or metal embellishments, also helps reduce waste. By selecting environmentally conscious materials, you not only create beautiful projects but also protect the planet.
It’s a simple way to celebrate responsibly while still enjoying festive creativity.
How Can I Personalize These Crafts for a Family-Friendly Activity?
You might be surprised to learn that personalizing crafts makes the activity more engaging and memorable. To do this, you can encourage everyone to add their own touches, like handprints, names, or favorite colors.
Use simple materials such as markers, stickers, or recycled items, making the process eco-friendly. This way, each family member feels involved, creating unique keepsakes that celebrate your togetherness and independence in a fun, meaningful way.
What Age Groups Are Appropriate for Each Craft Project?
You can tailor craft projects to suit different age groups by considering their skills and interests. Younger kids, like ages 3-6, enjoy simple activities such as coloring or sticker crafts.
Older children, 7-12, can handle more detailed projects like painting or assembling decorations. Teens might prefer more advanced crafts like creating banners or customizing accessories.
Adjust complexity to keep everyone engaged and guarantee safety during all activities.
Conclusion
You don’t need to be an expert to create these fun, festive crafts for the 4th of July. Even if you’re short on time or crafting experience, these DIY projects are simple and rewarding. Plus, they’ll add a personal touch to your celebration that everyone will love. So grab your supplies, get creative, and make this Independence Day unforgettable with your handmade decorations—because the best memories are made with a little DIY spirit!