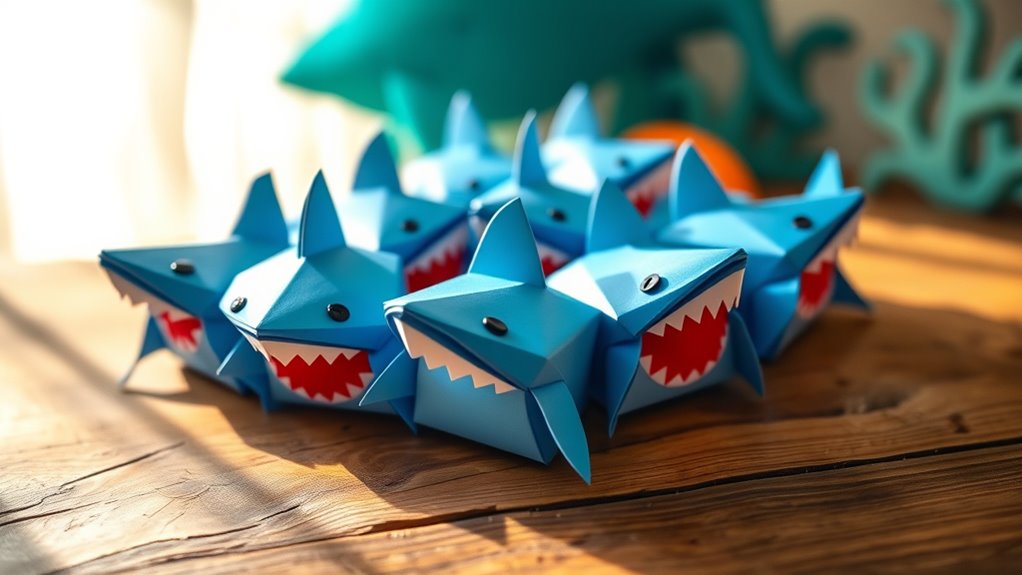

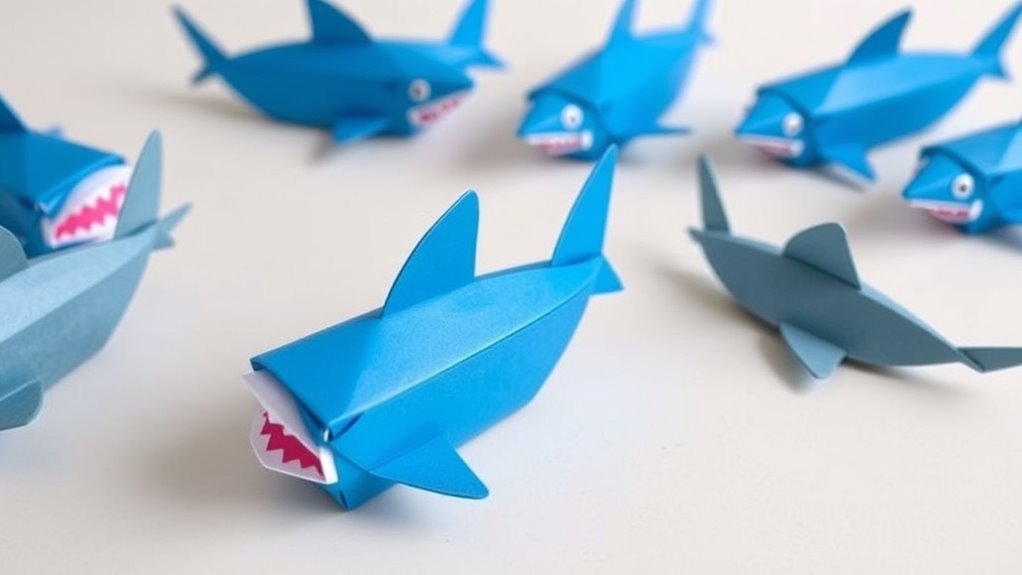
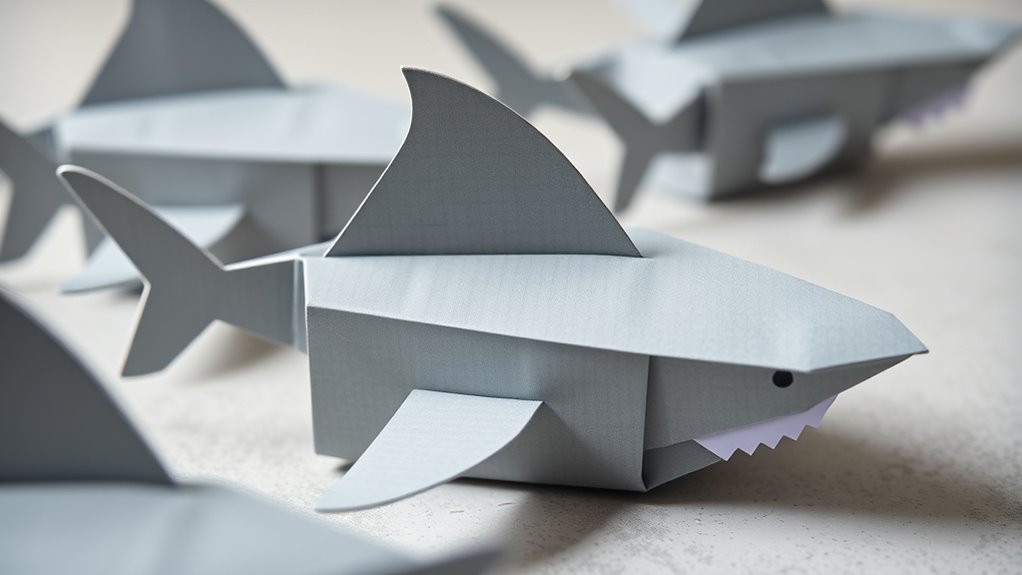
To create DIY Shark Week origami treat boxes, start by choosing sturdy, colorful paper like gray, blue, or mixed shades. Fold the paper into a shark shape, focusing on forming a sleek body, pointed snout, and fins with precise creases. Add fun details like eyes or fins for extra flair. Personalize and fill your boxes with treats or toys, then assemble and decorate to match your theme. Keep going to discover how to make your sharks stand out even more.
Key Takeaways
- Select shark-inspired paper colors like gray, blue, or white and gather adhesives for folding and assembly.
- Follow step-by-step origami instructions to create a sleek shark shape with detailed fins and tail.
- Customize the treat box with shark-themed stickers, metallic pens, and vibrant colors for a personalized look.
- Fill the box with shark-shaped treats, toys, or ocean-themed decorations, sealing it with themed stickers.
- Ensure crisp folds, secure gluing, and a neat finish for a durable, eye-catching Shark Week treat box.
Gathering Materials and Supplies
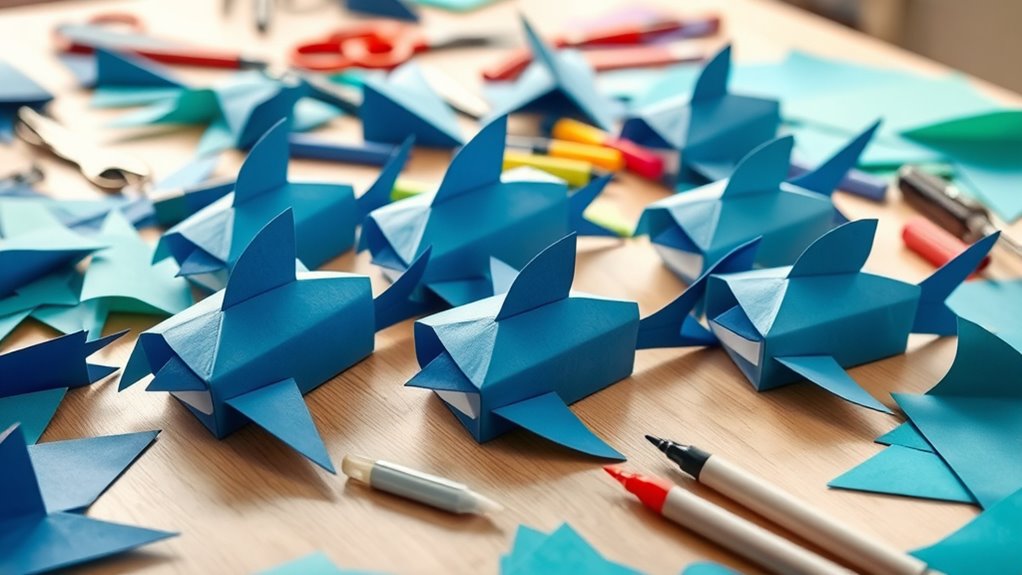
Before you begin creating your shark-week origami treat boxes, it’s important to gather all the necessary materials and supplies. Start by choosing your paper, paying attention to color selection—opt for shades like gray, blue, or even a fun mix to make your boxes stand out. Consider how vibrant or subtle you want your sharks to look. Next, decide on adhesive options; glue sticks, double-sided tape, or even washi tape work well for securing folds and attaching details. Make sure you have scissors or a craft knife on hand for any trimming. Having your materials ready guarantees a smooth crafting process and helps you focus on creating detailed, eye-catching shark treat boxes that are both sturdy and fun. Understanding the evolution of craft materials can help you select the most suitable supplies for your project. Additionally, exploring sustainable craft supplies can lead you to eco-friendly options that are better for the environment. Moreover, selecting child-friendly crafting tools ensures safety while encouraging creativity during your project. Using versatile crafting tools can further streamline your process and open up more design possibilities. Incorporating innovative crafting techniques can also elevate your finished boxes and inspire creative experimentation.
Preparing Your Paper for Folding
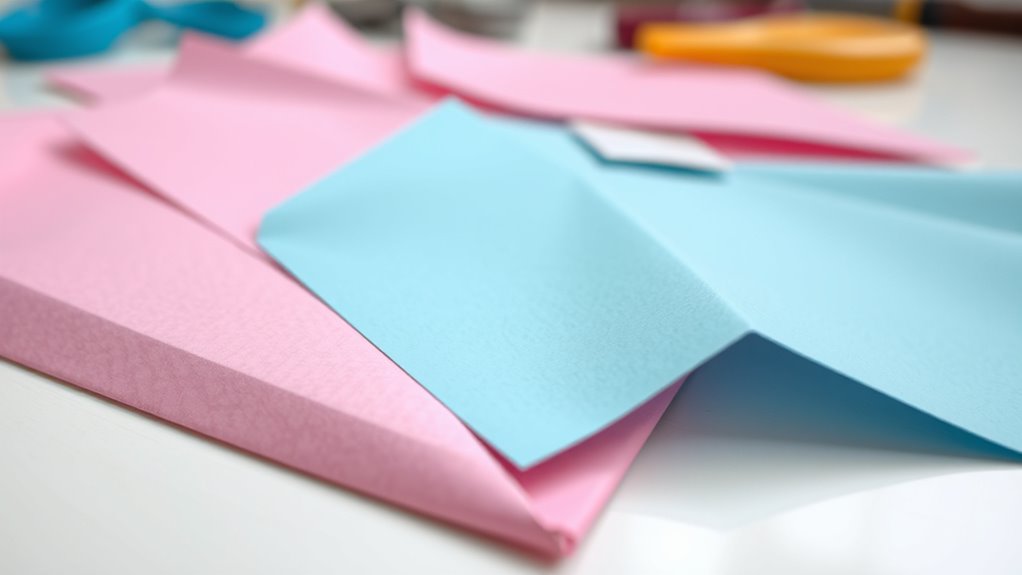
To guarantee your origami shark boxes turn out neat and precise, start by preparing your paper properly. First, choose a paper with a smooth texture, which makes folding easier and results in cleaner lines. Second, make sure your paper is crisp by lightly scoring or flattening folds beforehand, helping with accuracy. Third, select a size that suits your project, as larger sheets are easier to handle and fold precisely. Fourth, familiarize yourself with basic folding techniques like valley and mountain folds, practicing on scrap paper if needed. Proper preparation of your paper sets a solid foundation for intricate folds and sharp edges, making your shark-shaped treat boxes look professional and polished. Additionally, understanding industry trends can help you choose the best materials and techniques for your project, ensuring your craftsmanship stays current and impressive. Staying updated on latest innovations in origami can also inspire new creative approaches and improve your folding skills.
Crafting the Shark’s Body Shape
Start by shaping the main body of your shark to give it a sleek, streamlined appearance. To accurately reflect shark anatomy, fold your paper to create a long, narrow torso. Use origami techniques like valley and mountain folds to form the body’s curves. Begin by folding the edges inward to taper the tail, ensuring a smooth, aerodynamic shape. Keep the folds sharp and aligned, which helps maintain the shark’s realistic form. Focus on symmetry, so both sides mirror each other, enhancing the overall look. This step sets the foundation for the shark’s dynamic appearance. As you work, think about how the body tapers naturally, and adjust your folds accordingly to capture that sleek, marine silhouette. Incorporating knowledge about hydrogen fuel cells can inspire you to consider environmentally friendly materials or ideas in your crafting process.
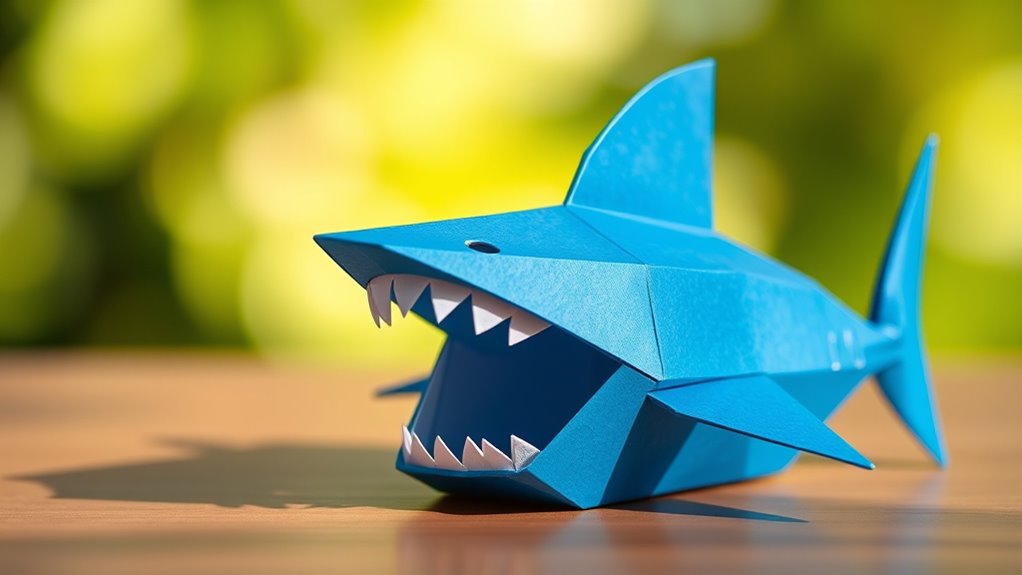
Forming the Shark’s Head and Mouth
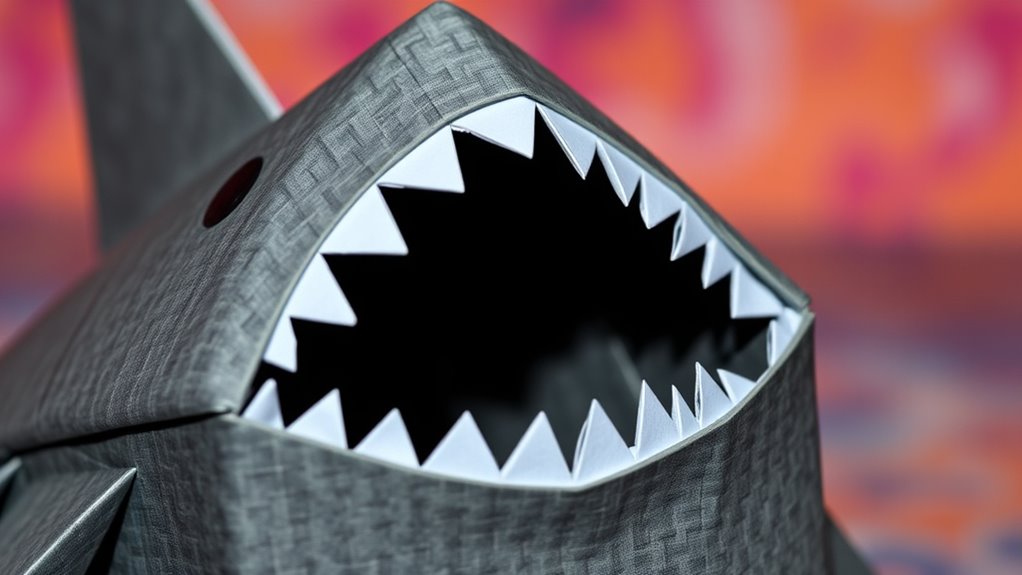
As you shape the shark’s head, focus on creating a pointed snout that tapers smoothly from the body. Use precise origami techniques to mimic shark anatomy, especially the streamlined head. To form the mouth, fold along the designated creases to open a wide, inviting gap. Ensuring sharp, crisp folds will help enhance the Halloween theme of your shark design. Follow these steps:
- Fold the tip of the snout downward to form the upper jaw.
- Crease the sides inward to shape the mouth’s opening.
- Adjust the sharpness of the snout for a realistic shark profile.
- Fold the lower jaw slightly upward for dimension.
These steps help you craft a fierce, authentic shark head, emphasizing clean lines and sharp angles. Focus on symmetry and crisp folds to bring your origami shark to life.
Creating the Fin and Tail Details
Now, it’s time to shape the shark’s fins and tail to give your box a realistic look. You’ll craft the fins by folding small sections to create sharp edges, then attach them securely to the sides. For the tail, carefully shape and fold the paper to form a sleek, pointed tip that completes your shark’s silhouette. Using precise folds can help mimic the natural shape of the fins, enhancing the overall realistic effect of your origami shark. Incorporating contrast ratio considerations can also inspire new design ideas and techniques to improve your craft. Paying attention to celebrity lifestyle insights can provide creative inspiration for customizing your design.
Crafting Shark Fins
To craft realistic shark fins and tails, you’ll need to carefully fold and secure small pieces of paper to create the sharp, pointed shapes. Focus on achieving a sleek shark fin design using origami paper techniques that emphasize clean lines and symmetry.
- Start with a sturdy square sheet, folding it in half diagonally to form a triangle.
- Fold the top corners inward, creating a pointed edge that resembles a fin.
- Use small, precise creases to define the dorsal fin’s ridges and sharpness.
- Secure the folds with a dab of glue or double-sided tape to keep the fin sturdy and three-dimensional.
Mastering these steps guarantees your shark fin looks realistic and complements the overall origami treat box design perfectly.
Shaping the Tail
Creating realistic fin and tail details involves carefully shaping and adjusting the paper to add depth and movement. Start by forming the tail fin, folding and curling the edges to give it a dynamic, lifelike appearance. Use gentle creases to define the fin’s shape, ensuring it stands out from the body. For tail shaping, pinch and fold the paper to create a tapered, streamlined look that mimics a shark’s tail. Adjust the angles to add a sense of motion, making the tail appear as if it’s swimming. Be precise with your creases, as this enhances the overall realism. By focusing on the tail fin and careful tail shaping, your origami shark will look more authentic and lively, perfect for your treat box design.
Assembling the Complete Shark Box
Assembling the complete shark box comes together quickly once you have all your pieces ready. Start by choosing your color schemes to match your theme or event. Next, fold and secure the main body, ensuring the head and tail align properly. Then, attach the fins and tail to give your shark a lively look. Attention to detail can make your shark look more realistic and polished. Additionally, using custom aesthetic modifications inspired by Kia Tuning can add a personalized touch to your design. Incorporating symbolism into your color choices can also enhance the thematic impact of your shark. Recognizing the importance of cybersecurity vulnerabilities in digital interactions can remind you to keep your crafting process safe and secure. Finally, consider storage options—use the inside to hold treats or small toys, making the box functional and fun. Keep the edges crisp and glued firmly for durability. Using vibrant colors can make your shark stand out, while a neutral palette gives a sleek appearance. Incorporating positive energy into your assembly process can make crafting more enjoyable and help attract good vibes for your Shark Week celebration. Once assembled, your origami shark box will be both eye-catching and practical for any Shark Week celebration.
Personalizing Your Treat Boxes
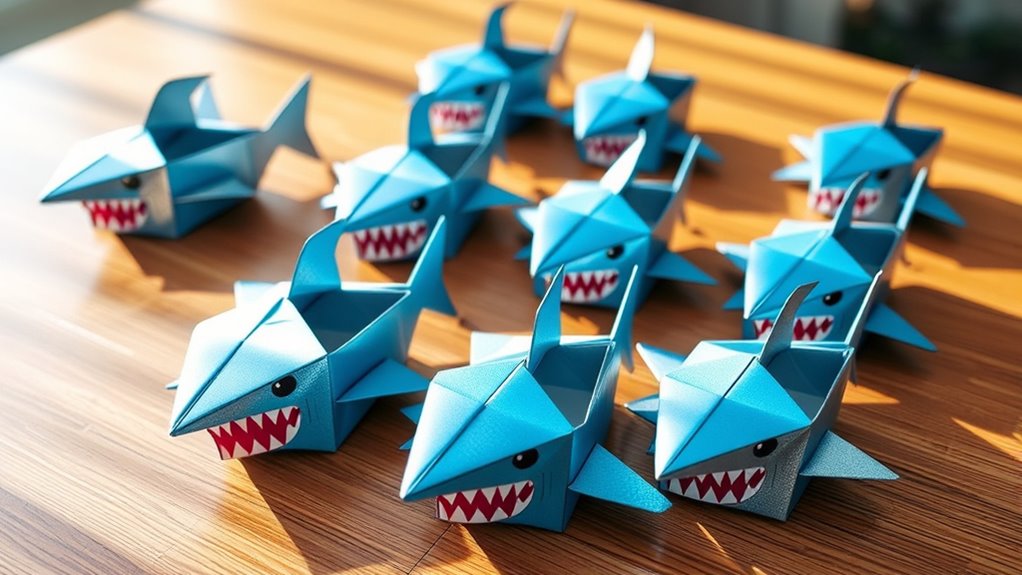
Personalizing your treat boxes adds a special touch that makes your Shark Week celebration memorable. Start by choosing color schemes that match your theme—blues, greys, and whites work great for a shark-inspired look. Use personalization tips like adding stickers, labels, or hand-written tags to give each box a unique flair. You can also incorporate fun details, such as mini shark fins or eye stickers, to enhance the design. Consider using metallic pens to write names or messages for an eye-catching effect. Keep your decorations simple yet bold, ensuring they complement your overall theme. Incorporating innovative materials can also elevate your designs and make your treat boxes stand out even more. With these personalization tips, your treat boxes will stand out and add a fun, customized element to your Shark Week festivities.
Filling and Presenting Your Shark-Themed Treats
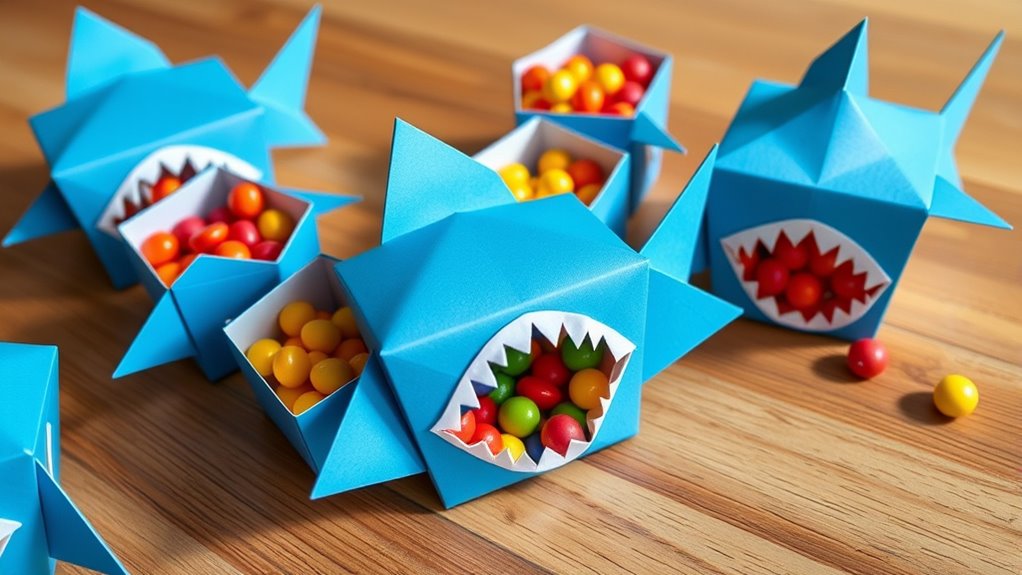
Once your treat boxes are personalized and ready, it’s time to fill them with fun, shark-themed goodies that will delight your guests. Focus on coordinating your color schemes to create a cohesive look. Consider using decorative stickers featuring sharks, waves, or ocean scenes to add extra flair. Here are some ideas to make your treats stand out:
- Fill the boxes with shark-shaped cookies or gummies that match your chosen color palette.
- Add small toys or plastic sharks for a playful touch.
- Use tissue paper in ocean hues to cushion delicate treats.
- Seal the boxes with matching decorative stickers to enhance the shark theme.
Frequently Asked Questions
What Are Alternative Eco-Friendly Materials for This Project?
You can explore alternative eco-friendly materials like biodegradable plastics and recycled paper for your project. Biodegradable plastics break down naturally, reducing pollution, while recycled paper minimizes waste and conserves resources. These options help you create sustainable, environmentally conscious treats boxes. By choosing biodegradable plastics or recycled paper, you support eco-friendly practices and reduce your carbon footprint, making your project both fun and responsible.
How Can I Customize the Shark’S Expression?
You can customize the shark’s expression by experimenting with different shark facial expressions and customizing shark eyes. Use markers, stickers, or cut-out paper to add details like a mischievous grin or surprised eyes. Adjust the shape of the mouth or position of the eyes to change the shark’s mood. Playing with these elements allows you to create a variety of expressive, fun sharks that match your theme or mood.
What Safety Precautions Should I Consider When Handling Scissors?
When considering scissor safety, you might worry about cuts or injuries. To stay safe, always handle scissors with care and avoid rushing. Use handling tips like keeping blades closed when not in use, cutting on a stable surface, and passing scissors handle-first. Remember, proper scissor safety prevents accidents and keeps your hands safe. Focus on these handling tips to enjoy your craft projects without worry.
Can This Design Be Adapted for Other Sea Creatures?
You can definitely adapt this design for other sea creatures by exploring different sea creature variations. Use craft customization techniques, like changing colors or adding details, to transform the origami into fish, whales, or octopuses. Adjust folding patterns and features to match each sea creature’s unique shape. This approach allows you to personalize your project and create a diverse collection of ocean-themed treat boxes, making your craft more fun and creative.
How Durable Are These Origami Treat Boxes for Shipping?
You might worry about shipping durability, but these origami treat boxes are surprisingly resilient. Their material robustness ensures they hold up well during transit, preventing damage to treats or contents. While lightweight, they can be reinforced with additional materials for extra strength if needed. Overall, their design balances aesthetic appeal with practical shipping durability, making them a reliable choice for sending treats without sacrificing style or sturdiness.
Conclusion
Now that you’ve crafted these adorable shark treat boxes, you’re all set to surprise everyone with your creativity—just be prepared for those jaws to drop! Ironically, your masterpiece might just steal the show at Shark Week, leaving everyone more excited about your snacks than the actual sharks. So, enjoy the fun (and a little bit of the chaos), because who knew a simple paper shark could make your party truly bite-sized and unforgettable?