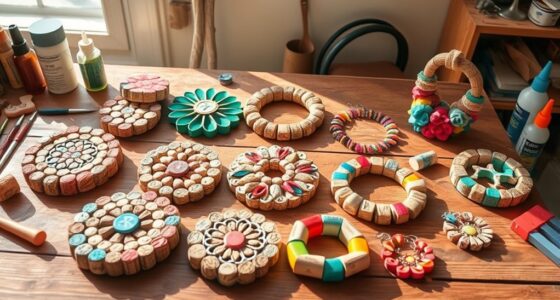
With air-dry clay, you can create personalized jewelry like charms and pendants, craft decorative plant pots, or make unique magnets for your fridge. You can also design stylish coasters, elegant candle holders, or whimsical suncatchers to brighten up your space. For a creative touch, try making wall hangings, playful sculptures, or beautiful wedding decor. If you want to explore exciting ideas and tips to start your projects, keep exploring more options ahead.
Key Takeaways
- Create personalized jewelry like charms and pendants by shaping clay into initials, symbols, or miniature designs, then decorating and sealing.
- Make decorative home accents such as plant pots, magnets, or candle holders with textured patterns and vibrant colors.
- Craft seasonal or themed ornaments like flowers, stars, or animals for window decor, gifts, or wall hangings.
- Design unique wedding or party decor including cake toppers, place cards, and centerpieces with metallic or pastel finishes.
- Experiment with layered textures, marbled effects, and embedded embellishments for artistic sculptures and statement pieces.
Personalized Jewelry and Charms

Creating personalized jewelry and charms with air-dry clay is a fun and easy way to express your unique style. You can craft necklaces, bracelets, or earrings that reflect your personality or mood. Start by rolling out the clay to your desired thickness, then cut or shape it into meaningful designs—like initials, favorite symbols, or tiny miniatures. Use simple tools or even household items to add texture and detail. Once shaped, let your creations dry completely, then personalize further with paint, glitter, or tiny embellishments. These custom pieces make great gifts or keepsakes, capturing special memories in wearable art. With a bit of creativity and patience, you turn ordinary clay into unique jewelry that truly represents you. Additionally, incorporating vintage decor elements can give your jewelry a nostalgic touch and enhance its rustic charm. Paying attention to clay preparation techniques ensures your designs are durable and well-finished.
Decorative Plant Pots and Holders
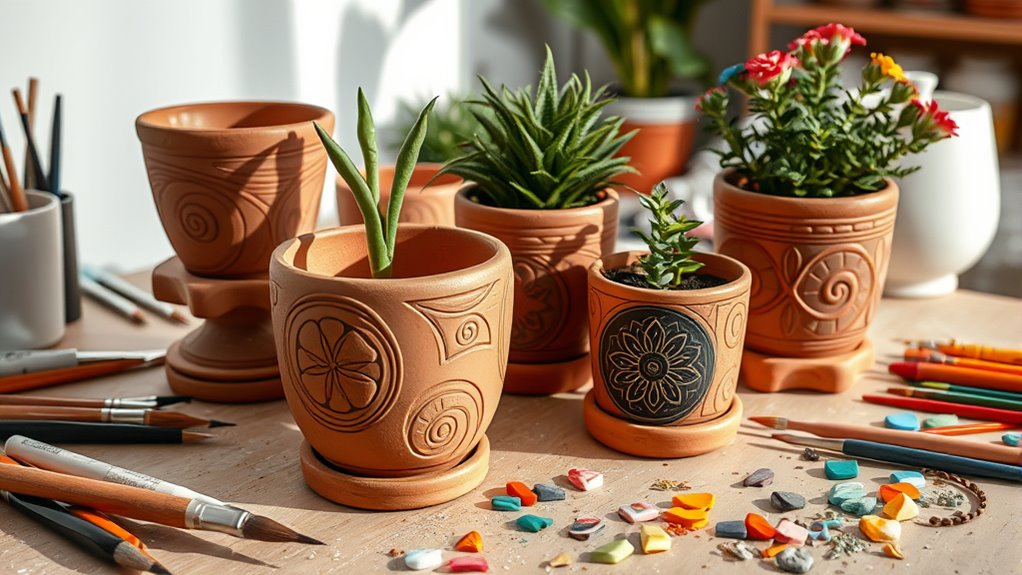
You can create plant pots and holders in custom shapes and sizes to match your style. Adding color accents makes each piece unique and eye-catching. To guarantee your creations last, sealing them for durability is an essential step.
Custom Shapes and Sizes
Using air-dry clay, you can easily customize the shapes and sizes of your decorative plant pots and holders to perfectly match your style and space. Whether you want small, delicate pots or large statement pieces, shaping the clay is straightforward. Roll, mold, or sculpt the clay into any form you envision. You can create round, square, or irregular shapes to suit your aesthetic. Adjust the height and width to fit your plants comfortably. For added uniqueness, incorporate textured patterns or personalized details during shaping. Since air-dry clay hardens without a kiln, you can experiment freely until you achieve your perfect design. This flexibility ensures your plant containers are truly one-of-a-kind, tailored specifically to your home decor and plant needs. Additionally, you can incorporate customized designs that enhance the aesthetic appeal of your creations. Embracing this creative process can also be enhanced by exploring automation in business, which supports the production and distribution of handmade crafts on a larger scale. Incorporating quality materials ensures your creations remain durable and visually appealing over time. Moreover, understanding material selection and proper curing techniques can improve the longevity and finish of your air-dry clay projects. Utilizing the right pimple patch technology can also help maintain the health of your skin while showcasing your creative side.
Adding Color Accents
Adding color accents can truly make your air-dry clay plant pots and holders stand out. You can achieve this by painting designs, patterns, or even simple splashes of color after your clay dries. Use acrylic paints for vibrant, long-lasting results, and consider applying a brush or sponge for different textures. For a more integrated look, try mixing pigments directly into the clay before shaping, but remember that painted details add a pop of contrast afterward. You might also use colored markers or pens for fine details. Keep in mind that layering colors can create depth and interest. Incorporating color theory principles can help you select harmonious shades that enhance your designs. Additionally, choosing complementary or analogous colors based on zodiac sign compatibility can add a personalized touch that reflects your personality. Experimenting with different color combinations allows you to personalize your creations, making them unique and eye-catching accessories for your plants. For best results, consider how color harmony influences the overall aesthetic of your pieces. Exploring color mixing techniques can further expand your creative options and help you achieve seamless color transitions.
Seal for Durability
To guarantee your air-dry clay plant pots and holders last longer and maintain their appearance, sealing them for durability is essential. This step protects your creations from moisture, scratches, and fading over time. Choose a clear acrylic sealer or varnish suitable for clay, ensuring it’s non-yellowing and weather-resistant if outdoors. Apply the sealer in thin, even coats with a brush or spray, allowing each layer to dry thoroughly before adding the next. This process creates a protective barrier that enhances the durability of your work. Sealing also gives your pots a polished, professional finish, making your designs stand out. Remember, proper sealing not only preserves the look but also extends the lifespan of your decorative plant pots and holders. Additionally, considering the color accuracy of your finishes can help achieve a more vibrant and true-to-design appearance. As machine learning algorithms continue to improve, developing techniques for color matching can further enhance the quality of your finished pieces. Using the right sealing technique can also help prevent damage from moisture, especially for outdoor displays. Incorporating protective coatings can provide an extra layer of defense against environmental elements, and selecting the appropriate sealant based on the air purifier features and technology can further optimize your project’s durability.
Custom Magnets and Fridge Art

Creating custom magnets and fridge art with air-dry clay is an enjoyable way to personalize your kitchen. You can craft small shapes, words, or images that reflect your style. Use cookie cutters or freehand shapes, then paint or add details after drying. Attach small magnets to the back with glue, and your unique creations are ready to display. This project is simple, fun, and allows you to showcase your personality. Here’s a quick guide: | Step | Tips | |———————-|—————————————————-| | Shape Creation | Use molds or freehand for variety | | Drying Time | Allow 24-48 hours for complete drying | | Finishing Touches | Paint or seal for extra durability and appeal | Incorporating creative techniques such as cultural impact can inspire unique designs and add meaningful elements to your fridge art. Additionally, understanding wicks and layering techniques from candle making can help you add textured details for a more intricate design. Exploring material safety is also important to ensure your projects are both beautiful and safe to display. Engaging with risk management strategies can also enhance your approach to creative projects, ensuring a balance between fun and safety.
Unique Candle Holders and Vases
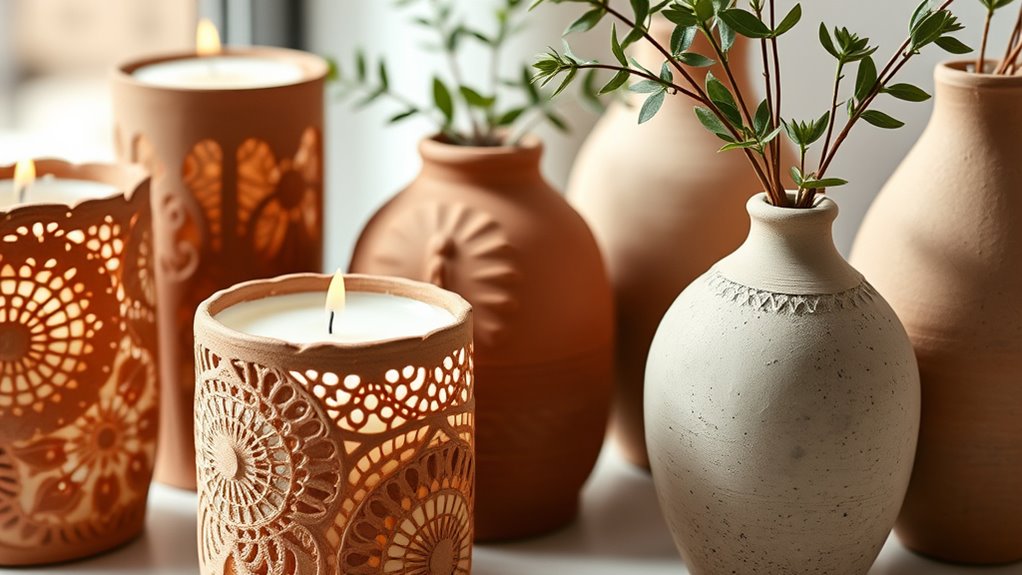
You can create stunning candle holders and vases by experimenting with different textures and surface finishes. Adding personalized embellishments, like beads or carved details, makes each piece unique. Combining these techniques allows you to craft functional art that reflects your style.
Mixing Techniques for Texture
Mixing techniques for texture can transform simple air-dry clay pieces into striking candle holders and vases. To add visual interest, try combining different tools like sponges, brushes, or textured fabrics while working the clay. Pressing a textured surface into the clay creates a unique pattern, while roughening certain areas introduces contrast. You can also incorporate small objects, such as beads or seed pods, by embedding them into the surface for a layered look. For a more dynamic effect, layer multiple colors or shades of clay and blend them with your fingers or a tool to produce marbled textures. Remember to work with wet clay for better adhesion of textures. These techniques give your candle holders and vases a handcrafted, artistic appeal that stands out.
Personalized Embellishments
Adding personalized embellishments is a great way to make your air-dry clay candle holders and vases truly unique. You can carve initials, dates, or meaningful symbols directly into the clay before it dries. Using stamps or textured tools, you can add patterns or designs that reflect your style. Consider painting small details or applying decorative elements like beads, buttons, or tiny ceramic pieces to enhance the look. For a more sophisticated finish, you might embed metallic or glitter accents. Personal touches like these turn simple clay pieces into memorable decor or thoughtful gifts. Keep in mind, the key is to plan your embellishments before the clay dries, ensuring they adhere well and stand out. With a little creativity, your candle holders and vases will showcase your personality beautifully.
Handcrafted Suncatchers and Window Decor
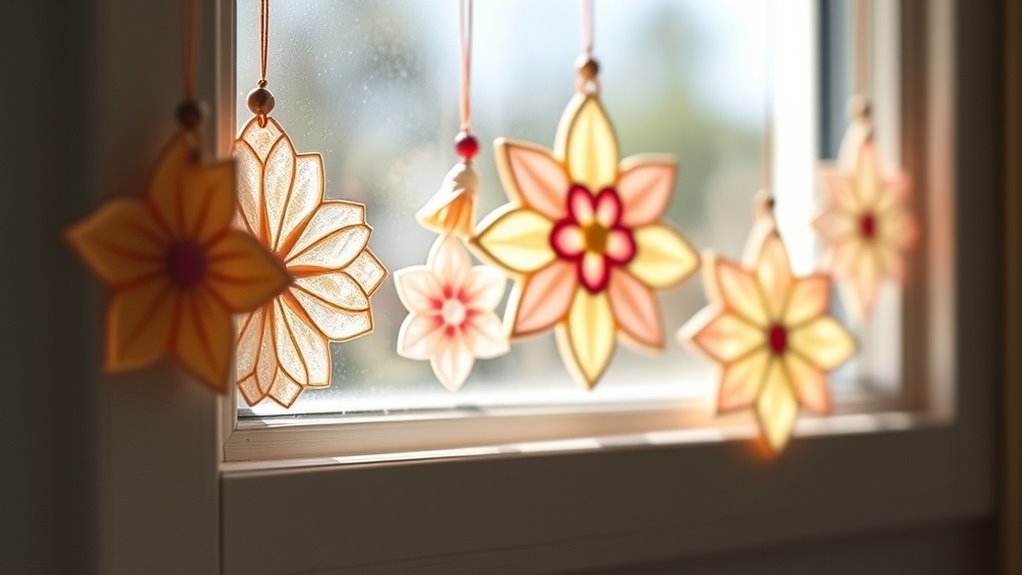
Creating handcrafted suncatchers and window decor with air-dry clay allows you to personalize your space with charming, one-of-a-kind pieces. You can shape delicate designs like flowers, stars, or abstract patterns that catch the light beautifully. Use vibrant paints or translucent glazes to enhance their appearance and make them stand out on your windows. These projects are simple to make and perfect for adding a personal touch to any room.
| Benefits | Tips |
|---|---|
| Custom designs | Use cookie cutters for consistent shapes |
| Light-catching effects | Incorporate semi-transparent paints |
| Easy to make | Seal with a clear varnish for durability |
Whimsical Animal Figurines
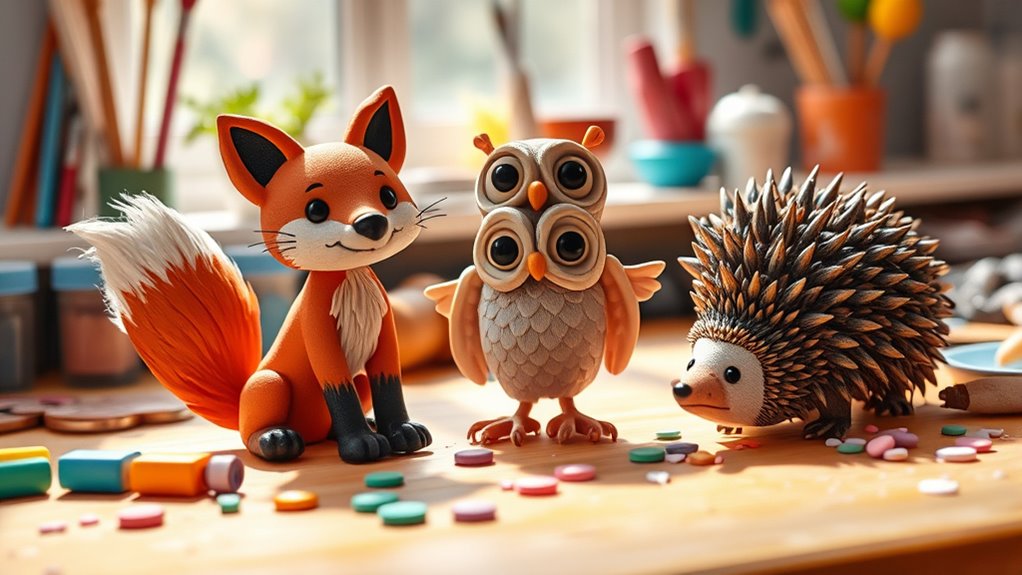
Whimsical animal figurines made from air-dry clay are a delightful way to bring playful charm to your decor. You can create adorable animals like foxes, owls, or bunnies, giving you endless options to showcase your creativity. Start by shaping the clay into simple forms, adding details with tools or your fingers to give each animal personality. Use vibrant paints or natural earth tones to finish your figurines, enhancing their whimsical appeal. These figurines make excellent gifts or charming accents for shelves, desks, or garden spaces. As you craft, don’t worry about perfection—imperfections add character and uniqueness. With a little patience, you’ll produce delightful, one-of-a-kind animal figurines that reflect your personal style and bring a touch of fun to any space.
Stylish Coasters and Trivets
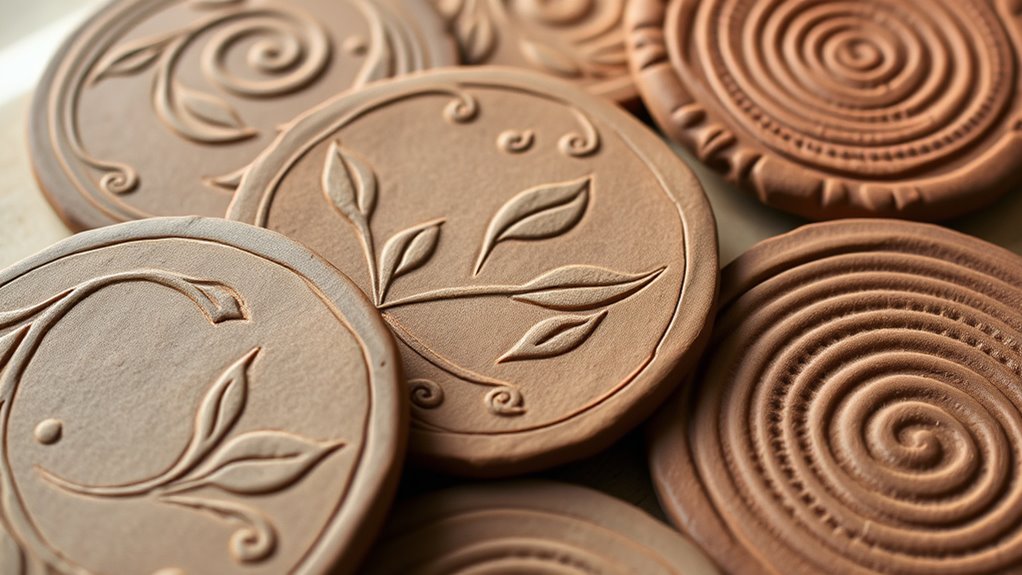
Air-dry clay offers a stylish and practical way to craft custom coasters and trivets that protect your surfaces while enhancing your decor. You can create unique shapes, patterns, and textures that match your personal style. Start by rolling out the clay to your desired thickness, then cut out circles, squares, or freeform shapes using cookie cutters or knives. Add decorative elements like stamped designs, pressed leaves, or textured tools before the clay dries. Once hardened, you can paint or seal your pieces to add color and durability. These handmade coasters and trivets are perfect for personal use or gifting, allowing you to showcase your creativity while keeping your tabletops safe. With a little effort, you’ll have stylish, functional accessories that stand out.
Artistic Wall Hangings and Friezes
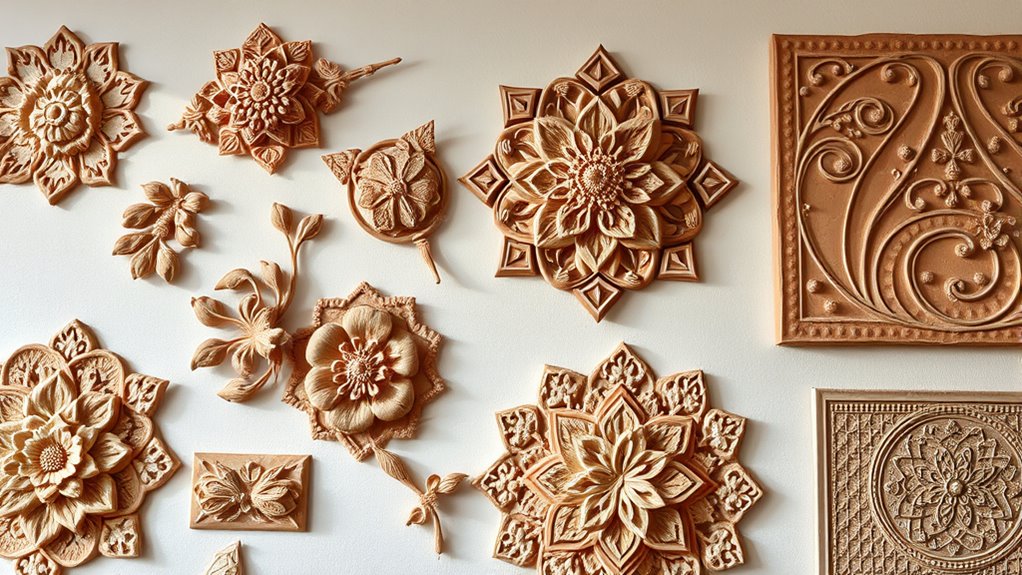
If you’re looking to add a striking focal point to your walls, artistic wall hangings and friezes made from air-dry clay offer a versatile and creative solution. You can craft intricate designs, nature-inspired motifs, or abstract patterns that reflect your style. Start by shaping your clay into basic forms or textured elements, then assemble and layer them on a sturdy backing or frame. Once dry, paint or seal your piece for added durability and visual impact. These wall hangings can be hung individually or combined to create a gallery wall. The lightweight nature of air-dry clay makes installation simple, and the possibilities for customization are endless. Whether you prefer modern minimalism or ornate detailing, these creations will elevate your space uniquely.
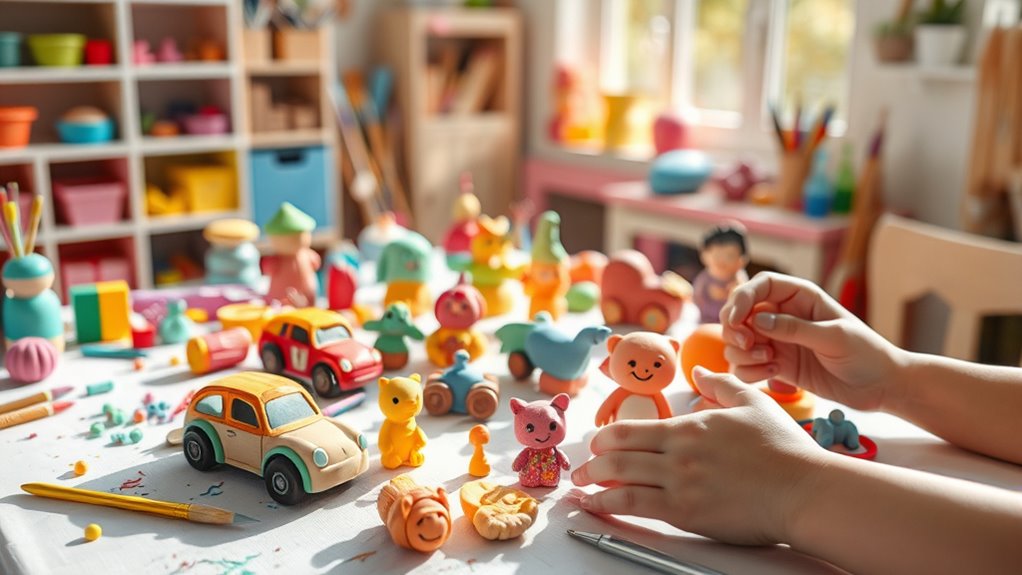
Playful Kids’ Sculptures and Toys
Creating playful kids’ sculptures and toys with air-dry clay is simple and fun. You can make easy character figures and customize toy accessories to match your child’s favorite themes. Bright, playful colors bring these creations to life, making them perfect for imaginative play.
Easy Character Figures
Making easy character figures with air-dry clay is a fun way to bring your imagination to life. Start by shaping simple forms like spheres, cylinders, or cones for the heads and bodies. Add small details such as eyes, noses, and mouths to give your characters personality. You can create playful kids, cute animals, or fantasy creatures—whatever sparks your creativity. Use tools or your fingers to carve features and add texture. Once you’re happy with your sculpture, let it dry completely. Painting your figures afterward can add vibrant details and bring them to life. These characters make delightful decorations or toys and are perfect for quick projects. With just a little practice, you’ll be making charming characters that showcase your unique style.
Customizable Toy Accessories
Customizable toy accessories add a playful touch to your air-dry clay projects, allowing you to personalize your kids’ sculptures and toys. You can create unique details that make each toy special, from tiny hats to miniature tools. These accessories can be swapped or added anytime, keeping playtime fresh and engaging. Use simple shapes and bold features to give your toys character and charm. Personal touches like glasses, jewelry, or tiny backpacks make each piece more interactive. This process encourages creativity and fine motor skills as your kids design their own accessories. Plus, air-dry clay’s versatility makes it easy to craft durable, lightweight additions that last through play. Whether for dolls or action figures, these customizable parts truly bring your toys to life.
- Miniature hats and caps
- Tiny glasses and masks
- Small backpacks or satchels
- Personalized jewelry or necklaces
- Playful weapon or tool accessories
Bright, Playful Colors
Adding bright, playful colors to your air-dry clay sculptures instantly transforms simple projects into lively, engaging toys and figures. Vibrant hues catch the eye and spark imagination, making your creations more appealing to kids. Use acrylic paints, colored clay, or even markers to achieve bold, fun shades. Mixing colors directly into the clay creates interesting marbled effects, while layering paints adds depth. To help you plan, here’s a quick overview:
| Color Type | Best For | Tips |
|---|---|---|
| Bright Colors | Toys, characters | Use multiple shades for contrast |
| Pastel Shades | Soft, friendly figures | Mix with white for lighter tones |
| Primary Colors | Bold, simple designs | Stick to red, blue, yellow |
Experiment with combinations to make your sculptures lively and playful!
Elegant Wedding and Party Decor
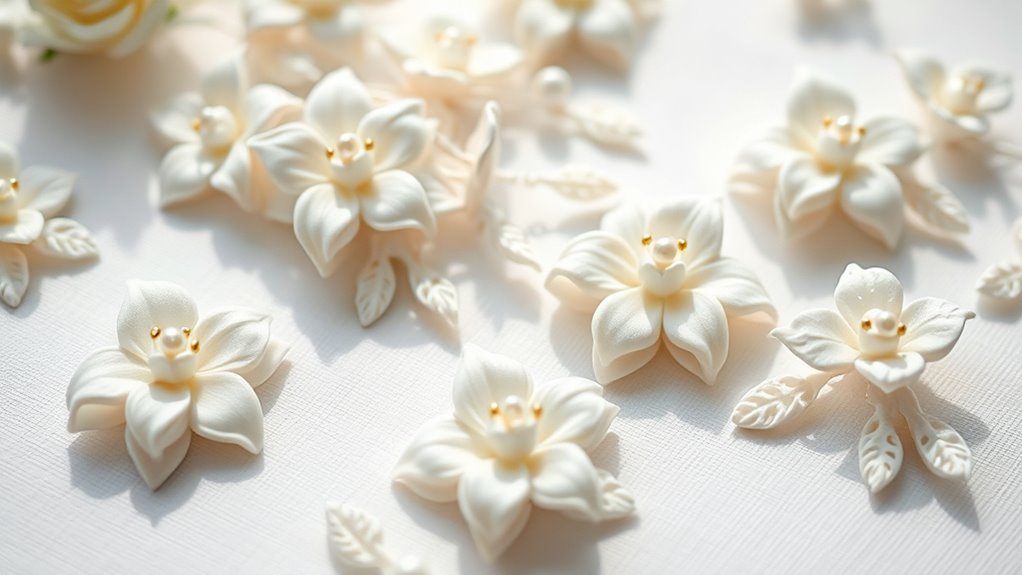
Air-dry clay offers a versatile and elegant way to create stunning wedding and party decor that adds a personal touch to any celebration. You can craft beautiful centerpieces, cake toppers, or decorative accents that reflect your style. Its ease of use allows you to customize designs, from intricate floral motifs to minimalist shapes. Use metallic paints or gloss finishes to elevate your creations and give them a sophisticated look. Incorporate elements like delicate garlands or ornate signage to enhance the decor. Whether for a rustic barn wedding or a chic party, air-dry clay allows you to make memorable, handcrafted pieces that stand out.
- Custom wedding cake toppers
- Elegant floral accents
- Personalized place cards or tags
- Decorative table centerpieces
- Ornamental signage or banners
Frequently Asked Questions
How Long Does Air-Dry Clay Take to Fully Dry?
The question about how long air-dry clay takes to fully dry is common. Typically, it takes about 24 to 72 hours for the clay to dry completely, depending on the thickness and size of your project. If your piece is thick or large, it may take longer. To guarantee it dries evenly, keep it in a well-ventilated area and avoid moving it until it’s fully hardened.
Can Air-Dry Clay Be Painted After It Dries?
Yes, you can definitely paint air-dry clay after it dries. Once it’s fully hardened and has cured, usually after 24-72 hours, you should sand it lightly for a smooth surface. Then, apply acrylic paints or other suitable paints. Make sure the clay is completely dry before painting to prevent cracking or peeling. Adding a sealant afterward can also help protect your artwork and give it a nice finish.
What Sealant Is Best for Finished Air-Dry Clay Projects?
You’re wondering what sealant works best for your finished air-dry clay project. To protect and enhance your work, you should use a clear acrylic sealer or varnish. These sealants provide a durable, glossy or matte finish, depending on your preference. Spray-on sealers are easy to apply and dry quickly. Just make sure to choose one compatible with clay and apply in a well-ventilated area for the best results.
Is Air-Dry Clay Suitable for Outdoor Crafts?
Imagine you’re in a time machine, jumping from the past to the present—air-dry clay isn’t ideal for outdoor crafts. It’s porous and can crack or erode when exposed to weather elements. If you want your outdoor project to last, consider sealing it with a waterproof varnish or using polymer clay instead. So, while air-dry clay is fun indoors, for outdoor use, you might want to explore other materials.
How Do I Prevent Cracks in My Air-Dry Clay Creations?
To prevent cracks in your air-dry clay creations, you should keep your clay moist while working and avoid over-thinning it. Smooth out the surface thoroughly and add a small amount of water if cracks start to form during drying. Also, work in a cool, dry environment and let your piece dry slowly to minimize cracking. Covering it loosely with plastic can help retain moisture during the drying process.
Conclusion
With air-dry clay, you can transform simple materials into stunning, personalized pieces that brighten your home and celebrate your creativity. Imagine delicate charms catching the sunlight, vibrant plant pots adding life to your space, or whimsical sculptures bringing smiles to kids’ faces. Each project offers a chance to craft something unique, turning plain clay into beautiful art that reflects your style. So grab your supplies, get inspired, and start creating your own charming masterpieces today.