If your print-then-cut sheets keep misaligning, recalibrating your printer and cutter can save your sticker sheets and reduce waste. First, print calibration patterns with clear registration marks and check alignment for both devices. Adjust printer settings and cutter blade height as needed. Regular maintenance and proper setup guarantee your print and cut actions match perfectly. Keep these tips in mind, and you’ll prevent costly mistakes—discover more on how to master this calibration process.
Key Takeaways
- Reprint calibration patterns with clear registration marks to realign printer and cutter accurately.
- Ensure software registration mark settings match the actual marks printed for precise cutting.
- Perform routine calibration of your printer and cutter to correct misalignment issues.
- Use high-quality materials and proper paper settings to maintain consistent print and cut accuracy.
- Adjust cutter blade height and registration margins based on calibration test results for optimal alignment.
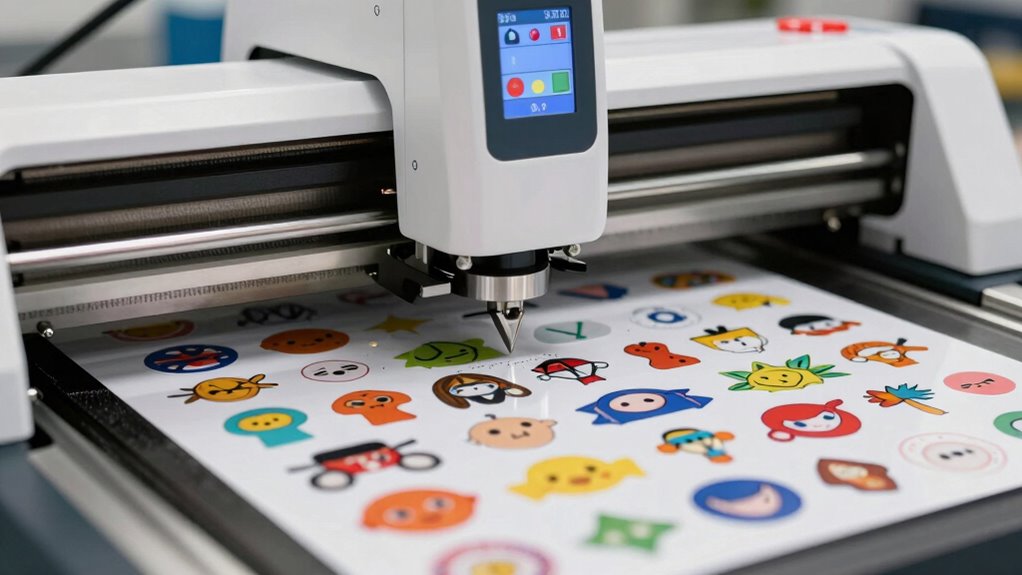
print-then-cut calibration patterns
As an affiliate, we earn on qualifying purchases.
As an affiliate, we earn on qualifying purchases.
Why Do My Print-Then-Cut Sheets Misalign and Waste Stickers?
Print-then-cut sheets often misalign because the printer and cutting machine don’t always share the same calibration settings. Poor color management can cause colors to appear differently on your print compared to your design, making it harder to judge cuts accurately. Additionally, if your print resolution isn’t optimized, details might blur or shift, leading to misalignment. When either device isn’t calibrated properly, even slight differences can throw off the entire cut line. Ensuring consistent color management between your design software, printer, and cutter helps maintain accurate color reproduction. Also, setting the correct print resolution guarantees sharp, precise images, reducing the chance of misaligned cuts. Proper calibration of both color accuracy and print resolution is essential for perfect print-then-cut results and minimizing wasted stickers. European cloud innovation emphasizes the importance of reliable, energy-efficient technology to achieve consistent results. Furthermore, understanding the impact of device calibration on overall accuracy is crucial for achieving professional-quality stickers. Regularly performing calibration checks on your equipment helps maintain optimal alignment and print quality over time. Additionally, utilizing automated calibration tools can streamline this process and improve long-term consistency. To further enhance your results, investing in professional calibration software can help fine-tune your devices for even better accuracy.

Brady BBP33 Label Printer with Auto Cutter (BBP33-C)
Benchtop label maker capable of creating multi-line labels for clear identification of wires, panels, circuit boards, and any…
As an affiliate, we earn on qualifying purchases.
As an affiliate, we earn on qualifying purchases.
How Does Print-Then-Cut Calibration Work?
Print-then-cut calibration guarantees your printer and cutter work together accurately by aligning their positions precisely. You’ll use calibration patterns and setup steps to identify any misalignments and make necessary adjustments. This process helps you achieve the best possible precision for your sticker sheets. Proper calibration also considers material properties, ensuring your results are consistent across different types of paper or sticker sheets. Additionally, understanding machine alignment is crucial to troubleshoot and maintain optimal performance over time.
Alignment of Printer and Cutter
To guarantee your printed stickers align perfectly with the cutting process, the printer and cutter must be precisely calibrated. Proper alignment ensures your designs are cut accurately, preventing wasted material. During calibration, the machine uses alignment marks and adjusts for variations like color management and material selection. If these factors aren’t considered, misalignments can occur, ruining your sheets. Use the table below to understand how different settings impact alignment:
| Setting | Effect on Alignment | Tips |
|---|---|---|
| Color Management | Ensures printed colors match design | Use calibrated monitors |
| Material Selection | Affects print quality and cutting accuracy | Choose consistent sheets |
| Print Resolution | Impacts detail and position | Use recommended DPI |
| Cutter Blade Height | Affects cut precision | Adjust for material thickness |
| Printer Speed | Influences registration accuracy | Use standard speeds |
Proper calibration combines these elements for perfect print-then-cut results.
Calibration Patterns and Setup
Calibration patterns serve as essential guides that help your machine align the printed design with the cutter’s path. They ensure precise cuts by providing reference points for calibration. Here’s how the process works:
- You print a pattern that includes specific marks or color blocks, which assist with color management and material consistency.
- You then scan or input the pattern into your calibration software, which detects alignment errors.
- Adjustments are made based on the pattern, accounting for material selection and print variations, to fine-tune the machine’s calibration.
Adjusting for Precision
Adjusting for precision involves fine-tuning your machine’s settings to guarantee that the cutter follows the printed design exactly where it should. Proper printer maintenance is essential, ensuring your printer produces sharp, consistent images without smudges or misalignments. When selecting paper, choose a sturdy, high-quality material compatible with your printer and cutter; this reduces the chances of paper jams or shifting during printing and cutting. Calibration settings often include adjusting the registration marks or alignment points, which help the machine recognize where to cut precisely. Regularly updating your printer drivers and firmware can also improve accuracy. By paying attention to printer maintenance and paper choice, you set a solid foundation for accurate print-then-cut results, minimizing errors and saving sticker sheets from waste. Additionally, considering printer calibration techniques can further enhance alignment precision. Monitoring your piercing healing process and ensuring proper aftercare can also prevent issues that might affect your project outcomes.

Vowlove T-Shirt Ruler for Precise Alignment, Center & Left Chest Placement Tool for Shirt Making, Compatible with Cricut, Heat Press, HTV, Vinyl, DTF, Sublimation
Game Changer For Shirt Making: Make placing your HTV and sublimation easier & more consistent. Simply line it…
As an affiliate, we earn on qualifying purchases.
As an affiliate, we earn on qualifying purchases.
How to Check Your Printer and Cutter Alignment Before Starting
Before you start, make sure your printer settings are correct for your sticker sheets to guarantee accurate colors and size. Next, perform a test cut to check if your cutter aligns properly with the printed design. Adjust your settings if needed to guarantee the cut lines match perfectly with your print. Ensuring your device calibration is accurate can prevent misalignments and save you time and materials. Additionally, confirming your alignment accuracy through test cuts is essential for consistent results across multiple sheets. Regularly checking your print-to-cut registration helps maintain precision over time and reduces material waste. Keeping your cutting machine maintenance up to date also plays a vital role in sustaining optimal calibration and accuracy, which is essential for consistent results.
Check Printer Settings
To guarantee your print-then-cut process goes smoothly, start by checking your printer settings. Proper setup assures accurate sticker alignment and prevents issues like misprints or incorrect cuts. Additionally, ensuring your printer supports the correct media type helps achieve optimal print quality. Here are three key steps: 1. Verify paper type and quality—use the recommended settings for sticker sheets to improve print clarity. 2. Check print size and scaling**—set to 100% or actual size to avoid resizing errors. 3. Run printer troubleshooting**—test print to confirm colors and alignment are correct before printing your full sheet.
Test Cut Accuracy
Performing a test cut is essential to guarantee your printer and cutter are perfectly aligned before you start your full project. This step helps ensure ideal color registration and cutting precision, preventing wasted materials. To evaluate accuracy, cut a test sheet with registration marks and compare the cut lines to the marks. Use this chart to interpret results:
| Issue | Solution |
|---|---|
| Misaligned cuts | Adjust cutter alignment or calibration settings |
| Blurred registration marks | Improve print quality or increase contrast |
| Inconsistent cutting | Check blade sharpness and material stability |
Self-Laminating Calibration Labels, Waterproof Write-On Adhesive Calibration Stickers for NIST & ISO-9000 Calibrations, Pack of 180
Each package includes 15 sheets of 180 high quality calibration labels (1.75''×0.63'') to go around.
As an affiliate, we earn on qualifying purchases.
As an affiliate, we earn on qualifying purchases.
Step-by-Step: How to Calibrate Your Printer for Perfect Print-Then-Cut Results

Calibrating your printer is a crucial step to guarantee your print-then-cut stickers come out perfectly every time. Start by adjusting your color management settings to verify colors match your design. Next, select the appropriate paper type—using the right paper influences ink absorption and print quality. Finally, follow these steps:
- Print a calibration test sheet, paying attention to color consistency and alignment.
- Review the test sheet and note any discrepancies in colors or alignment.
- Adjust your printer’s color profiles and paper settings based on your observations, then reprint the test until the results are spot-on.
This process ensures your prints are color-accurate and properly aligned, setting the stage for flawless cut results. Proper calibration minimizes misprints and wasted sticker sheets.
How to Adjust Your Cutter Settings to Match Your Printer’s Calibration
Once your printer is properly calibrated, it’s essential to adjust your cutter settings so they align perfectly with the printed design. Start by reviewing your cutter’s registration and margin settings, making sure they match the calibration you’ve done. Accurate material selection is key; choose a compatible sticker paper that responds well to your printer’s color matching and printing profile. Test cuts on scrap material to fine-tune blade depth and pressure, making certain the cuts follow the printed lines precisely. Remember, slight adjustments can make a big difference in avoiding misalignment or tearing. Consistently using the same material and maintaining your cutter helps guarantee your print-then-cut workflow remains smooth and precise. Properly calibrated cutter settings save time and prevent wasted sticker sheets.
Common Calibration Problems and How to Fix Them
Even with careful setup, calibration issues can still arise, causing misalignments between your printed images and cut lines. These problems often affect print quality and your sticker design’s precision. To troubleshoot, consider these common issues:
Calibration issues can cause misalignments, affecting print quality and sticker precision.
- Printer calibration errors: Ensure your printer’s settings match your cutter’s calibration. Misaligned print heads can distort print quality. Regular device calibration helps prevent such issues.
- Incorrect registration marks: If the marks are too faint or misplaced, the cutter can’t read them accurately. Reprint with clear, sharp marks.
- Software misconfiguration: Check your print-then-cut software for correct settings, especially the registration mark size and position.
- Proper home calibration: Regularly calibrate your printer and cutter setup to prevent recurring misalignments and ensure consistent results.
Addressing these problems promptly helps maintain print quality and guarantees your sticker design cuts perfectly every time.
Tips for Maintaining Accurate Calibration and Reducing Sticker Waste
Maintaining accurate calibration is essential to guarantee sticker waste is minimized and your print-then-cut projects turn out perfectly. Regular printer maintenance, like cleaning print heads and checking alignment, helps ensure consistent results. When it comes to sticker design, use simple shapes and clear cut lines to reduce errors and misalignment. Always double-check your design files for proper sizing and margins before printing. Keep your printer’s software up to date to avoid calibration issues caused by outdated drivers. Store your sticker sheets in a flat, dust-free environment to prevent warping or damage that could affect calibration. Staying attentive to print calibration and how it impacts your results can help you troubleshoot issues more effectively. Understanding connected equipment and maintaining your hardware can also improve overall printing accuracy. Additionally, performing routine printer calibration checks can catch issues early before they affect your projects. Regularly inspecting your printer’s hardware performance ensures that mechanical components are functioning correctly, which is crucial for maintaining calibration. By staying diligent with printer maintenance and paying close attention to your sticker design, you’ll reduce waste and achieve cleaner, more precise cuts every time.
How Proper Calibration Can Save You Money and Improve Your Stickers
Proper calibration is key to saving money and enhancing the quality of your stickers. When your printer and cutter are correctly calibrated, you’ll notice improved sticker durability and color vibrancy. To maximize these benefits, focus on these three steps:
- Adjust your printer settings for ideal ink distribution, ensuring vibrant colors that last longer.
- Align your cutter precisely to prevent miscuts that waste material and ruin stickers.
- Test print and cut regularly to maintain calibration accuracy, avoiding costly reprints.
Frequently Asked Questions
Can Calibration Fix All Types of Print-Then-Cut Misalignments?
Calibration can fix many print-then-cut misalignments, but it doesn’t resolve all issues. You’ll improve print alignment and cutter precision, reducing errors considerably. However, if your printer or cutter has hardware problems or inconsistent performance, calibration alone might not solve the problem. Always ensure your equipment is well-maintained and follow calibration steps carefully to achieve the best results. For persistent issues, consider professional maintenance or troubleshooting.
How Often Should I Recalibrate My Printer and Cutter?
You should recalibrate your printer and cutter whenever you notice misalignments, or at least once a month for consistent results. Maintaining a regular calibration frequency helps prevent issues and keeps your equipment running smoothly. Follow maintenance tips like cleaning the rollers and checking for software updates, which can improve calibration accuracy. Staying proactive with calibration ensures your print-then-cut projects stay precise and save you time and materials.
Does Paper Type Affect Calibration Accuracy?
Absolutely, paper type can make or break your calibration! High-quality paper with perfect ink absorption guarantees your printer and cutter stay in sync, avoiding miscuts or smudges. Cheap or textured paper, on the other hand, can throw off calibration like a wild card, causing your cuts to go haywire. Always choose smooth, premium paper for precise, flawless results, and recalibrate whenever you switch paper types to keep everything perfectly aligned.
Are There Specific Calibration Settings for Different Sticker Materials?
Yes, there are specific calibration settings for different sticker materials. You should adjust your calibration methods based on material compatibility to guarantee precise cuts. For thicker or textured stickers, increase the pressure and fine-tune the blade depth. For smoother, thinner materials, reduce pressure accordingly. Always test on a small section first, and follow manufacturer guidelines to optimize your calibration and avoid wasting sticker sheets.
What Are Common Signs Indicating Calibration Needs Adjustment?
When your print and cut process feels off-kilter, it’s like a ship veering off course. Look for signs like misaligned cuts, uneven edges, or printed images that don’t match the design. These are telltale signs of alignment issues. Use calibration tools to fine-tune your machine, ensuring everything lines up perfectly. Regular checks help catch these issues early, keeping your sticker sheets looking sharp and professional every time.
Conclusion
So, after all that fuss, you’d think perfect print-then-cut results are impossible, right? Turns out, a simple calibration fix can save you from endless sticker sheet waste and frustration. Ironically, the key to flawless stickers lies in tiny adjustments most overlook. Instead of tossing sheets or cursing your printer, take a moment to calibrate. Who knew that saving money and boosting precision could be so easy—yet so often ignored?