
You can turn a simple frame into endless creative craft projects. Think about transforming it into personalized wall art, rustic photo displays, or a stylish chalkboard for your kitchen. You might add texture with layered designs, repurpose it as a jewelry holder, or create an interactive kids’ craft. Whether you’re making gifts or decorating your space, the possibilities are vast. Curious about more ideas? Keep exploring to discover how you can elevate basic frames into stunning handmade crafts.
Key Takeaways
- Transform frames into jewelry organizers with hooks, compartments, or wire overlays for stylish storage solutions.
- Create personalized wall art by framing printed quotes, photos, or abstract designs with colorful or vintage frames.
- Use frames as unique photo collages by overlapping or arranging multiple small images for a vibrant display.
- Repurpose frames into decorative mirrors by adding mirror backing and artistic finishes like distressed paint or metallic accents.
- Turn frames into functional shelves or bulletin boards by removing glass and backing, then attaching brackets or corkboards inside.

VOKOY 4 Pack Wooden Picture Frames for Crafts, 4×6 Inch Wood DIY Picture Frame for Crafting & Painting, Unfinished Standing Photo Frame Wood Decorations for Art Projects Birthday Gifts
- Frame Dimensions: Outer 7.44" x 5.5", Inner 5.5" x 3.54"
- Set of 4 Frames: Unfinished wooden frames for DIY projects
- Versatile Orientation: Supports horizontal and vertical display
As an affiliate, we earn on qualifying purchases.
As an affiliate, we earn on qualifying purchases.
Why Using Basic Frames Sparks Creative DIY Crafts
Using basic frames can truly ignite your creativity because they provide a simple, versatile foundation for a wide range of DIY crafts. Their historical significance dates back centuries, often serving as symbols of important moments or cultural stories. Over time, frames have reflected cultural influences, from ornate European designs to minimalist modern styles. This rich history inspires you to explore different styles and techniques, giving your crafts depth and meaning. When you start with a basic frame, you’re not just creating something visually appealing—you’re connecting with a tradition that’s evolved across generations. This connection encourages you to experiment and personalize your projects, blending history and culture into unique, meaningful art. Additionally, understanding the cultural significance of frames can deepen your appreciation and inspire more thoughtful creations. Recognizing how traditional craftsmanship has shaped these designs can further enhance your appreciation and inspire authentic, culturally respectful projects. Exploring the history of frames can also provide valuable ideas for your new crafts, enriching your creative process. Embracing the artistic evolution of frames can help you appreciate their adaptability and inspire innovative approaches in your projects. Furthermore, studying design trends associated with different eras can help you incorporate contemporary elements into your crafts. Ultimately, simple frames open endless possibilities for your creative expression.
How to Choose the Perfect Frame for Your Project
Choosing the right frame for your project starts with understanding the purpose and style you want to achieve. To do this effectively, consider these factors:
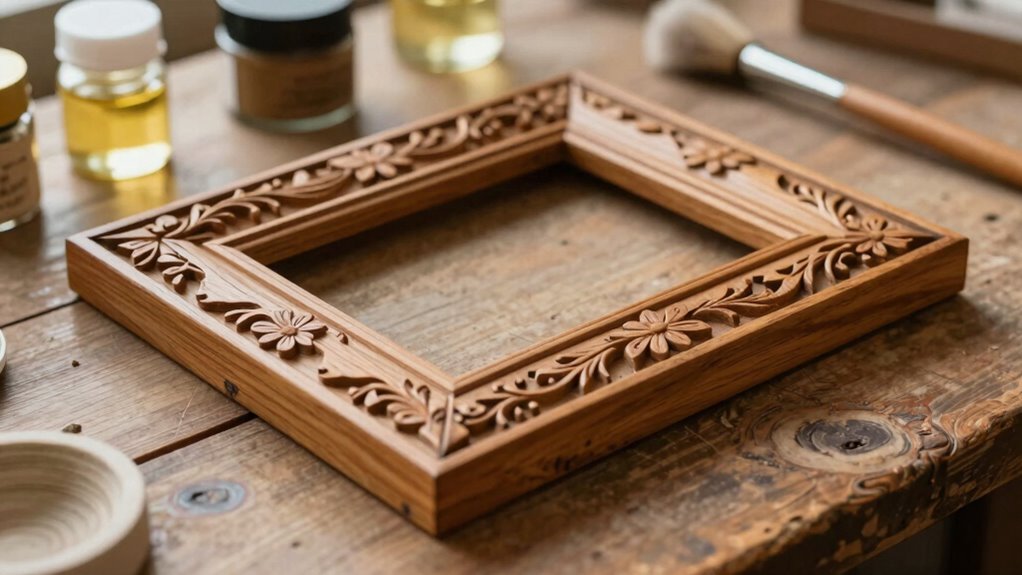
- Choosing materials – Decide if you want a rustic wood, sleek metal, or vintage ornate frame, based on your craft’s theme. Incorporating material durability can help ensure your finished piece remains attractive over time, especially if it will be displayed outdoors or in high-traffic areas. Additionally, examining the material’s longevity can guide you toward options that maintain their appearance and structural integrity over years of use. Knowing the material’s resistance to environmental factors can also be crucial for outdoor displays.
- Framing styles – Select a style that complements your project, such as minimalist, decorative, or distressed.
- Size and proportion – Ensure the frame fits well around your artwork or craft, leaving appropriate borders.
- Color and finish – Match or contrast the frame’s color with your project for visual harmony or pop.
- Material durability – Consider how the material’s longevity will impact the overall look and feel of your finished piece.
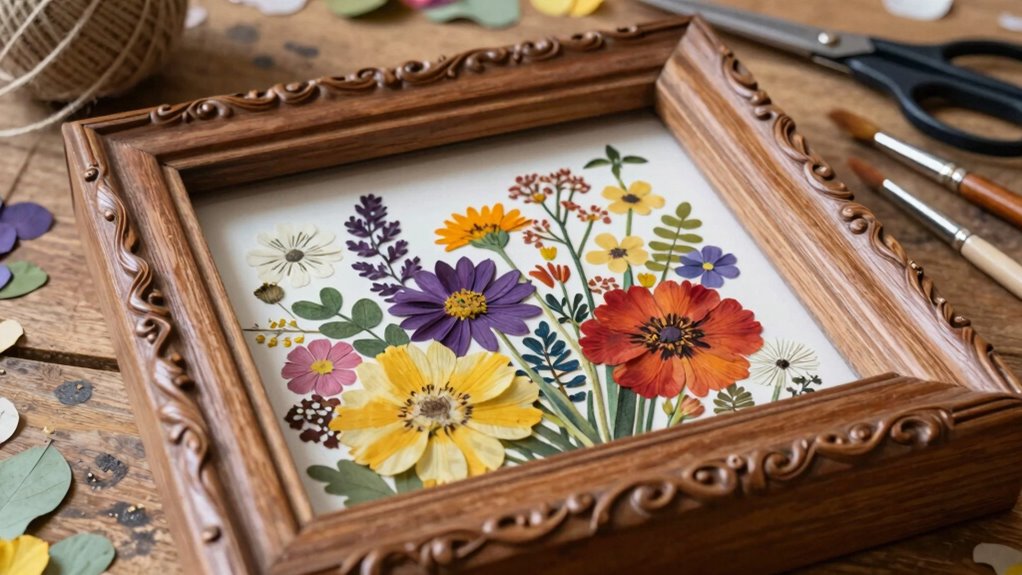
Create Personalized Wall Art With Simple Frames
Creating personalized wall art with simple frames is an easy way to add a meaningful touch to any space. Start by selecting a color palette that complements your room’s decor, whether bold and vibrant or soft and muted. Choose frame materials like sleek metal, classic wood, or lightweight plastic to match your style and the artwork’s vibe. You can create abstract designs, inspirational quotes, or even a collection of photos that tell a story. Print or craft your visuals, then place them in your chosen frame. Keep the design simple for a modern look or add embellishments for a more eclectic feel. This DIY project transforms basic frames into unique, heartfelt wall art that truly reflects your personality.
Make Rustic Photo Displays Using Reclaimed Frames
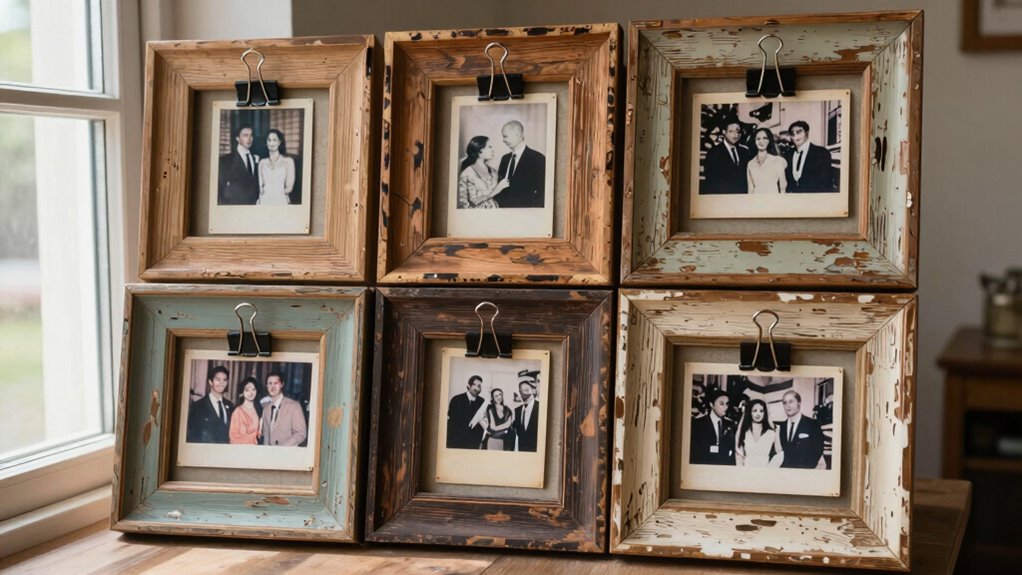
If you’re looking to add a warm, vintage touch to your home decor, rustic photo displays made from reclaimed frames are a perfect choice. These displays bring vintage charm and eco-friendly style into any space. Using reclaimed wood, you can craft a unique, textured backdrop that highlights your favorite photos. Incorporating vital health tips into your home environment can also promote overall well-being. Here are some ideas to get you started:
- Arrange frames in a gallery wall for an eclectic, vintage look.
- Create a hanging display with twine and clothespins for easy photo swapping.
- Paint or distress frames for added rustic appeal.
- Combine different reclaimed frames to add variety and character to your display. Incorporating sustainable materials not only enhances the aesthetic but also supports environmental conservation. Additionally, choosing reclaimed materials can reduce waste and lessen your carbon footprint, making your DIY project more environmentally friendly. This DIY project transforms simple frames into charming, personalized decor with eco-conscious choices.
Build a Chalkboard Frame for Kitchens and Offices
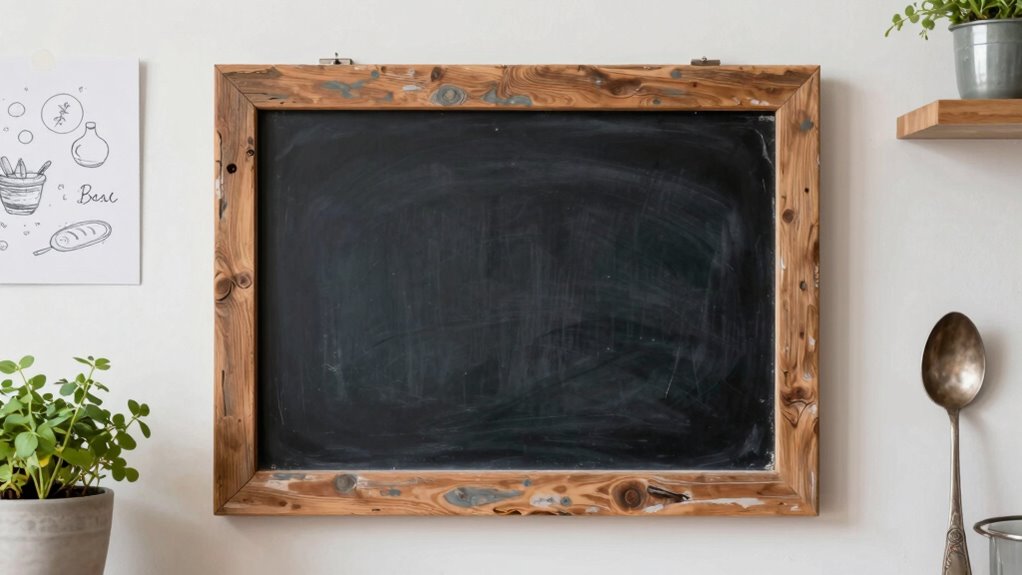
A chalkboard frame adds both functionality and charm to your kitchen or office space, making it easy to jot down reminders, menus, or motivational notes. To create a vintage signage look, repurpose an old frame or build one from eco-friendly materials like reclaimed wood or recycled metal. Sand and paint the frame in neutral or distressed finishes to enhance its vintage appeal. Insert a chalkboard panel, which you can also craft from eco-conscious materials, or repurpose a chalkboard from old signage. This DIY project not only saves money but also adds a personalized touch to your space. Incorporating smart home technology insights can further enhance its functionality and integration into your modern space. Additionally, choosing durable and eco-friendly materials ensures your chalkboard frame remains a sustainable and stylish addition for years to come, aligning with sustainable design principles. Using reclaimed materials not only supports eco-friendly practices but also gives your project a unique, authentic character. Incorporating innovative design techniques can elevate the aesthetic and functionality of your handmade frame even further.
Design Fairy Light Frame Decor to Add a Cozy Touch
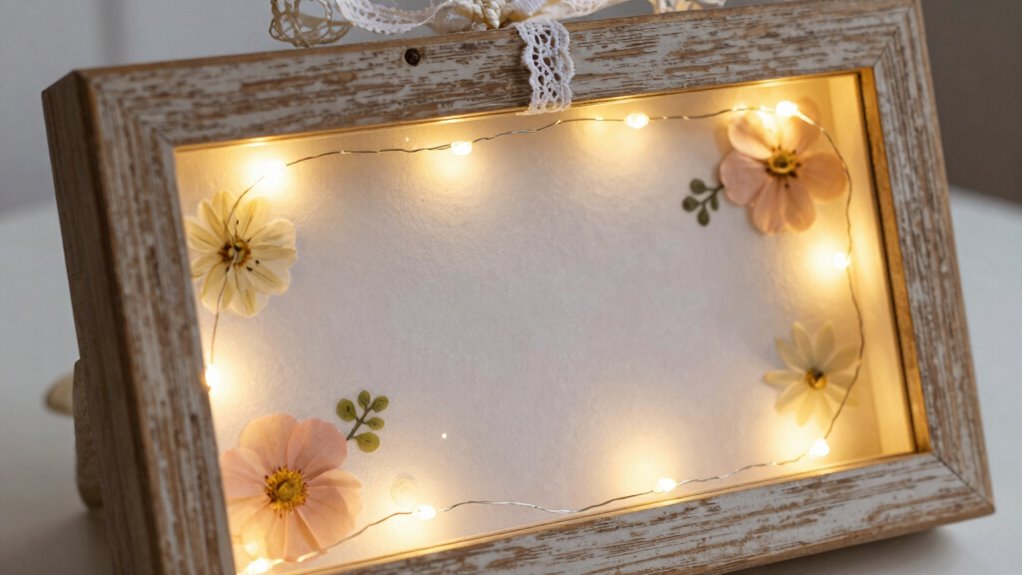
Choosing the right fairy light style can instantly warm up your frame decor, so consider options like warm white or colorful LEDs. Once you’ve selected your lights, experiment with arranging them to highlight your frame’s features and create a cozy ambiance. Play around with different layouts until you find the perfect balance that makes your space inviting. Incorporating market insights can help you choose the most popular and effective lighting options for your decor. Additionally, selecting energy-efficient LEDs ensures your decor remains sustainable and cost-effective over time. For an even more personalized touch, consider DIY lighting arrangements that reflect your unique style and enhance the overall cozy atmosphere. Exploring gadget reviews can also provide helpful tips on the best lighting products suited for your craft project. Utilizing 3D scanning technology can help you design custom light fixtures or decorations that perfectly fit your frame and style.
Selecting Fairy Light Styles
Selecting the right fairy light style can instantly transform your frame decor into a warm and inviting space. When choosing fairy light styles, consider how they complement your overall aesthetic and the frame’s size. For a cozy, vintage look, opt for warm white or Edison bulbs. If you want a playful vibe, colorful or multicolored lights work well. For a delicate and elegant touch, fairy lights with tiny LED bulbs are perfect. Here are some tips for frame selection:
- Match the fairy light style to your room’s theme.
- Choose battery-operated lights for portability.
- Consider the length of the fairy lights for your specific frame.
- Opt for energy-efficient LED options to save power.
Arranging Frame Decor
To create a cozy, inviting atmosphere with your fairy light frame decor, focus on arranging the lights thoughtfully to highlight your design. Start by considering frame restoration; a fresh coat of paint or a new finish can refresh an old frame. If the glass is cracked or cloudy, glass replacement instantly elevates the look and protects your decor. When positioning fairy lights, weave them around the frame’s edges or create a pattern that draws attention to your centerpiece. Keep the lights evenly spaced for a balanced glow. Use the frame’s structure to showcase other elements, like photos or decorative accents. Proper arrangement guarantees your fairy light frame decor feels warm and polished, transforming a simple piece into a striking focal point.
Turn Frames Into Elegant Mirror Accents
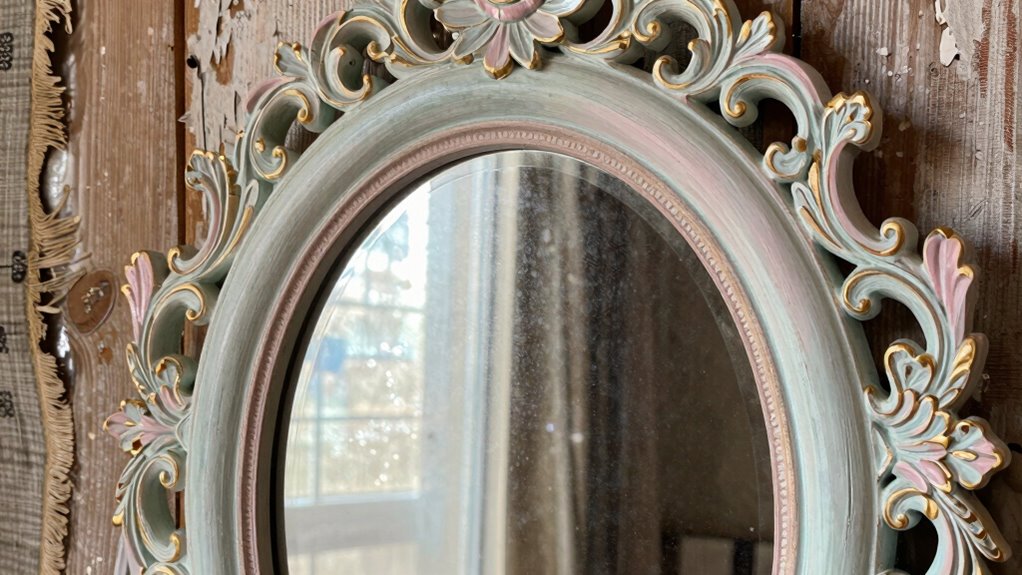
Transforming a simple frame into an elegant mirror accent can instantly elevate your space. Vintage frames add character, and with some frame restoration, they become stunning mirror borders. To start, choose a frame with unique details or a worn look that adds charm. Then, carefully restore it if needed, cleaning and repairing any damage. Next, secure a mirror backing inside the frame, ensuring it’s flush and stable. Finally, add finishing touches like a fresh coat of paint or decorative accents to match your decor. Incorporating child-friendly paint options can make your project safer for homes with little ones. Here are four ideas to enhance your project:
Transform simple frames into elegant, vintage-inspired mirror accents with restoration and decorative touches.
- Use distressed paint for a vintage, shabby-chic look
- Incorporate metallic or gilded finishes for elegance
- Attach small decorative elements for added detail
- Choose a size that complements your space for maximum impact
Create Vibrant Frame Collages for Visual Impact
Ever thought about how a vibrant frame collage can instantly energize a room? Using color theory, you can select frames in bold, contrasting hues or harmonious shades to create visual excitement. Mix and match frame materials like wood, metal, and even plastic to add texture and depth. Arrange your collage with balance, but don’t be afraid to experiment with overlapping or asymmetrical layouts for a dynamic look. Bright colors like turquoise, coral, and lime green can make your space pop, while neutral tones offer a sophisticated backdrop. This approach not only showcases your favorite pictures or artwork but also turns your wall into a lively focal point. Keep your design cohesive by considering the overall color palette and frame styles for maximum impact. Incorporating a website dashboard can help you plan and monitor your design projects efficiently.
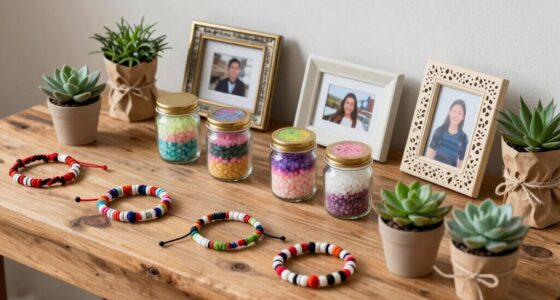
Transform Frames Into Jewelry and Accessory Holders

You can turn a simple frame into a stylish jewelry display or a customizable accessory organizer that fits your space. By adding hooks, wires, or small compartments, you make it easy to showcase your favorite pieces. This quick upgrade offers a practical and personalized way to keep your accessories organized and within reach.
Stylish Jewelry Display Options
A stylish jewelry display can instantly elevate your space while keeping your accessories organized and easy to access. You can transform simple frames into stunning holders using vintage textiles or eco-friendly materials. These options add charm and sustainability to your decor. To get started:
- Cover the frame with vintage textiles like lace or embroidered fabrics for a textured, nostalgic look.
- Attach small hooks or clips to the frame’s edges for necklaces and earrings.
- Use reclaimed wood or bamboo for a sturdy, eco-friendly base.
- Decorate with painted or stained frames that complement your room’s color scheme.
These ideas make your jewelry display functional and stylish, blending eco-consciousness with vintage charm. It’s a creative way to showcase your accessories while adding personality to your space.
Customizable Accessory Organizers
Building on the idea of transforming frames into stylish displays, you can also customize them into versatile accessory organizers. Start by lining the frame with vintage textiles or botanical prints to add a unique touch. Attach small hooks or pins inside the frame to hold jewelry, scarves, or sunglasses. You can also add mesh or fabric backing for easier organization. For a more personalized look, incorporate decorative elements like lace or ribbon. These frames turn into charming, functional pieces that keep your accessories tidy and accessible. Plus, using vintage textiles or botanical prints gives each organizer a distinctive, handcrafted feel. Whether hung on a wall or placed on a dresser, these customizable accessory organizers are practical, stylish, and easy to tailor to your space.
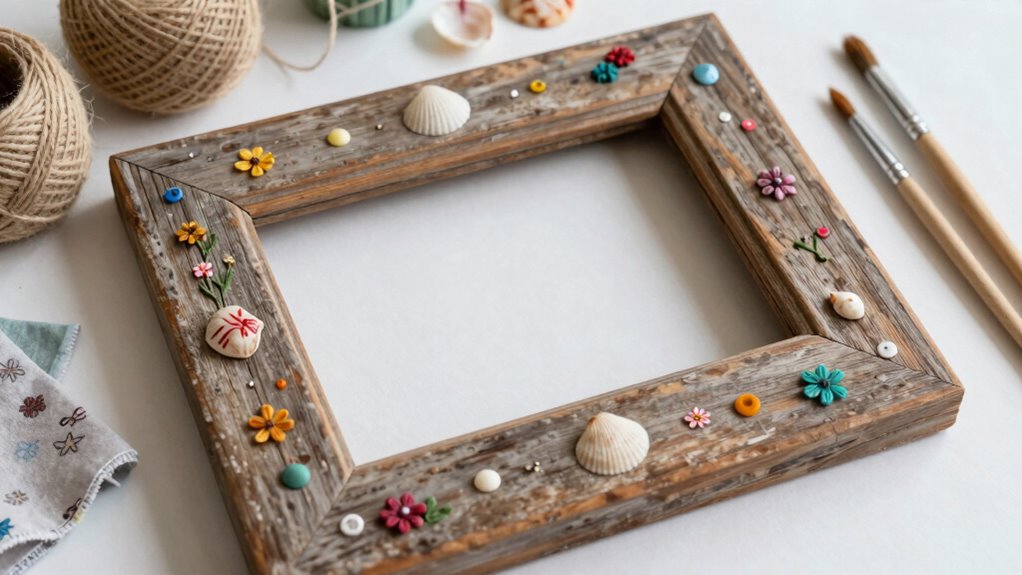
Decorate Frames With Paint, Fabric, and Embellishments
- Use metallic or chalk paint for a vintage or modern look.
- Cover the frame with fabric for a soft, textured finish.
- Add embellishments like faux pearls or rhinestones for sparkle.
- Mix and match paint techniques with different frame embellishments for a personalized touch.
These methods let your creativity shine while making a memorable, handcrafted frame.
Seasonal and Holiday Frame Ideas for Every Occasion

Celebrating seasons and holidays with themed frames adds a festive touch to your decor and makes your photos stand out. You can create stunning seasonal wreaths or holiday centerpieces to enhance your frames. For winter, add faux pine, berries, and ornaments around the frame’s border, creating a cozy, festive look. During spring, incorporate fresh flowers or pastel ribbons to evoke renewal and freshness. For Halloween, use mini pumpkins, black lace, or spooky charms to craft a hauntingly fun frame. Christmas frames can feature holly, pinecones, or glitter accents. These themed touches make your photos pop and turn simple frames into eye-catching holiday decor. With just a few craft supplies, you can celebrate every occasion with personalized, seasonal flair.
Make a Miniature Art Gallery in a Frame
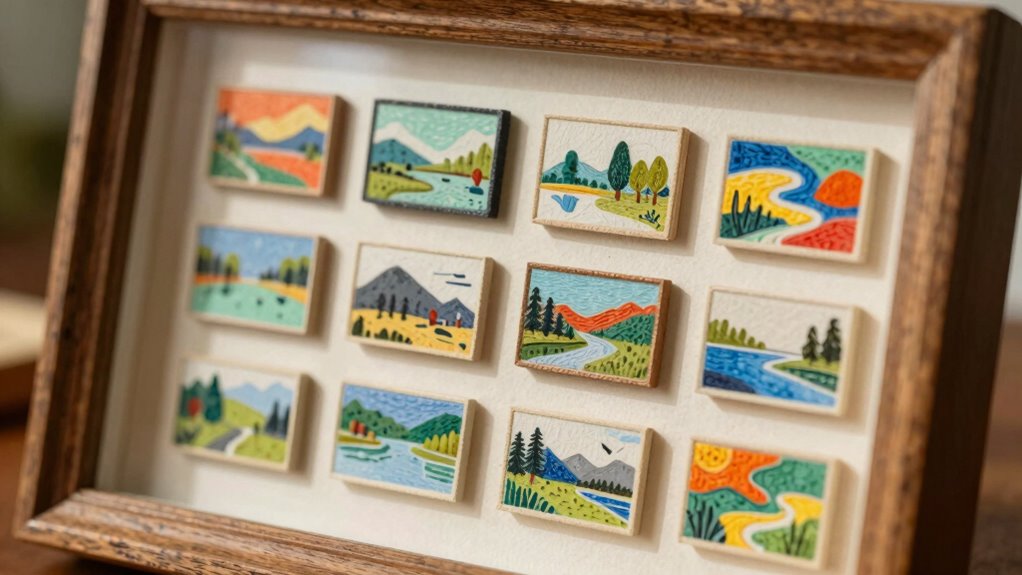
Creating a miniature art gallery in a frame is a fun way to showcase your favorite small pieces. Choose interesting miniature art, arrange them creatively, and experiment with framing and display options. This approach lets you personalize your space with a unique, curated look.
Selecting Miniature Art Pieces
Have you ever wondered how to choose the perfect miniature art pieces for your tiny gallery? Picking the right items makes your frame truly stand out. Start by considering vintage textiles, which add texture and a nostalgic touch. Next, select botanical prints that bring natural beauty and freshness. Look for diverse colors and styles to create visual interest. Also, think about scale—small, detailed pieces work best in miniature frames. Finally, aim for a cohesive theme or color palette to tie everything together. Combining vintage textiles with botanical prints offers a charming contrast. Keep your selections balanced and intentional, so each piece complements the others and enhances your miniature art gallery.
Arranging Art Creatively
To make your miniature art gallery inside a frame truly eye-catching, experiment with different arrangements that highlight each piece’s unique charm. Use color theory to create visual harmony—pair warm tones with cool hues or contrasting shades for impact. Play with layering or overlapping artwork for depth, or arrange pieces symmetrically for balance. Consider framing materials that complement your art; sleek metal frames emphasize modernity, while ornate wood adds warmth. Mix different sizes and orientations to keep the display dynamic. Don’t be afraid to leave some space between pieces or cluster smaller artworks together. The goal is to craft a cohesive yet lively arrangement that draws viewers in and showcases the individuality of each piece within your miniature gallery.
Framing and Display Tips
Once you’ve arranged your miniature artworks with thoughtfulness, the next step is to choose the right framing and display techniques to enhance their visual impact. Focus on framing materials that complement the artwork’s historical significance, such as vintage wood or ornate metal for an antique feel. Consider clear glass or acrylic to protect delicate details without distracting from the art. To create a cohesive miniature gallery, try these tips:
- Match frame styles to the artwork’s era or theme.
- Use uniform matting for a clean, organized look.
- Vary frame sizes for visual interest while maintaining balance.
- Hang at eye level for *ideal* viewing and appreciation.
These choices will highlight your miniature gallery’s charm and storytelling power.
Repurpose Old Frames Into Functional Wall Shelves
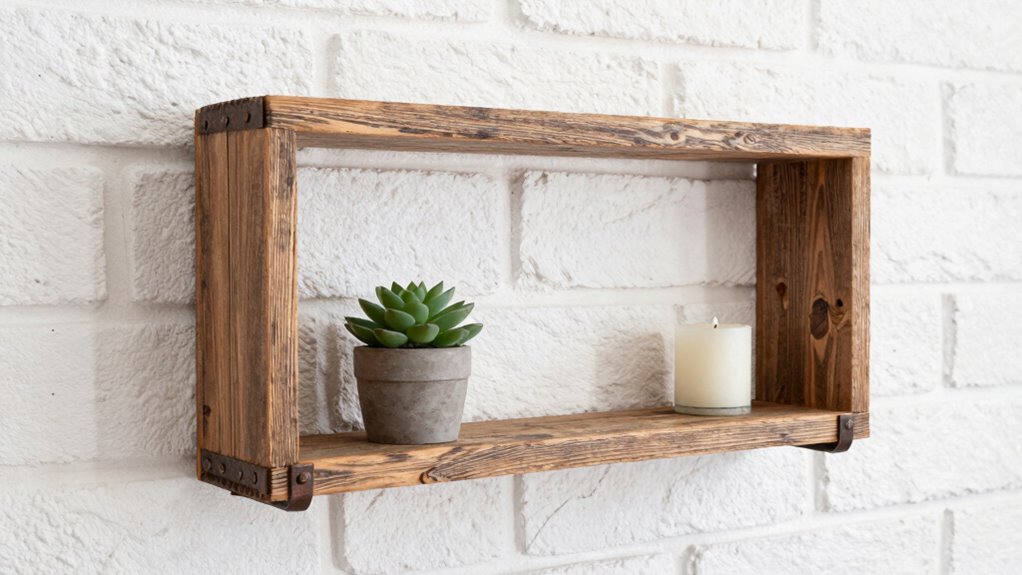
Transforming old frames into functional wall shelves is a creative way to breathe new life into forgotten decor pieces. Start by removing the glass and backing, then attach sturdy brackets inside the frame to support weight. You can use these shelves for a charming tableware display in your kitchen or dining area, showcasing your favorite dishes or cups. Alternatively, hang a series of frames in your garden to create a unique garden trellis, providing both visual interest and support for climbing plants. Paint the frames in bright colors or distressed finishes to match your decor style. Secure the shelves firmly to guarantee stability, and you’ll have a versatile, handmade piece that combines aesthetics with practicality. This simple transformation adds character and function to any space.
Build a Colorful Frame Ladder for Display and Storage
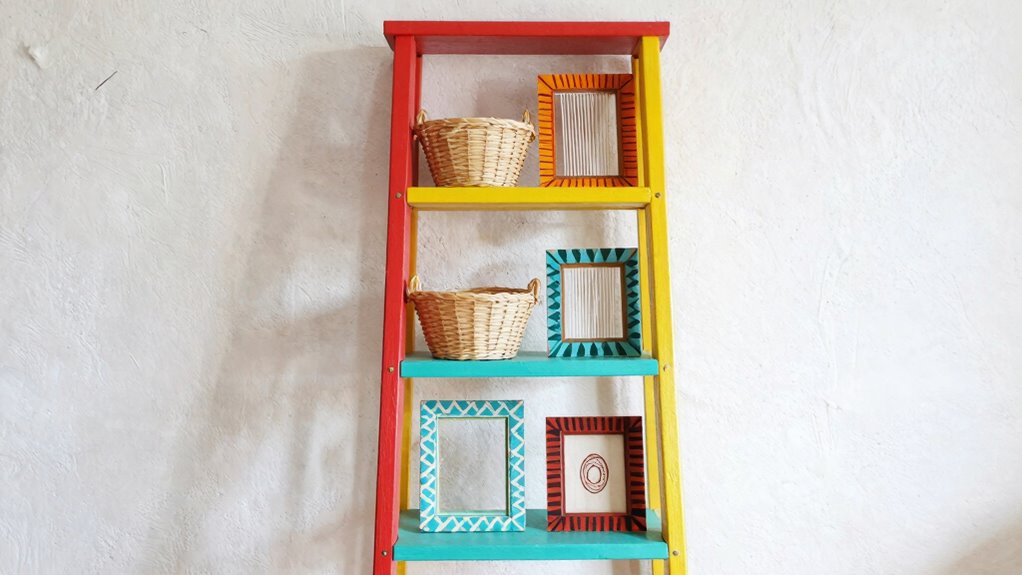
Creating a colorful frame ladder is a fun and practical way to add vertical storage and display space to your home. To start, select frames with vibrant, contrasting frame colors to make your ladder stand out. Next, consider material choices—wood offers durability, while metal provides a sleek look. Here are some ideas:
- Paint or stain each frame in different bright colors for a lively effect.
- Use sturdy, lightweight materials like bamboo or PVC pipes for the ladder sides.
- Attach the frames with strong hooks or brackets, ensuring stability.
- Arrange the frames vertically, leaving enough space for hanging or stacking items.
This project combines style and function, giving you a customizable, eye-catching display piece that’s both decorative and useful.
Craft a Custom Memo or Inspiration Board
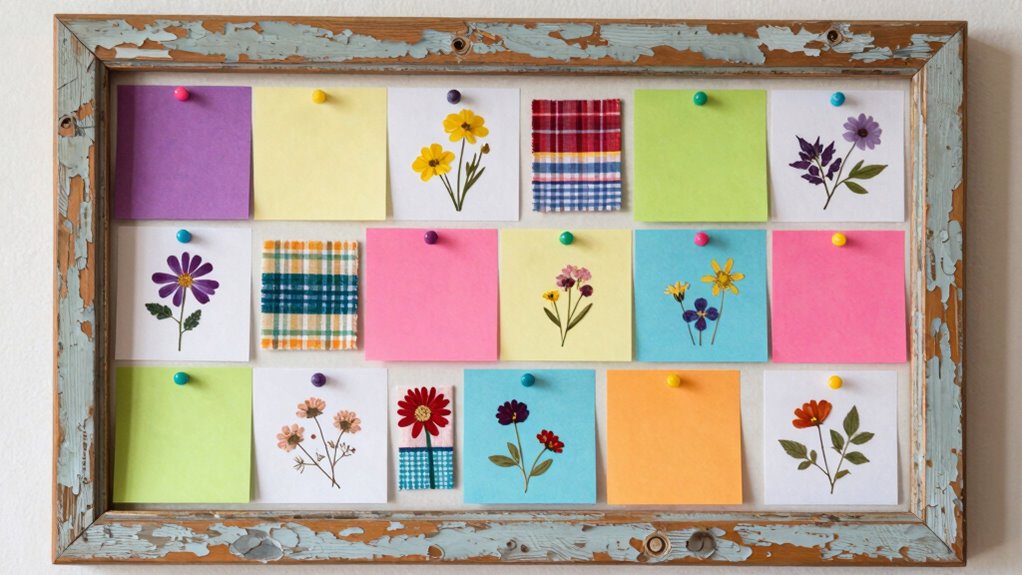
Start by choosing a frame that matches your space and style, whether it’s sleek, rustic, or colorful. Personalize your board by adding photos that inspire you or keep important notes visible. This simple project transforms a basic frame into a functional and meaningful display.
Choosing the Right Frame
- Match the frame color to existing decor for harmony.
- Choose framing materials that align with your style—rustic, modern, or vintage.
- Use a frame that enhances the visual impact without overpowering your content.
- Consider the thickness of the frame to balance the size of your board.
Selecting thoughtfully guarantees your project becomes a stylish, cohesive addition to your space.
Personalizing With Photos
Have you considered how adding personal photos can transform a simple frame into a meaningful and inspiring display? By arranging your favorite memories alongside vintage furniture pieces, you create a cozy, nostalgic vibe. Use the frame to craft a custom memo or inspiration board, blending photos with small plant arrangements for a fresh touch. Incorporate tiny succulents or air plants to add life and color, enhancing the visual appeal. This personalized setup can serve as a daily motivator or a heartfelt gift. Mix in vintage elements for an eclectic feel that ties everything together. With a little creativity, your photos and plant arrangements turn a basic frame into a unique, lively display full of personality and story.
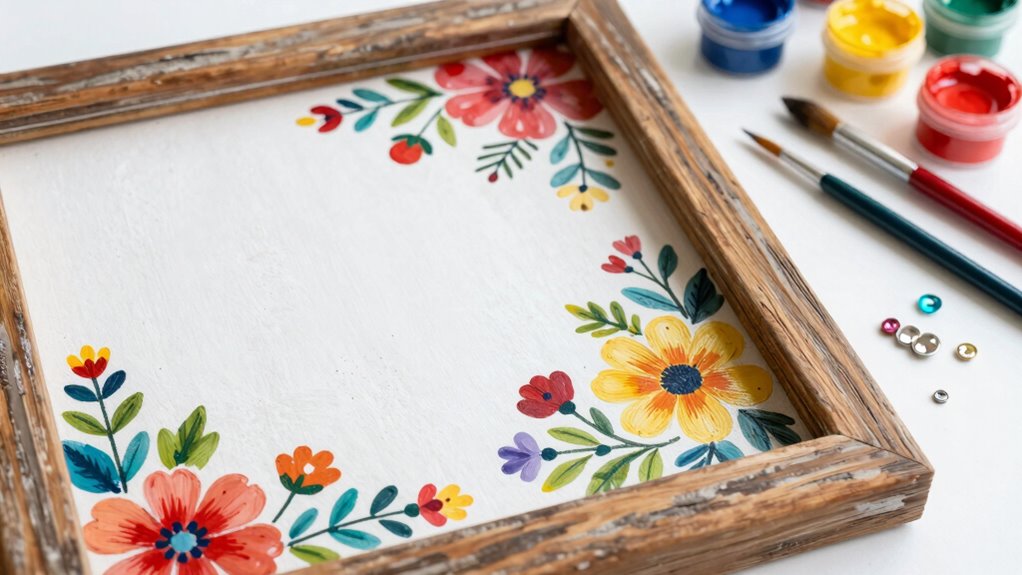
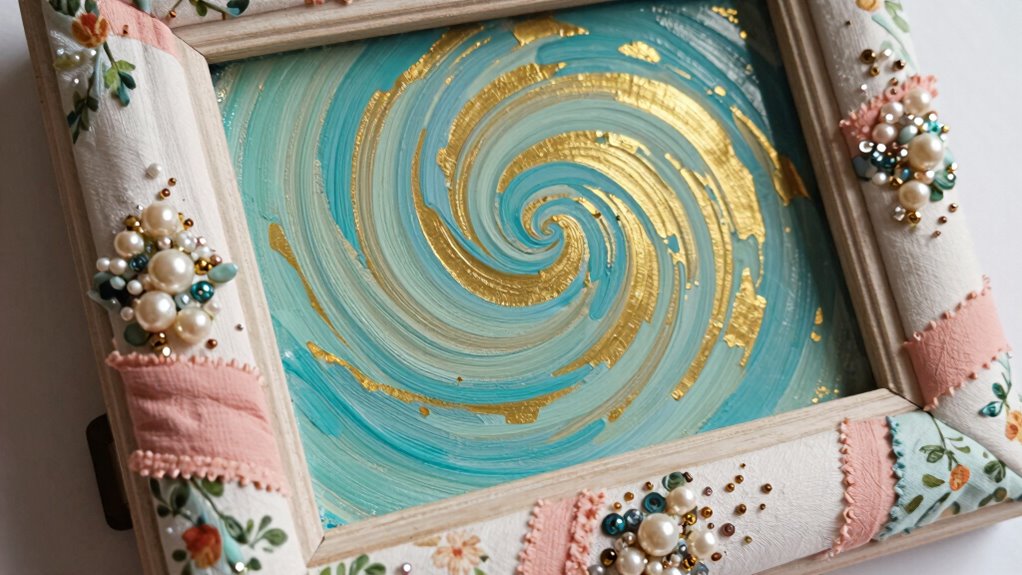
Create Statement Art Using Mixed Media on Frames
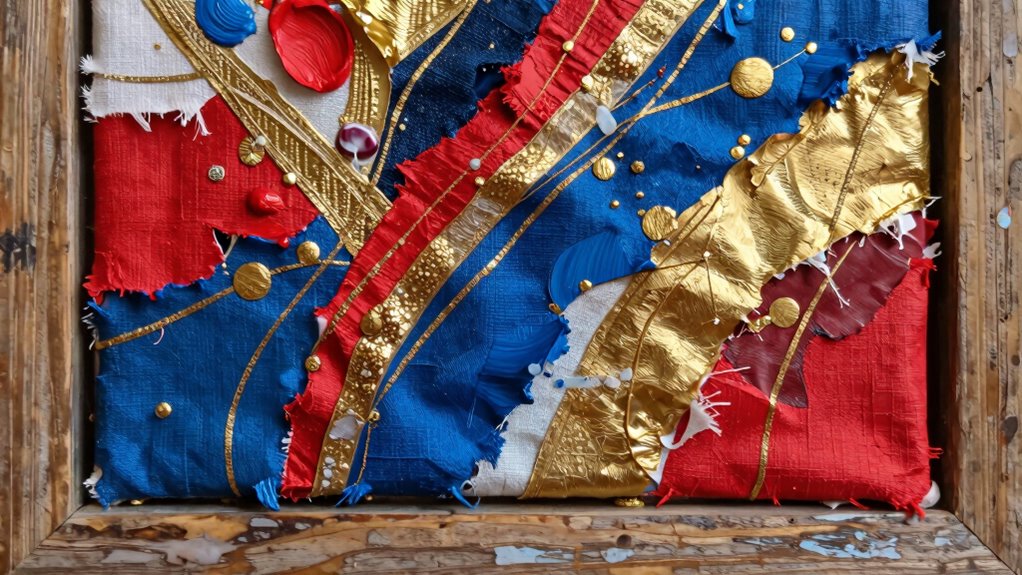
Adding mixed media to your frames transforms simple art into bold, eye-catching statements. You can experiment with abstract patterns or vibrant color blending to make your piece stand out. Use textured materials like fabric, paper, or even metal to add dimension and depth. Incorporate acrylics, ink, or watercolors to create dynamic backgrounds or focal points. Here are some ideas to get started:
- Layer different paints and papers for a textured, abstract pattern.
- Blend colors seamlessly for a vibrant, eye-catching background.
- Add elements like fabric or found objects for unique texture.
- Use stencils or masks to create bold shapes and contrasts.
Mixing media allows you to craft statement art that truly reflects your style on any frame.
Fun and Easy Kids’ Frame Crafts for Learning and Play
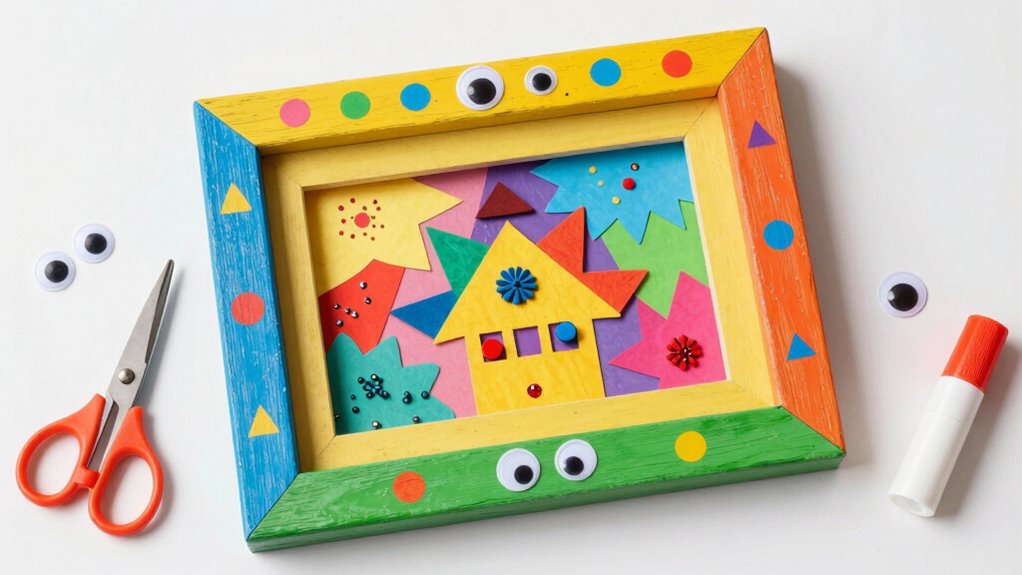
Transforming frames with mixed media opens up exciting creative possibilities, inspiring kids to explore their artistic side. For fun and easy kids’ frame crafts, vintage inspiration can spark their imagination. Use eco-friendly materials like recycled paper, natural yarns, and plant-based paints to make the projects both engaging and environmentally conscious. Kids can decorate frames with colorful buttons, fabric scraps, or pressed flowers, turning simple supplies into learning tools. These crafts promote fine motor skills and encourage storytelling through visual elements. Plus, working with sustainable materials teaches kids about caring for the planet. Whether they’re creating a photo frame or a decorative piece, these projects make learning fun and foster creativity while emphasizing eco-awareness.
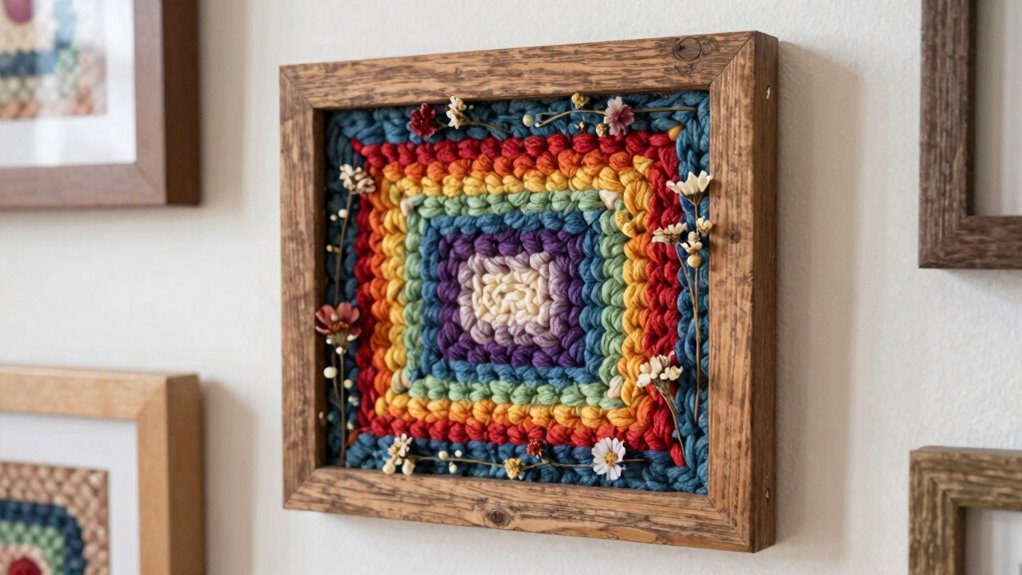
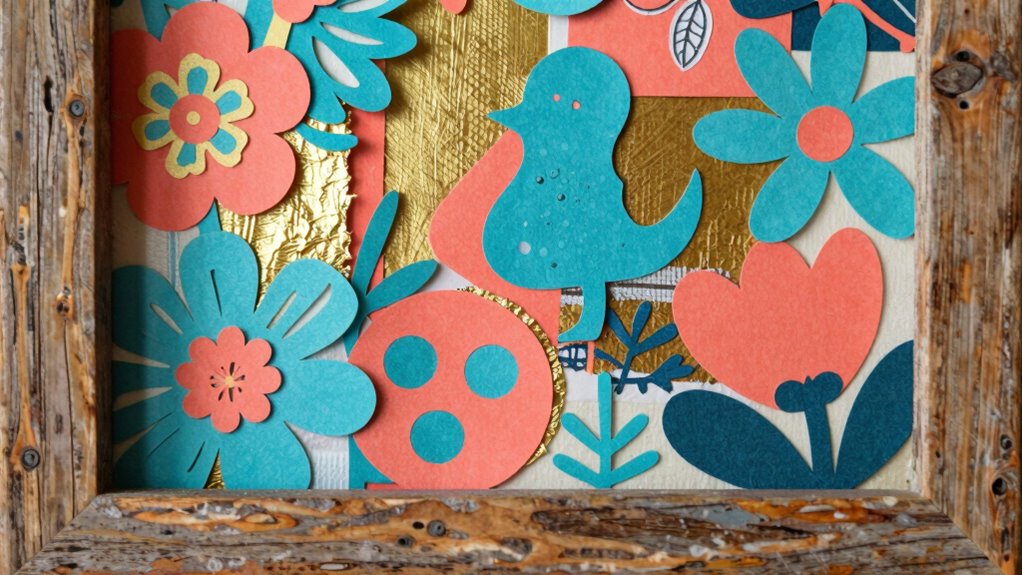
Add Texture and Depth With Layered Frame Art
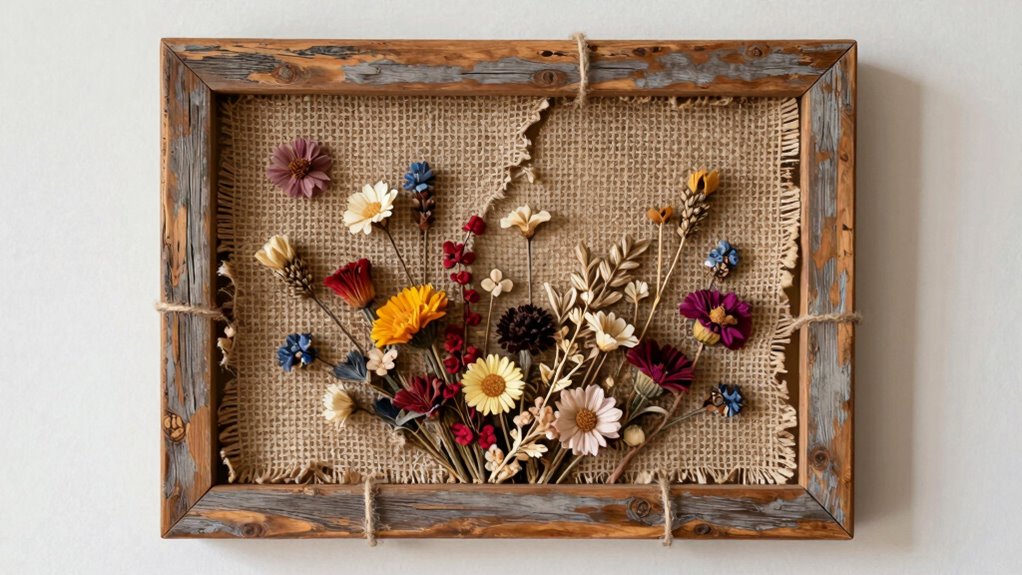
Layering different materials and elements on a simple frame instantly creates a sense of texture and depth, making your artwork stand out. To achieve this, incorporate textured accents like fabric, burlap, or embossed paper for added tactile interest. Use depth layering by stacking various elements at different heights, such as cutouts, small objects, or layered paper pieces, for visual intrigue.
Layer textures and layers with fabric, paper, and small objects for a dynamic, multidimensional artwork.
- Attach textured accents to your frame’s surface for a tactile feel.
- Use foam or cardboard spacers to create layers that pop out.
- Combine materials like wood, fabric, and paper for rich textures.
- Vary the sizes and positioning of elements to enhance depth layering.
These techniques will turn a simple frame into an engaging, multidimensional piece of art.
How to Care for and Maintain Your Handmade Frame Crafts
To keep your handmade frame crafts looking their best, you need to know the right cleaning techniques and proper storage methods. Handling and display care are essential to prevent damage and maintain their beauty over time. By following simple tips, you can guarantee your creations stay vibrant and well-preserved.
Cleaning Techniques and Tips
Proper cleaning and maintenance are essential to keep your handmade frame crafts looking their best over time. Regular care preserves their beauty and supports art therapy benefits, especially when using sustainable materials. To keep your frames in top shape:
- Gently dust with a soft cloth to remove surface dirt without damaging delicate surfaces.
- Use a slightly damp cloth for stubborn spots, avoiding harsh chemicals that could harm eco-friendly materials.
- Avoid excessive moisture to prevent warping or mold, especially on wooden or woven frames.
- Occasionally, apply a light coat of natural or eco-friendly polish to preserve the finish and enhance longevity.
Following these tips helps maintain your crafts’ appearance and integrity, ensuring they continue to inspire and serve as meaningful artistic expressions.
Proper Storage Methods
Storing your handmade frame crafts properly is essential to keep them looking their best over time. To protect their frame durability, choose storage solutions that prevent warping, cracking, or fading. Keep them in a cool, dry place away from direct sunlight, which can weaken materials and cause discoloration. Use acid-free tissue paper or bubble wrap to cushion the frames and prevent scratches or dents. Store them upright or flat, depending on their size and shape, ensuring they aren’t stacked tightly to avoid pressure damage. Regularly inspect your stored crafts for signs of moisture or pests, and maintain good airflow around them. Proper storage not only preserves their appearance but also extends the life of your handmade frame crafts, keeping them beautiful for years to come.
Handling and Display Care
Handling your handmade frame crafts with care is essential to maintaining their beauty and integrity. Proper care prevents damage and guarantees they remain vibrant over time. When displaying your crafts, consider color theory to enhance visual harmony, choosing framing materials that complement your artwork’s hues.
To keep your crafts in top shape:
- Use gentle cleaning methods, avoiding harsh chemicals on frames and artwork.
- Keep your pieces away from direct sunlight to prevent fading of colors.
- Choose framing materials that are acid-free and archival-quality for longevity.
- Handle frames by the edges to avoid fingerprints or smudges on the surface.
Following these tips helps preserve the color vibrancy and structural integrity of your handmade crafts, ensuring they remain stunning for years.
Gift Ideas: Present Your Handmade Frame Creations
When it comes to giving handmade frames as gifts, the key is to showcase their personal touch and creativity. Incorporate vintage aesthetics to add charm and timeless appeal, making your gift stand out. Using eco-friendly materials not only shows thoughtfulness but also promotes sustainability, which many recipients appreciate. You can embellish the frame with recycled fabrics, pressed flowers, or vintage buttons for a unique look. Personalize it further by adding a meaningful photo, quote, or artwork that resonates with the recipient. Presenting your handmade frame as a gift demonstrates effort and care, making it more than just a decorative piece. Whether for birthdays, holidays, or special occasions, your thoughtful creation will surely be cherished for years to come.
Frequently Asked Questions
What Eco-Friendly Materials Can I Use for Frame Crafts?
You can use eco-friendly materials like recycled wood to craft your frames, giving old wood a new life. Biodegradable materials such as bamboo, cork, or natural fibers like jute or hemp are also great options. These materials break down naturally, reducing environmental impact. Using recycled or biodegradable materials not only makes your craft sustainable but also adds a unique, rustic charm to your handmade frames.
How Do I Select the Right Size Frame for My Project?
Choosing the right size frame is like fitting a puzzle piece perfectly; it should complement your project without overwhelming it. Consider the artwork’s dimensions and aim for a balance that enhances its visual appeal. Think about frame durability and color coordination—select a size that not only supports your craft but also harmonizes with its style. Measure carefully and visualize your project inside different frames to find the perfect fit.
Can I Customize Frames for Outdoor Use?
Yes, you can customize frames for outdoor use by choosing materials with outdoor durability and weather resistance. Opt for metal, PVC, or treated wood that withstands moisture and sun exposure. Seal or paint the frame with weatherproof finishes to enhance longevity. By selecting the right materials and protective coatings, your customized outdoor frame will resist the elements and maintain its appearance, ensuring your craft remains beautiful and durable over time.
What Tools Are Essential for Frame Craft Projects?
Think of yourself as an artist preparing for a masterpiece—essential tools are your palette. For frame decoration and material selection, you’ll need scissors, a hot glue gun, paintbrushes, and sandpaper. A ruler and pencil help with precise measurements. These tools let you transform a simple frame into a stunning piece, whether you’re adding embellishments or customizing for outdoor use. With them, your creative vision comes effortlessly to life.
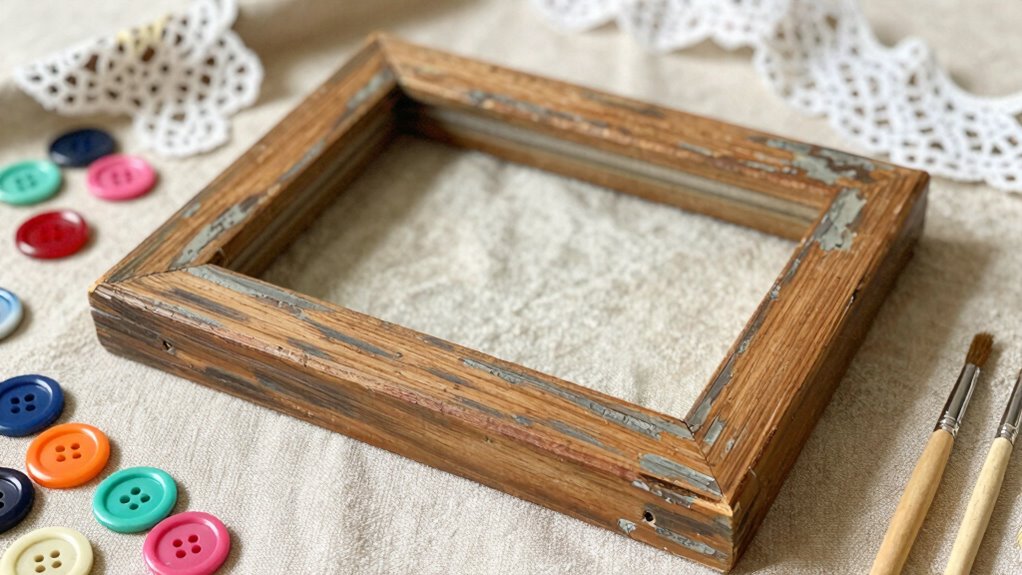
How Do I Repair or Restore Old or Damaged Frames?
To repair or restore old or damaged frames, start by cleaning the frame thoroughly to remove dust and grime. If the paint is chipped or faded, consider repainting it with a suitable color, ensuring you sand the surface first for better adhesion. For structural damage, use wood glue or filler to fix cracks or breaks, then sand smooth before repainting. This process revives your frame’s appearance and extends its life.
Conclusion
With just a simple frame, you hold the power to transform ordinary materials into extraordinary art. As you explore these 20 creative ideas, remember that each project is a doorway to self-expression and joy. Embrace the magic of crafting—where your hands breathe life into everyday objects, turning them into treasured keepsakes. So, why not start today? After all, the canvas of your imagination is endless, waiting to be painted with your unique touch.