
To add chic metallic accents to your DIY decor, start by preparing surfaces thoroughly to guarantee good adhesion. Use high-quality foil or leaf to create polished wall art, gilded vases, or metallic furniture details. Incorporate these finishes into seasonal decorations, candle holders, or personalized signs for a sophisticated touch. Seal your projects with protective coatings to keep the metallic look vibrant. Keep exploring for tips and techniques that will elevate your metallic projects even further.
Key Takeaways
- Prepare surfaces thoroughly and choose high-quality metallic leaf or foil for a polished, durable finish.
- Use appropriate adhesives and tools to apply foil or leaf smoothly, avoiding bubbles and uneven edges.
- Seal metallic accents with clear sealers or wax to protect against tarnishing and maintain shine.
- Incorporate metallic details into furniture, frames, or signage for chic, personalized decor accents.
- Experiment with different textures and finishes, like matte or brushed, to create modern, eye-catching metallic designs.
Applying Metallic Foil to Wall Art and Frames

Applying metallic foil to wall art and frames is a simple way to add a touch of elegance to your decor. You’ll immediately notice how metallic textures transform ordinary pieces into eye-catching accents. The key lies in foil craftsmanship—carefully applying thin sheets of metallic foil ensures a smooth, polished finish. Start by cleaning your surface thoroughly, then apply adhesive designed for foil, following the product instructions. Gently press the foil onto the surface, smoothing out any bubbles or wrinkles. Trim excess foil for a clean edge, and seal it with a clear topcoat for durability. This technique allows you to customize frames and artwork effortlessly, giving your space a sophisticated, luxe look with minimal effort. Using the right materials can also enhance overall comfort and ensure long-lasting results. Incorporating proper surface preparation techniques can help keep your decor looking pristine and clutter-free, making your DIY projects even more enjoyable. Additionally, paying attention to moisture control can prevent damage to the metallic foil over time, especially in humid environments.
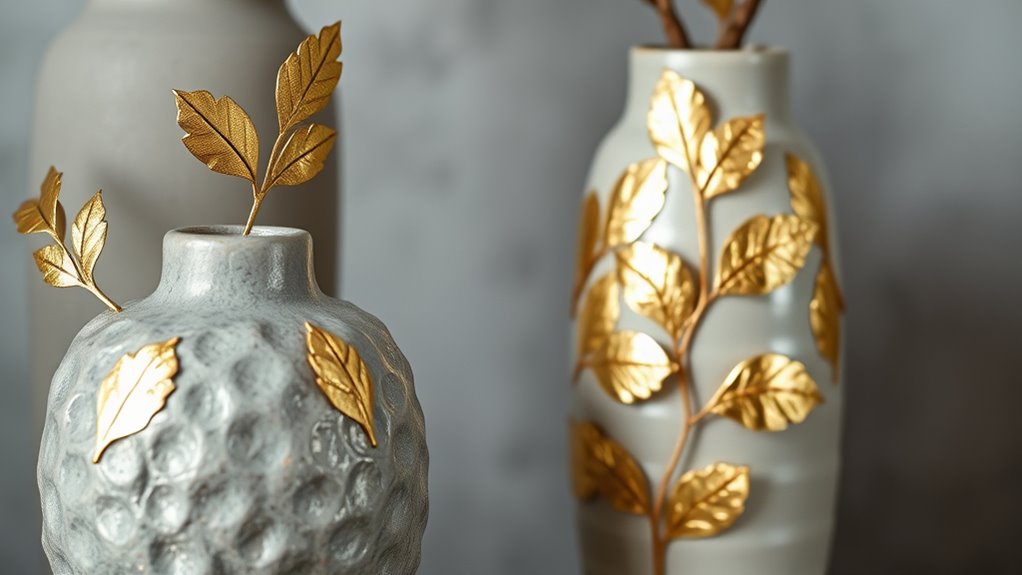
Creating Gilded Vases and Containers With Leaf Embellishments

To create stunning gilded vases and containers, start by choosing the right type of leaf, like real gold or silver leaf for a luxe finish. Next, guarantee your surfaces are clean and smooth so the adhesive sticks evenly and securely. Applying a protective sealant after the leaf application can help preserve and enhance the finish over time. Additionally, selecting the appropriate adhesive ensures that the leaf adheres properly and lasts longer. Finally, apply the adhesive carefully, following the instructions, to achieve a flawless and durable leaf embellishment. Incorporating advanced AI technology can help design intricate patterns or customize your decor, elevating your craft projects to a new level of sophistication.
Selecting the Right Leaf
Choosing the right leaf is essential for achieving a stunning gilded effect on your vases and containers. The best option is metal leaf, which comes in various finishes like gold, silver, and copper. When selecting foil, look for high-quality foil selection that is thin and flexible, making it easier to conform to curves and details. Real metal leaf offers a rich, authentic look, but faux alternatives can work if you prefer a more affordable or eco-friendly option. Consider the size and shape of your project—smaller, intricate designs benefit from delicate leaf, while larger surfaces can handle broader sheets. Ultimately, selecting the appropriate foil and leaf type will ensure your embellishments look polished, vibrant, and professional.
Preparing Surfaces Properly
Before attaching your leaf embellishments, you need to prepare the surface thoroughly to guarantee a smooth, durable finish. Start by cleaning the surface with a mild soap solution to remove dust, grease, or residue. If you’re working with porous materials like clay or wood, lightly sand them to create a better grip for adhesives. Applying a metallic patina beforehand can add depth and richness to your design. For leaf embossing, ensure the surface is smooth and free of bumps so the details pop. Use a primer if necessary, especially on glossy or painted surfaces, to help the leaf adhere better. Proper preparation helps your gilded vase or container withstand wear and highlights the beauty of metallic accents.
- Clean and sand the surface for idealadhesion
- Use a metallic patina to add depth
- Guaranteesmoothness for detailed leaf embossing
- Apply primer if needed for better grip
Applying Adhesive Techniques
Once you’ve prepared your surface, the next step is to apply the adhesive that will secure your leaf embellishments. For metallic textures, choose an adhesive specifically designed for leafing, such as a gilding adhesive or a water-based glue. Use a small brush or a spatula to spread a thin, even layer of adhesive over the area where you want the metallic accents. Be careful to avoid over-application, as excess adhesive can seep out and ruin the finish. Follow the manufacturer’s instructions for drying time before applying the leaf. Proper adhesive application guarantees the leaf adheres smoothly, creating a seamless metallic look. This step is vital for achieving professional-looking gilded vases and containers with beautifully secure leaf embellishments.
Designing Elegant Metallic Accents on Furniture Pieces

Adding metallic accents to furniture can instantly elevate your space, creating an elegant and modern look. To achieve stunning furniture design, focus on highlighting edges, handles, or tabletops with foil or leaf. Use stencils or painter’s tape to create clean lines, ensuring your metallic accents look sleek. Combining matte and shiny finishes adds dimension and sophistication. For a cohesive style, choose metallic tones that complement your existing decor. Experiment with different application techniques, like dry brushing or gilding, to add texture. Remember, less is more—subtle metallic details often make the biggest impact. Incorporating metallic finishes thoughtfully can enhance your interior. To seamlessly blend metallic accents with rustic elements, consider incorporating natural textures, which can add warmth and authenticity. Additionally, understanding layer concepts can help you organize your design layers for a more polished look. When selecting the right technique, keep in mind how color temperature adjustments can influence the overall ambiance of your space. Here are some ideas to inspire you:
Adding subtle metallic accents can transform furniture with elegance and modern charm.
- Accent the edges of a coffee table
- Add metallic handles to cabinets
- Highlight decorative carvings
- Create a metallic strip along furniture borders
Crafting Personalized Metallic Nameplates and Signs

Creating personalized metallic nameplates and signs allows you to add a distinctive touch to your space, whether for home decor, events, or branding. Using metallic typography, you can craft eye-catching labels that instantly elevate any setting. Start by choosing a font style that reflects your personality or theme. Then, use foil stencil art to create crisp, shiny designs on your signs. Applying metallic foil with stencils is a simple way to achieve a professional look, even if you’re a beginner. You can customize with names, quotes, or logos for a truly personal touch. These DIY projects not only showcase your creativity but also add a luxurious, metallic accent that instantly draws attention and enhances your decor.
Adding Metallic Touches to Candle Holders and Lanterns

Choosing the right metallic finish can instantly elevate your candle holders and lanterns. Once you’ve picked your preferred foil technique, you’ll want to safeguard your work with proper sealing methods. These steps ensure your metallic accents stay vibrant and durable over time. Incorporating metallic sealing techniques in your project process can also help you explore innovative ways to add metallic touches. Using sound design principles such as proper layering and manipulation can enhance the visual impact of your metallic accents, making them truly stand out. Additionally, selecting the appropriate dog names can add a personalized and stylish touch to your project, especially if you’re customizing items for pet lovers. To ensure your metallic accents do not fade or tarnish, choosing high-quality vetted materials for sealing can make a significant difference in the longevity of your craft.
Selecting Metallic Finishes
Selecting the right metallic finish can instantly elevate the look of your candle holders and lanterns. Your choice of metallic paint or finish options influences the style and mood of your decor. Consider whether you want a sleek, modern vibe or a vintage feel. Matte finishes add sophistication, while glossy options create a bold statement. You can also explore brushed or hammered textures for added dimension. Think about the overall color scheme and whether you prefer classic gold, silver, or trendy rose gold tones. Testing small areas first helps you see how the finish complements your pieces. Remember, your metallic finish choice sets the tone, so pick one that matches your decor style and personal taste.
- Matte vs. gloss finish options
- Warm gold vs. cool silver tones
- Textured metallic paint for dimension
- Trending metallic colors for 2024
Applying Foil Techniques
Applying foil techniques is a simple way to add a striking metallic accent to your candle holders and lanterns. To achieve a sleek metallic texture, start by choosing the right foil, such as adhesive or craft foil. Clean your surface thoroughly to guarantee proper adhesion. Use foil application techniques like smoothing the foil with a burnishing tool or your fingers to eliminate air bubbles and wrinkles. Carefully cut excess foil for clean edges. For a seamless finish, press the foil firmly onto curves and edges. This method allows you to create bold metallic accents that catch the light beautifully. With patience and practice, your candle holders and lanterns will showcase a sophisticated metallic texture, elevating your decor effortlessly.
Sealing and Protecting
Sealing and safeguarding your metallic accents guarantees they stay vibrant and intact over time. This step preserves the brilliance of your metallic color and enhances the decorative textures on your candle holders and lanterns. To protect your work, consider applying a clear sealer or spray designed for metallic finishes. These products prevent tarnishing and scratching, keeping your decor looking fresh. You can also use a wax coating for added durability and a soft sheen. Remember, proper sealing helps avoid fingerprints and smudges, maintaining your project’s polished look.
- Use a clear acrylic sealer for a matte or glossy finish
- Apply multiple thin coats for even coverage
- Test on a small area first to ensure compatibility
- Handle with care until fully dry
Incorporating Foil and Leaf Into DIY Wall Palettes and Murals

Adding foil and leaf accents to your wall palettes and murals instantly elevates their visual impact, creating a striking contrast against matte or painted backgrounds. To achieve this, start with a base of your chosen color or design. Use metal leaf for a luxurious, textured look by applying adhesive and carefully pressing the leaf onto your surface. Foil application offers a sleek, reflective finish; apply adhesive in your desired pattern, then gently lay the foil, smoothing out bubbles. Both techniques can highlight specific areas, like borders or focal points, adding depth and sophistication. Be sure to seal your work afterward to protect the metallic accents. With precision and creativity, foil and leaf transform simple murals into eye-catching, elegant wall art. Understanding the importance of visual contrast] can help guide your design choices for a more dynamic effect.
Making Sparkling Metallic Coasters and Trays

Transforming metallic accents from wall art into functional pieces like coasters and trays allows you to bring sparkle and sophistication to everyday items. To create dazzling metallic coasters and trays, start by selecting surfaces that can handle foil textures, such as ceramic or wood. Use metallic patterns to add visual interest, combining gold, silver, or rose gold foils for contrast. Apply adhesive and carefully lay the foil, smoothing out air bubbles for a sleek finish. Experiment with different foil textures—crinkled, smooth, or embossed—to add dimension. You can also incorporate painter’s tape to create geometric designs. For an extra touch of elegance, consider adding protective sealers to ensure the metallic finish endures over time. These shimmering pieces instantly elevate your space, blending practicality with eye-catching metallic accents. Incorporating foil textures can enhance the visual depth and appeal of your DIY decor projects. Additionally, choosing appropriate surfaces ensures durability and a polished look. Considering surface preparation is key to achieving a flawless metallic finish. Seal with a clear top coat for longevity.
Enhancing Plant Pots With Metallic Details

If you want to give your plant pots a stylish upgrade, metallic details are an easy and eye-catching choice. You can achieve stunning plant pot customization by adding metallic paint, foil, or leaf to create unique designs. Consider metallic color coordination to match your decor—gold pairs well with warm tones, while silver complements cooler shades. Use painter’s tape to create clean lines or geometric patterns, or apply metallic accents randomly for an abstract look. For a trendy touch, try highlighting the rim or base of your pot with metallic paint or foil. These simple techniques instantly elevate plain containers, making your indoor or outdoor garden feel more curated and sophisticated. With a little effort, your plant pots become statement pieces that showcase your personal style.
Using Foil and Leaf to Accentuate Holiday and Seasonal Decor

Foil and leaf accents are perfect for giving your holiday and seasonal decorations a touch of elegance and sparkle. They instantly add that special holiday sparkle, making your decor feel more festive and refined. You can highlight wreaths, centerpieces, or ornaments with metallic foil or leaf details to elevate their look. These accents create a luxurious texture and shine that draws attention and sets the mood. Incorporate gold, silver, or copper foil to match your seasonal theme. Using metallic leaf can add depth and a natural touch to your decorations. Whether you’re decorating for Christmas, fall, or any seasonal celebration, these accents make your decor stand out and feel more polished.
- Wrap foil around candle holders for a festive glow
- Add metallic leaf to wreaths for texture
- Highlight table runners with foil accents
- Use leaf and foil on ornaments for a luxe finish
Frequently Asked Questions
What Are the Best Adhesives for Metallic Foil and Leaf Application?
You should choose adhesive types suited for foil and leaf application, like gold leaf adhesive or a clear, water-based adhesive. These adhesives work well with delicate metallic accents and allow for easy application. Use proper application techniques, such as applying a thin, even coat and pressing the foil or leaf gently onto the surface. This guarantees a smooth finish and helps you achieve professional-looking metallic accents in your decor.
How Do I Prevent Tarnishing or Fading of Metallic Finishes Over Time?
To prevent tarnishing or fading of metallic finishes, you should apply protective sealants like clear acrylic or polyurethane after your project dries. These sealants create a barrier against environmental factors such as moisture, sunlight, and air exposure, which can cause deterioration over time. Make sure to reapply the sealant periodically to maintain the finish’s shine and durability, keeping your metallic accents looking fresh and vibrant for years to come.
Can Metallic Foil and Leaf Be Used on Outdoor DIY Projects?
You might be surprised, but metallic foil and leaf can work outdoors if you prioritize weather resistance and outdoor durability. To make your projects last, seal the metallic accents with a clear, outdoor-grade sealant that withstands moisture and UV rays. This way, your DIY decor stays vibrant and chic, even when exposed to the elements. Just remember, proper sealing is key to maintaining the metallic finish over time.
What Safety Precautions Should I Take When Working With Metallic Leaf and Foil?
When working with metallic leaf and foil, you should wear protective gear like gloves and a mask to avoid irritation from adhesives and particles. Make sure you have good ventilation to prevent inhaling fumes or dust. Keep your workspace well-ventilated, and work in a well-lit area. These safety precautions help you enjoy your DIY project while minimizing health risks associated with metallic leaf and foil.
How Do I Achieve a Smooth, Bubble-Free Finish on Metallic Surfaces?
Did you know that a flawless metallic finish can make your decor look 50% more polished? To achieve a smooth, bubble-free surface, start with thorough surface preparation—clean, dry, and sand if needed. Use proper application techniques like gentle, even strokes and avoid overworking the foil or leaf. Patience and precision will help you eliminate bubbles and create a sleek, professional look every time.
Conclusion
Now that you’ve explored these chic ways to add foil and leaf, your space will shimmer with effortless elegance. Picture sunlight catching the metallic accents, casting a warm glow on your handcrafted wall art, furniture, and decor pieces. With a touch of foil or leaf, your DIY projects transform into stunning focal points that reflect your style. Get creative, embrace the shine, and watch your home come alive with dazzling, personalized detail.