
To master advanced paper quilling 3-D sculpting, focus on selecting high-quality, lightweight paper, and using precise tools like tweezers and styluses for shaping. Build depth with layered coils, varying their sizes, angles, and heights, and add realism with surface details like tiny curls or fringes. Incorporate wire supports to maintain stability in complex shapes. If you want to create lifelike, multi-dimensional sculptures, exploring these techniques further will give you the skills you need.
Key Takeaways
- Utilize layered coils, varying sizes, and orientations to create depth and realistic surface textures in 3-D quilling sculptures.
- Incorporate fine details like tiny curls, fringes, and surface embellishments to mimic natural textures and enhance realism.
- Apply color blending and shading techniques to emphasize contours, highlights, and shadows for a lifelike appearance.
- Integrate support wires using suitable gauges to maintain complex shapes and prevent sagging over time.
- Finish with protective coatings and precise detailing to achieve a polished, professional, durable 3-D quilling artwork.
Understanding the Foundations of 3-D Quilling
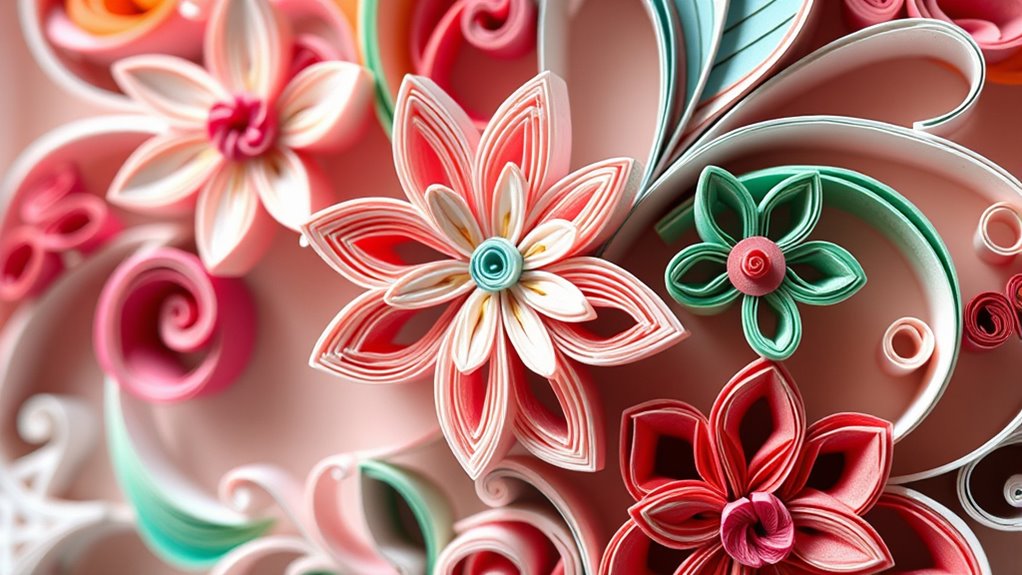
Have you ever wondered what sets 3-D quilling apart from traditional flat designs? It all begins with mastering paper folding techniques that add dimension. Unlike flat quilling, 3-D sculpting relies on carefully curved and layered strips to create depth and texture. Color blending plays a vital role, as you can manipulate shades to enhance the illusion of volume and realism. By blending colors seamlessly, you give your sculptures a more lifelike appearance, emphasizing shadows and highlights. This foundation requires precision in your folding and twisting, which transforms simple strips into intricate, multi-dimensional forms. Developing an eye for detail is essential to successfully execute these techniques and bring your sculptures to life. Understanding these core principles helps you develop more dynamic and visually striking pieces, elevating your quilling from basic flat designs to sophisticated 3-D art. Additionally, practicing float mounting textile art techniques can help display your quilled sculptures more professionally, adding another layer of depth to your work. Developing an awareness of visual perception can further enhance your ability to create convincing three-dimensional effects, making your art truly stand out. Moreover, mastering spatial awareness can significantly improve your ability to plan and execute complex designs with accurate depth and perspective. Gaining knowledge about emotional support can also assist you in staying motivated and overcoming challenges during your creative process.
Selecting the Right Materials and Tools for Sculpting
Choosing the right materials and tools is vital for creating detailed paper sculptures. You’ll want to select high-quality paper, the necessary tools for shaping, and reliable adhesives to guarantee your work holds together. Finishes also play a key role in giving your sculptures a polished, professional look. Incorporating specialized Tuning techniques can also inspire new textures and effects in your paper art. Additionally, understanding store hours for your favorite beauty retailers ensures you can conveniently purchase supplies when needed. Being aware of grocery store hours in your area can help you plan your shopping trips efficiently, avoiding long waits and ensuring you get all your supplies in one trip.
Quality Paper Selection
What makes a piece of paper ideal for quilling? Primarily, paper quality matters—choose sturdy, lightweight paper that bends easily without tearing. Look for smooth, uniform textures to ensure clean coils and precise shapes. High-quality paper also holds its form better, especially in 3-D sculpting, giving your artwork durability and a polished appearance. Additionally, color coordination is vital; select papers that complement each other to create harmonious designs. Consistent shades and tones help your sculpture look cohesive and professional. Avoid cheap or overly thin paper, which can wrinkle or collapse during shaping. Investing in good-quality paper ensures your techniques translate beautifully, making your intricate designs stand out with clarity and elegance.
Essential Sculpting Tools
Selecting the right sculpting tools is essential to achieving precise and smooth paper quilling designs. You need tools that let you shape and refine your curls with control, especially when working with complex paper curling techniques. Fine-tipped tweezers, sculpting needles, and stylus tools are perfect for detailed adjustments and creating dimension. These tools help you manipulate paper strips accurately, ensuring your quilling color schemes stay vibrant and cohesive. A good selection allows you to add depth and texture, transforming flat shapes into 3-D sculptures. When choosing your tools, prioritize precision and comfort, so you can work seamlessly. The right tools make all the difference in elevating your quilling from simple to sophisticated, allowing you to master advanced sculpting techniques confidently.
Adhesive and Finishes
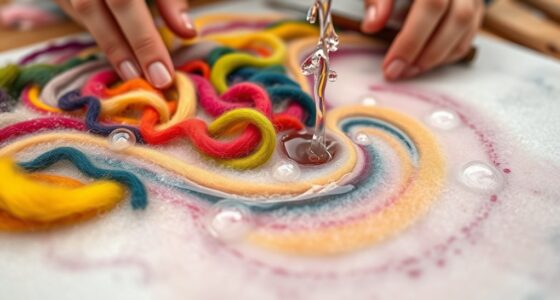
To achieve a polished and durable paper quilling sculpture, using the right adhesive and finish materials is essential. Choose adhesive types like PVA glue, tacky glue, or archival adhesive, depending on your project’s needs. PVA glue offers strong bonding and dries clear, making it ideal for detailed work. Tacky glue is quick-setting and forgiving for larger sculptures. For finishing, consider techniques such as applying a clear sealant or varnish to protect your work from moisture and fading. Finish techniques might include gloss, matte, or satin coatings, which enhance the sculpture’s appearance while providing durability. Always test your adhesives and finishes on scrap paper first to ensure compatibility. Proper selection and application of these materials will elevate your 3-D quilling sculptures, giving them a professional, lasting finish.
Techniques for Building Structural Depth in Your Designs
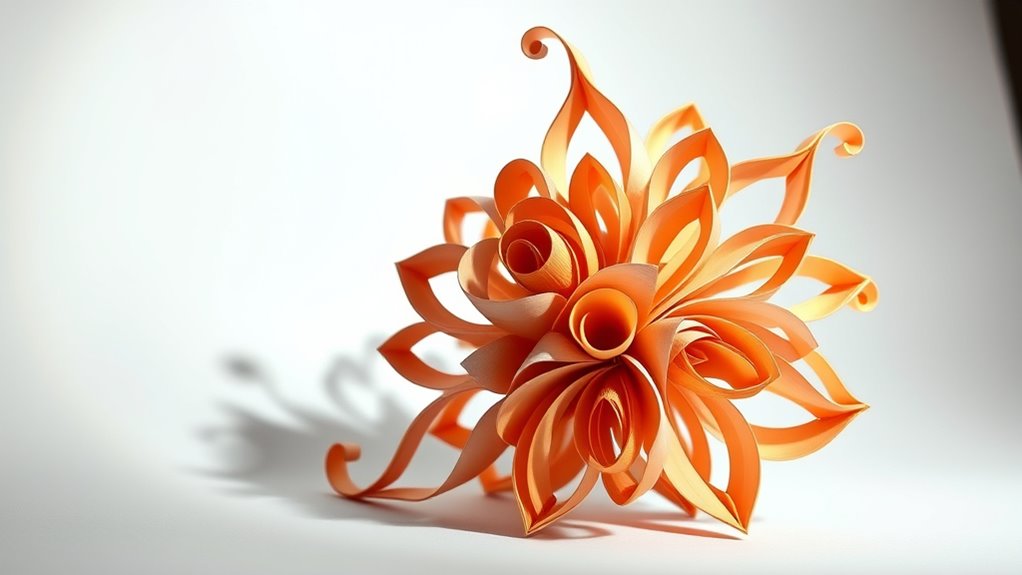
Ever wonder how to make your paper quilling designs truly stand out with a sense of depth? One effective technique is mastering structural layering, which adds dimension by stacking and shaping coils at different levels. Using color theory, you can enhance depth by selecting shades that create contrast and highlight focal points. Incorporate historical inspirations by studying traditional motifs that utilize layered elements to evoke richness and complexity. Vary your coil sizes and orientations to simulate shadows and highlights, giving your work a three-dimensional feel. Exploring popular anime movies can provide inspiration for dynamic and vibrant color combinations that translate well into layered designs. Additionally, understanding trademark concepts can help you create unique brand elements for your art to distinguish it further. Recognizing the importance of authenticity in your designs can further elevate their appeal and uniqueness. Integrating celebrity lifestyle insights can inspire innovative presentation styles that resonate with audiences. Incorporating techniques from essential oils for various health concerns can inspire creative ways to incorporate thematic elements into your designs, adding layers of meaning. By thoughtfully combining color, shape, and layering, you’ll craft designs that appear more dynamic and lifelike. This approach transforms flat coils into intricate, textured pieces that capture viewers’ attention with their depth and detail.
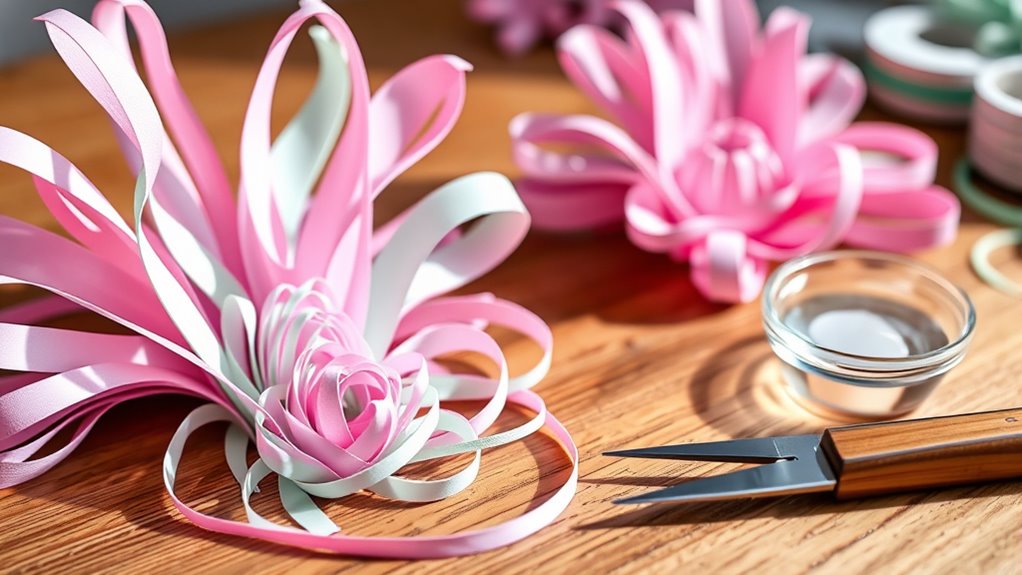
Crafting Realistic Textures and Surface Details

To create realistic textures, start by layering paper pieces to add depth and dimension. Then, incorporate fine details like tiny curls or fringes to mimic surface variations. These techniques bring your quilling projects to life with authentic, tactile qualities. Additionally, understanding surface textures and how they influence visual realism can help you choose appropriate shaping techniques for more convincing results. Recognizing the impact of material properties can further enhance the authenticity of your designs. Moreover, experimenting with different quilling tools can improve your control over shaping and detailing, allowing for more precise replication of natural textures found in real-world objects. Exploring techniques used in other crafts can also inspire innovative methods to achieve diverse surface effects.
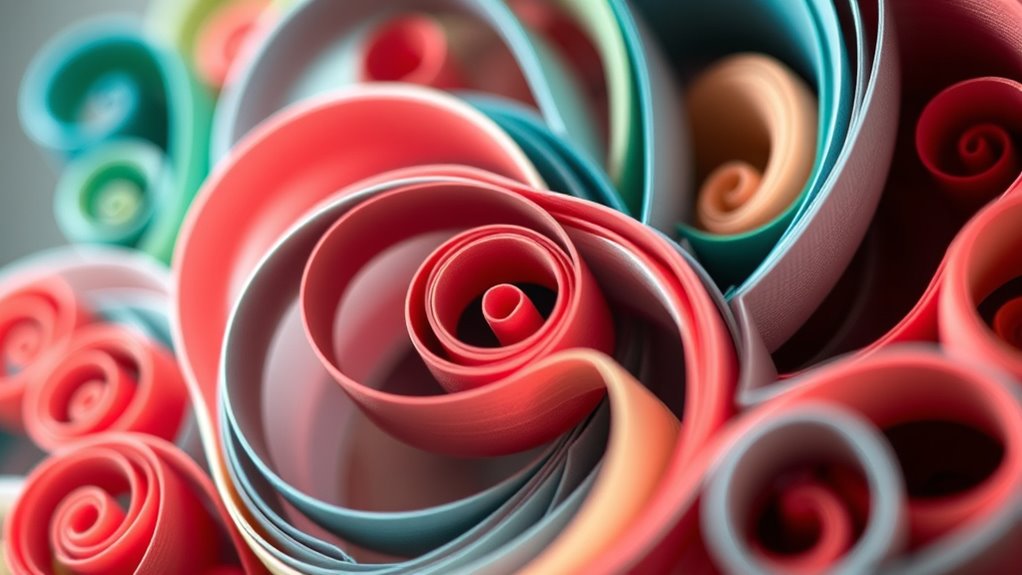
Layering for Depth
Layering paper strips is essential for creating realistic textures and surface details in quilling. By carefully stacking strips, you add depth and dimension to your design. To enhance this effect, focus on:
- Applying color blending techniques to gradually transition smoothly between shades, mimicking natural variations.
- Using shadow techniques to create the illusion of light and depth, emphasizing raised or recessed areas.
- Varying strip thickness and overlap to suggest different surface textures, like smooth or rough.
- Strategically layering strips to build up areas that appear to recede or protrude, giving your piece a three-dimensional feel.
Mastering layering allows you to craft realistic textures, making your quilling projects come alive with depth and surface richness.
Adding Fine Details
How can you make your quilling designs look truly lifelike? The key is adding fine details that mimic real textures. Use intricate shading to create depth and dimension, highlighting light and shadow variations across your piece. This technique emphasizes surface contours and gives a realistic feel. Tiny embellishments, like delicate lines or small textured elements, can replicate surface details such as veins on leaves or fur on animals. Carefully placing these details with precision enhances the overall realism. Don’t rush—small, deliberate touches make a big difference. Focus on subtle variations and layered effects to bring your design to life. When you master adding fine details, your quilling projects will stand out with authentic, enthralling textures that truly impress.
Creating Layered and Multi-Dimensional Compositions

Ever wondered how to make your paper quilling projects stand out with striking depth and dimension? You can achieve this through creating layered and multi-dimensional compositions. Start by stacking coils at varying heights to add physical depth. Use color blending skillfully to gradually transition smoothly between shades, enhancing visual richness. Incorporate shadow effects by positioning shadows beneath certain elements, giving a sense of lift. To create realistic depth, consider these steps: 1. Layer different sized shapes to build complexity. 2. Use contrasting colors for foreground and background. 3. Add subtle shadow effects for a three-dimensional look. 4. Vary the angles of coils to mimic natural shadows and highlights. You can also explore different crochet styles for locs to add textured details to your layered designs. This approach brings your artwork to life, with vibrant, dimensional qualities that captivate viewers.
Incorporating Wire Support for Enhanced Stability
Incorporating wire support into your paper quilling projects considerably boosts their stability and durability. It provides the necessary framework to maintain complex shapes and prevent sagging. Using wire support enhances stability, especially for intricate 3-D designs, giving your sculptures a firm foundation. To select the right wire, consider thickness and flexibility. Here’s a quick comparison:
| Feature | Description |
|---|---|
| Material | Copper, aluminum, or craft wire |
| Thickness | 20-28 gauge for flexibility and support |
| Flexibility | Easy to bend without breaking |
| Durability | Resists bending over time |
| Application | Inner support for delicate shapes |
Adding wire support ensures your quilling pieces stay intact, elevating the overall stability enhancement of your art. Additionally, understanding projector contrast ratio can help you choose the best display setup for your home cinema. Recognizing the importance of attention in creative practice can also improve your focus and the quality of your work.
Assembling and Finishing Your 3-D Quilling Projects

Ready to bring your 3-D quilling project to life? Assembling and finishing involves several key steps. First, carefully connect your sculpted pieces, ensuring they fit seamlessly, like puzzle pieces coming together. Second, focus on color blending; subtle shifts in hue can add depth and realism to your sculpture. Third, enhance surface textures with embellishments—tiny beads, glitter, or metallic accents—to add visual interest. Fourth, secure everything with a gentle touch of craft glue, making sure your layers stay intact without warping. As you assemble, keep your workspace steady and your hands precise. When finished, step back and evaluate your work, adding surface embellishments as needed to elevate your masterpiece. These finishing touches transform your sculpture from great to stunning.
Tips for Troubleshooting and Refining Your Sculptures

When you notice issues with your sculpture, addressing them promptly can save time and improve your final piece. If colors don’t blend smoothly, gently adjust the paper’s placement or layer to enhance the progression. For symmetry balancing, compare both sides carefully, and realign or reshape elements as needed. Small misalignments can throw off the sculpture’s overall harmony, so use fine-tipped tools to correct these issues precisely. If parts seem uneven or unstable, reinforce them with a little extra adhesive. Always step back and evaluate your work from different angles to spot imperfections. Refining your sculpture with patience ensures better color blending and symmetry, resulting in a polished, professional-looking piece. Troubleshooting early prevents larger problems later and elevates your craftsmanship.
Frequently Asked Questions
How Do I Prevent My 3-D Quilling Sculptures From Collapsing Over Time?
To prevent your 3D quilling sculptures from collapsing over time, you should focus on material reinforcement and structural support. Use stronger adhesives like clear-drying glue, and consider reinforcing delicate areas with thin wire or toothpicks for added stability. Be sure to let your sculpture dry thoroughly before handling, and avoid excessive bending or pressure. These steps will help maintain the integrity and longevity of your intricate designs.
What Are the Best Ways to Store and Display 3-D Quilling Artworks?
Imagine your masterpiece in the dark, slowly losing its shape. To prevent that, you need the right storage solutions and display options. Use clear, dust-proof boxes for safe storage, and consider acrylic stands or shadow boxes to showcase your 3-D quilling art. Position it in a stable, low-humidity environment, away from direct sunlight. Proper storage and display not only protect your work but also highlight its intricate beauty.
Can Advanced Paper Quilling Techniques Be Combined With Other Art Forms?
You can definitely combine advanced paper quilling techniques with other art forms. Mixing media allows you to incorporate elements like paint, fabric, or digital components for unique textures and effects. Digital integration enables you to enhance your quilling pieces with digital design tools or projections, creating dynamic displays. This fusion broadens your creative possibilities, making your artwork more expressive and engaging, and pushing the boundaries of traditional paper art.
How Do I Correct Mistakes Without Damaging Delicate 3-D Structures?
Mistakes in delicate 3-D structures are like tiny cracks in glass—easily worsened. To correct them, gently lift the misaligned piece with tweezers, applying minimal glue for color correction or re-shaping. Use a fine brush for precise glue application, avoiding excess that could damage delicate layers. Patience and a steady hand protect your sculpture, allowing you to fix errors without compromising its intricate beauty.
Are There Specific Safety Precautions for Working With Sharp Tools and Wires?
When working with sharp tools and wires, you should always wear protective gear like gloves and safety glasses to prevent injuries. Make sure your workspace is well-ventilated to avoid inhaling fumes or dust. Keep your tools organized and handle them carefully to avoid accidents. Taking these safety precautions helps you work confidently while minimizing risks, ensuring your crafting experience remains safe and enjoyable.
Conclusion
With these advanced techniques, you can bring your paper quilling projects to life, sculpting intricate, three-dimensional masterpieces that leap off the page. Imagine your designs as delicate, swirling architectures, each curve and layer adding depth and realism. As you refine your skills, you’ll craft vibrant, textured sculptures that captivate and inspire. Keep experimenting and pushing boundaries—your next stunning creation is just a quill stroke away, waiting to emerge from your imagination into stunning reality.