
To organize your craft room effectively, create designated zones for tasks like cutting, sewing, and painting, each with tailored storage solutions. Use labels on bins, drawers, and shelves to make supplies easy to find and put away. Optimize flow by arranging main tools within arm’s reach and positioning workstations near relevant storage. Incorporate vertical storage to free up surfaces and regularly reassess your setup to keep everything streamlined and inspiring. Keep exploring for more tips to perfect your space.
Key Takeaways
- Create designated zones for different tasks like cutting, sewing, and painting to improve workflow and focus.
- Use clear labels on containers, drawers, and shelves to easily identify supplies and maintain order.
- Arrange tools and materials within arm’s reach in each zone to streamline project transitions and reduce movement.
- Maximize space with vertical storage solutions such as shelves and pegboards to keep surfaces uncluttered.
- Regularly reassess and tidy your craft room to ensure organization remains effective and inspiring.

Have you ever felt overwhelmed by clutter in your craft room? It’s a common experience, but the good news is that proper organization can make a huge difference. The key is to focus on effective storage solutions and a well-thought-out workspace layout. When you create designated zones for different activities and materials, your craft space becomes more functional and inspiring. Start by evaluating what you use most often and grouping similar supplies together. Use clear storage containers, labeled bins, and drawer organizers to keep everything visible and accessible. This way, you won’t waste time searching for that perfect pair of scissors or a specific color of thread.
Your workspace layout plays a vital role in how smoothly you work through your projects. Think about how you move around your craft room—your goal is to minimize unnecessary steps and create a natural flow. Position your main supplies within arm’s reach and keep frequently used tools close to your work surface. For example, set up your cutting station near your fabric or paper storage, and place your glue guns, scissors, and rulers within easy reach. Use vertical space wisely by installing shelves or pegboards for hanging tools and supplies. This not only frees up your work surface but also keeps everything visible and organized.
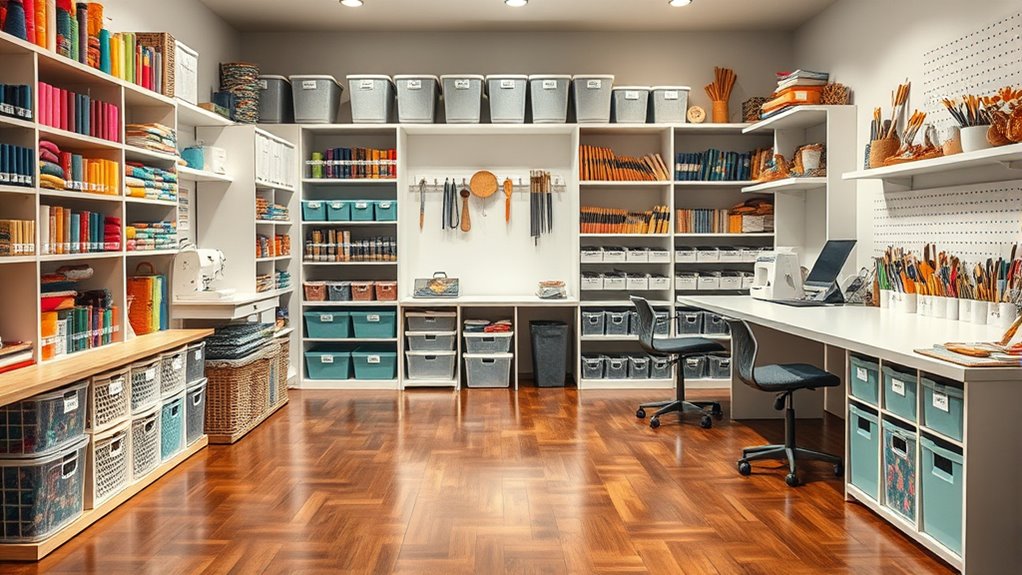
Designing zones helps you focus on specific tasks without cluttering your workspace. Dedicate areas for cutting, assembling, and finishing projects. Each zone should have its own storage solutions tailored for that activity. For instance, your sewing zone might include a small table, a bin for threads, and a rack for finished projects. Your painting zone could have a portable cart for paints, brushes, and palettes. When each zone has its dedicated storage solutions, you’ll find it easier to switch between projects and keep your craft room tidy. Plus, labeling storage containers and drawers further streamlines your workflow, so you know exactly where everything belongs and where to find it later.
Additionally, incorporating specialized storage like rolling carts or stackable bins can maximize space and improve access to your supplies. Finally, maintaining your craft room organization requires regular upkeep. After each project, put supplies back in their designated spots, and reassess your storage solutions periodically. This ongoing effort keeps your workspace inviting and functional, making it more enjoyable to craft. When your craft room is thoughtfully organized with strategic zones, clear labeling, and a logical workspace layout, you’ll transform chaos into creativity. It’s all about creating a space that works for you—so you can spend more time crafting and less time cleaning up.
craft room storage bins with labels
As an affiliate, we earn on qualifying purchases.
As an affiliate, we earn on qualifying purchases.
Frequently Asked Questions
How Often Should I Reorganize My Craft Room?
You should revisit your craft room organization every few months to maintain efficiency. Regularly assess your storage solutions and adjust your organizational routines as your supplies or projects change. If you notice clutter or difficulty finding supplies, it’s time to reorganize. Staying proactive helps prevent chaos, keeps your workspace inspiring, and ensures your craft room stays functional and enjoyable. Consistent check-ins make maintaining order easier and more manageable.
What Are the Best Storage Containers for Small Supplies?
For small supplies, you should use clear acrylic bins and drawer dividers. Acrylic bins keep your items visible and organized, making it easy to find what you need quickly. Drawer dividers are perfect for separating smaller supplies within drawers, preventing clutter. Both options maximize space and keep your craft room tidy. Choose stackable acrylic bins for flexibility and adjustable drawer dividers for versatile organization, helping you maintain a functional, clutter-free space.
How Can I Maximize Space in a Small Craft Room?
Like a master artist with a blank canvas, you can maximize your small craft room by using wall shelving to free up floor space and multi-purpose furniture that combines storage with functionality. Hang your supplies within easy reach, and choose pieces that serve dual roles, such as a table with built-in drawers. This approach keeps your workspace organized, efficient, and inspiring, turning limited space into a creative haven.
What Are Cost-Effective Ways to Organize Craft Tools?
You can organize your craft tools cost-effectively by creating DIY storage solutions and repurposing household items. Use empty jars or cans for brushes and small tools, and repurpose old drawers or boxes for larger supplies. Attach hooks or small shelves to walls to free up space. These budget-friendly ideas help keep your tools accessible and organized without spending much, making your craft room more functional and tidy.
How Do I Maintain Organization Over Time?
A stitch in time saves nine, so stay ahead by regularly tidying your craft space. Keep your decor theme and lighting options consistent to motivate you. Set aside a few minutes weekly to put tools back in their zones, check labels, and clear clutter. This routine helps maintain your organized craft room long-term, making it easier to find what you need and stay inspired every time you craft.
Conclusion
By organizing your craft room into clear zones, labeling everything, and ensuring a smooth flow, you’ll make your creative space more enjoyable and efficient. Some might think it takes too much effort upfront, but once set up, you’ll save time searching for supplies and reduce stress. Remember, a well-organized craft room isn’t just about looks—it’s about making your crafting experience more fun and inspiring. Start small, stay consistent, and enjoy your beautifully arranged space!