
To stop fabric puckering during embroidery, make certain you choose the right hoop size and secure fabric tightly without overstretching. Use quality stabilizers and pre-wash or iron your fabric to remove wrinkles before hooping. Proper hooping techniques, like tightening from the center outward and avoiding over-tightening, also matter. Regularly check tension and handle fabrics carefully—these tips can help you achieve smooth, professional results every time. Keep going, and you’ll discover even more ways to perfect your embroidery.
Key Takeaways
- Properly tighten stabilizer and fabric in the hoop without overstretching to prevent puckering.
- Use the right hoop size and ensure fabric is smooth and wrinkle-free before hooping.
- Test tension on scrap fabric to find optimal thread and fabric tension settings.
- Choose stable, tightly woven fabrics and apply stabilizer evenly to support embroidery.
- Regularly check and adjust tension during embroidery to maintain smooth fabric and stitch consistency.

Brother XR9550 Sewing and Quilting Machine, Computerized, 165 Built-in Stitches, LCD Display, Wide Table, 8 Included Presser Feet, White
165 unique built-in stitches: The Brother XR9550 computerized machine includes 110 built-in utility, decorative and heirloom stitches including...
As an affiliate, we earn on qualifying purchases.
Why Fabric Puckers During Embroidery and How to Prevent It

Fabric puckers during embroidery happen when the material doesn’t feed smoothly through the machine, often due to tension issues or improper hooping. One common cause is incorrect thread tension; if it’s too tight or too loose, the fabric won’t move evenly, causing puckering. Additionally, fabric quality plays a role—stiff or overly delicate fabrics are more prone to puckering if not handled properly. To prevent this, always adjust your thread tension before starting, ensuring it’s balanced for your fabric type. Use fabrics that are stable and well-prepared, avoiding wrinkled or stretched textiles. Properly selecting and testing tension settings based on fabric quality can markedly reduce puckering, giving you cleaner, professional-looking embroidery results. Consulting embroidery machine settings and manufacturer guidelines can also help optimize tension for different fabrics. Being aware of fabric stability can further improve your embroidery outcomes.
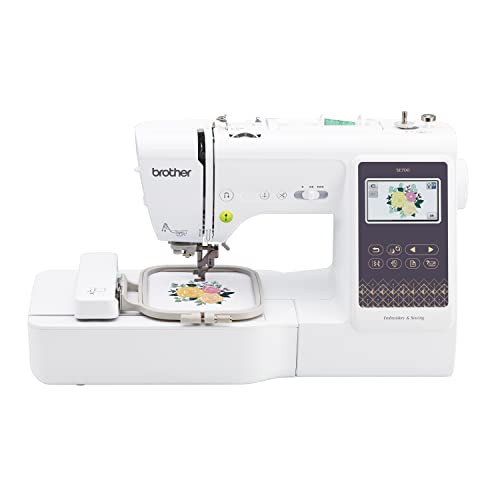
Brother SE700 Sewing and Embroidery Machine, Wireless LAN Connected, 135 Built-in Designs, 103 Built-in Stitches, Computerized, 4" x 4" Hoop Area, 3.7" Touchscreen Display, 8 Included Feet, White
SEWING and EMBROIDERY IN ONE: The SE700 is the ideal machine to start your sewing and embroidery journey...
As an affiliate, we earn on qualifying purchases.
Choose the Right Hoop and Tension to Keep Fabric Smooth

Choosing the right hoop is essential for smooth embroidery; pick one that fits your fabric without over-tightening. You also need to regulate the tension settings on your machine to make sure the fabric stays flat and even. When you match the hoop size and tension properly, your stitches will look cleaner and more professional.
Proper Hoop Selection
Selecting the right hoop is essential for keeping your fabric smooth and ensuring a successful hooping experience. Start by choosing the appropriate hoop size for your project; a larger hoop provides more room for complex designs, while a smaller hoop offers better control for detailed work. The hoop material also matters—plastic hoops are lightweight and affordable, but metal hoops offer more durability and consistent tension. Make sure the hoop fits your fabric snugly without causing puckering or wrinkles. Always check that the hoop is compatible with your embroidery machine. Proper hoop selection minimizes fabric distortion and helps prevent puckering during embroidery, leading to cleaner, professional-looking results. Investing time in choosing the right hoop improves both your workflow and the quality of your finished designs. Additionally, understanding wiring basics can help you troubleshoot any issues with your embroidery setup and maintain your equipment properly.
Adjust Tension Settings
To achieve smooth, professional-looking embroidery, adjusting the tension settings on your machine is essential, especially when using the right hoop. Proper thread tension prevents puckering and ensures even stitches. Start by testing your thread tension:
- Adjust thread tension to match your fabric and thread type, ensuring stitches aren’t too tight or loose.
- Fine-tune stitch length—shorter stitches help secure fabric, while longer stitches reduce puckering.
- Monitor stitch quality during a test run, making small adjustments to tension and stitch length until your embroidery lies flat and smooth.
- Remember that Free Floating techniques can also help reduce fabric tension issues during embroidery, leading to cleaner results.
Additionally, selecting the appropriate hoop size can significantly impact tension and fabric stability during embroidery.
Consistently check these settings, especially when switching fabrics or threads, as fabric tension can vary and affect the final outcome. Correct tension and stitch length work together to keep fabric taut and stitches even, eliminating puckering and delivering crisp embroidery results.

Brother CS7000X Computerized Sewing and Quilting Machine, 70 Built-in Stitches, LCD Display, Wide Table, 10 Included Feet, White
70 UNIQUE BUILT-IN STITCHES: The Brother CS7000X sewing and quilting machine includes 70 built-in stitches including utility, decorative,...
As an affiliate, we earn on qualifying purchases.
Prepare Your Fabric to Avoid Puckering Before Hooping
To prevent puckering, start by choosing the right fabric type that works well with your project. Use stabilizers effectively to support the fabric during embroidery, and always pre-wash and iron your fabric to remove wrinkles. These steps help guarantee your design stays smooth and professional-looking.
Choose Proper Fabric Type
Choosing the right fabric type is essential to prevent puckering and guarantee smooth embroidery. The fabric’s texture affects how well your design will sit, so select a material with a stable, even surface. Additionally, verify your fabric is compatible with your needle to avoid skipped stitches or damage. Consider these factors:
- Fabric Texture: Opt for tightly woven fabrics like cotton or linen that provide a smooth, consistent surface for embroidery.
- Needle Compatibility: Match your needle size and type to your fabric—using the correct needle reduces puckering and preserves fabric integrity.
- Fabric Stability: Use fabrics that won’t stretch or shift easily during embroidery, maintaining design accuracy and preventing puckering.
Choosing appropriate fabric type and understanding its properties help create professional-looking embroidery without puckers.
Use Stabilizer Effectively
Before you hoop your fabric, applying the right stabilizer is essential to prevent puckering and guarantee a smooth embroidery surface. Select a fabric stabilizer that matches your project’s fabric type and embroidery design. Use appropriate hooping techniques by securing the stabilizer tightly and evenly, ensuring it remains taut without stretching the fabric. Proper stabilization provides a firm foundation, reducing shifting and puckering during embroidery. Consider whether a tear-away, cut-away, or water-soluble stabilizer best suits your project, and layer it correctly for extra support. Always smooth out wrinkles and ensure the stabilizer is flush against the fabric before tightening the hoop. Effective stabilization and proper hooping techniques are key to achieving professional, puckering-free embroidery results.
Pre-Wash and Iron Fabric
Have you ever noticed how fabric can shrink or wrinkle after washing, causing embroidery puckering? To prevent this, pre-wash your fabric to remove sizing and soften the fibers. Follow these steps:
- Wash with a gentle cycle using fabric softening to loosen fibers and improve drape.
- Iron the fabric thoroughly to remove wrinkles, ensuring a smooth surface for embroidery.
- Allow the fabric to cool completely before hooping, maintaining its flatness and minimizing puckering.
Pre-washing and ironing help stabilize the fabric, reducing the risk of puckering during embroidery. These steps ensure your stitches lay flat and neat, saving time on corrections later. Proper preparation creates a smooth, even surface, making your embroidery project much easier and more professional-looking.

SINGER Quantum Stylist 9960 Computerized Sewing & Quilting Machine – Metal, Plastic, with Extension Table, Hard Case & Accessories, 600 Stitches, Lettering, LED Light, 1-Step Buttonhole
VERSATILE STITCH OPTIONS: The SINGER Quantum Stylist 9960 offers 600 built-in stitches and 1,172 stitch applications, including essential,...
As an affiliate, we earn on qualifying purchases.
Proper Techniques for Hooping Different Types of Fabric
To hoop different types of fabric effectively, you need to understand how each material responds to tension and stretching. Some fabrics, like knits, have significant stretch and require gentle handling to prevent puckering. Others, such as woven cotton, are more stable but still need proper tension. When hooping, focus on correct hoop alignment to ensure even tension across the fabric. For stretchy fabrics, use a smaller hoop or stabilizer to minimize movement and distortion. For delicate or lightweight fabrics, avoid excessive stretching to prevent puckering or distortion. Always test hooping techniques on scrap material first. Proper hooping involves not just securing the fabric tightly but also maintaining even tension, which helps prevent puckering during embroidery. Additionally, understanding your fabric’s tensile strength allows you to adjust hooping pressure accordingly, ensuring optimal results without damaging the material.
How to Tighten and Secure Fabric for Flawless Embroidery
Achieving flawless embroidery starts with properly tightening and securing your fabric in the hoop. To prevent puckering, focus on controlling thread tension and fabric stretch. Follow these steps:
- Ensure the fabric is taut but not overstretched—excessive stretch can cause puckering.
- Tighten the hoop evenly, starting from the center and working outward, to maintain consistent fabric tension.
- Check the fabric’s tightness by gently pressing it; it should be smooth with no slack or sagging, ensuring even thread tension during stitching. Proper fabric tension is crucial to preventing puckering and achieving professional results.
Common Hooping Mistakes That Lead to Puckering: and How to Fix Them
One common mistake that causes puckering is uneven hooping, where the fabric isn’t centered or tension is inconsistent across the hoop. If the fabric isn’t properly aligned, the embroidery design can pull unevenly, leading to puckering. Additionally, incorrect thread tension can exacerbate the problem; too tight or too loose tension causes the fabric to distort during stitching. To fix this, ensure your hoop is aligned correctly, with the fabric taut but not overstretched. Check that the hoop is evenly tightened and that the fabric is smooth and secure. Avoid skewed hoop placement and inconsistent tension, as these mistakes lead to puckering. Proper hooping technique, including correct tension, is essential for achieving high-quality embroidery results and preventing fabric distortion. Using the appropriate hooping materials can further help maintain consistent tension and fabric stability during embroidery. Paying attention to fabric quality can also significantly reduce puckering, as higher-quality fabrics tend to hold tension better and respond more predictably during embroidery.
Tips for Maintaining Consistent Tension Throughout Your Project
Maintaining consistent tension throughout your embroidery project is essential for achieving a smooth, professional finish. Proper thread tension and fabric stability are key to preventing puckering and uneven stitching. To keep tension steady, consider these tips:
Consistent tension ensures smooth, professional embroidery with minimal puckering and uneven stitches.
- Regularly check and adjust your thread tension dial to match the fabric and design requirements.
- Use stabilizers that support fabric stability without adding bulk or distortion.
- Keep your fabric taut in the hoop but avoid overstretching, which can cause uneven tension and puckering.
- Consistently monitor your machine’s performance and make adjustments as needed to ensure thread tension consistency during your project.
- Being aware of fabric quality can also influence tension maintenance and overall embroidery results.
- Understanding how fabric type impacts tension can help you select the appropriate settings and stabilizers for optimal results.
- Being familiar with machine maintenance ensures your equipment runs smoothly, which is crucial for maintaining consistent tension and achieving professional results.
Frequently Asked Questions
How Do I Remove Puckering After Embroidery Is Complete?
To remove puckering after embroidery, start by loosening your thread tension slightly, which can help relax the fabric. Use a suitable needle, like a sharp or ballpoint, depending on your fabric type, to prevent further puckering. Gently press the embroidered area with a warm iron or steam, using a pressing cloth. This method helps smooth out puckers without damaging your design or fabric.
Can Specific Embroidery Stabilizers Prevent Fabric Puckering?
Yes, choosing the right stabilizer and preparing your fabric properly can prevent puckering. You should select a stabilizer suited to your fabric type and embroidery design, ensuring it provides enough support. Before hooping, smooth out your fabric to remove wrinkles and secure it tightly. Proper stabilizer selection and fabric preparation work together to keep your fabric taut, reducing puckering and resulting in a cleaner, professional-looking embroidery.
Is It Better to Hoop Fabric Tightly or Loosely?
You want perfect embroidery, right? Think of hooping techniques like Goldilocks—tight enough to keep fabric stretch steady, but not so tight it’s like a drum. A snug hoop prevents puckering without distorting your fabric. Loosening it causes slack, leading to uneven stitches and puckering. Find that happy medium, and your designs will stay smooth and flawless every time. Tension really makes all the difference!
How Does Fabric Type Influence Puckering Risk?
Your fabric type greatly influences puckering risk. For stretchy fabrics, you should reduce fabric stretch to prevent puckering, and adjust thread tension accordingly—looser tension helps avoid pulling. Conversely, with stable fabrics, you can hoop tighter without issues. Always test your fabric beforehand, and tweak thread tension based on material stretch. Properly matching hoop tightness and tension guarantees smooth embroidery and minimizes puckering.
What Tools Can Help Detect Tension Issues Early?
You can use tools like a tension gauge or tension tester to detect thread tension issues early. Regularly check your thread tension and hoop pressure as you work; uneven tension often causes puckering. Some embroidery machines feature built-in tension monitors, but a manual tension gauge gives precise readings. Adjust thread tension and hoop pressure promptly if you notice irregular stitches or puckering, preventing more significant problems down the line.
Conclusion
By paying attention to your hooping techniques and maintaining steady tension, you’ll create smooth, flawless embroidery just like a skilled artist. Imagine your fabric lying perfectly flat, ready to showcase intricate designs without puckers or wrinkles. With practice, you’ll develop a sense of how to tighten and secure your fabric effortlessly. Soon, each project will feel like a dance—fluid, precise, and beautifully crisp, turning your embroidery into true works of art.