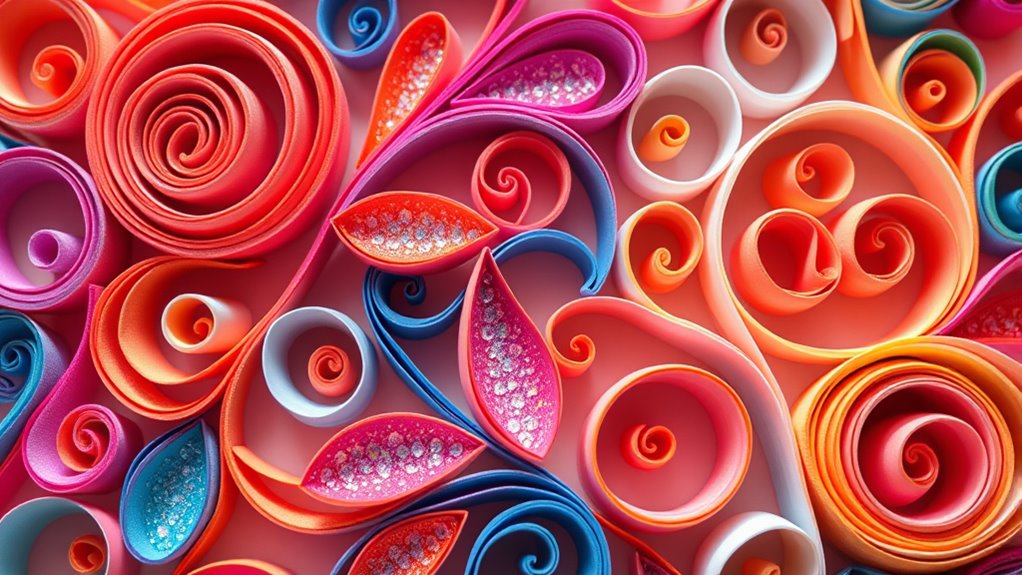

To master paper quilling, start by creating coils, which are the foundation of many designs—you roll the paper strips tightly or loosely, then secure them with glue. Next, shape some coils into teardrops for petal-like effects or other curved forms. S-scrolls involve forming graceful S-shaped curves that add movement. Learning these techniques opens up a world of intricate patterns, and if you continue exploring, you’ll discover even more exciting ways to elevate your quilling skills.
Key Takeaways
- Coils are formed by rolling strips of paper around a tool, then shaping them into tight or loose circles for various designs.
- Teardrops are created by pinching one side of a coil to form a pointed, petal-like shape, ideal for floral patterns.
- S-Scrolls are shaped by curling paper into an S-like curve, useful for decorative borders and elegant accents.
- Proper tools like slotted and needle tools help achieve consistent coils, teardrops, and S-Scrolls with precision.
- Techniques involve careful shaping, pinching, and curling, often combined with modern tools to enhance accuracy and design complexity.

Paper quilling is a versatile craft that transforms thin strips of paper into intricate designs and stunning artwork. If you’re just getting started, understanding its history can give you a deeper appreciation for the craft. The history of paper quilling dates back to the Renaissance period, where it was popular among European nuns and aristocrats. They used quilled designs to decorate religious manuscripts and jewelry, turning delicate paper strips into elegant embellishments. Over the centuries, quilling evolved from a decorative art into a widely practiced craft, spreading across Europe and later to America. Today, the tradition continues, blending historical techniques with modern innovation.
Speaking of modern times, the tools you use can substantially influence your quilling experience. Modern quilling tools have been designed to make the process easier and more precise. You’ll find slotted tools and needle tools that help you lift, shape, and coil strips effortlessly. These tools allow you to create consistent tight coils or loose, relaxed shapes without straining your fingers. Additionally, tweezers and stylus tools help with positioning tiny quilled elements, especially for intricate designs. The introduction of specialty glue pens and precision scissors also streamlines your workflow, giving you clean edges and secure attachments. Using these modern tools, you can achieve professional-looking results even as a beginner. Furthermore, understanding sound healing science and its principles can inspire new ways to approach the meditative and calming aspects of the craft, enhancing your overall experience.
As an affiliate, we earn on qualifying purchases.
Frequently Asked Questions
What Tools Are Essential for Beginner Quillers?
You need a few essential tools to start quilling. A beginner quilling kit usually has quilling paper types in various colors and sizes, a slotted tool or needle, and fine-tipped scissors. These help you shape and roll the paper easily. Additionally, a quilling board and glue are handy for precise designs. With these, you can explore different techniques and create beautiful quilled projects confidently.
How Do I Choose the Right Paper for Quilling?
When choosing paper for quilling, you want to pick options that are easy to roll, hold their shape, and enhance your designs. Opt for textured paper to add dimension, select sturdy cardstock for durability, and avoid overly thin or flimsy sheets that might tear. Look for colors that inspire you, and consider experimenting with different types to see which works best for your style and projects.
Can I Combine Different Quilling Techniques in One Project?
Yes, you can definitely combine different quilling techniques in one project. Technique blending allows you to create more dynamic and intricate designs, enhancing your overall composition. Focus on design integration by carefully coordinating your coils, teardrops, and S-scrolls to flow seamlessly. Use contrasting colors and shapes to make each technique stand out while maintaining harmony. This approach adds depth and interest, showcasing your versatility and creativity in paper quilling.
How Do I Fix Mistakes Without Damaging the Paper?
For delicate correction, don’t despair—delicately detach and re-dress your paper. Use a fine-tipped glue applicator for gentle paper repair, avoiding excess adhesive. Carefully lift the mistake with tweezers, then reposition or reshape the paper as needed. Patience is key; take your time to fix mistakes without damaging your design. This careful, cautious approach keeps your masterpiece pristine and perfect, preserving your passion and precision.
What Are Some Advanced Quilling Patterns to Try?
You should try creating intricate filigree patterns and layered designs to elevate your quilling skills. Experiment with combining tight coils and delicate teardrops to form complex motifs, or incorporate S-scrolls for a flowing, dynamic look. These advanced patterns challenge your precision and creativity, helping you develop a more sophisticated style. Keep practicing different combinations, and you’ll master stunning, detailed quilling projects that stand out beautifully.
Conclusion
Now that you’ve explored coils, teardrops, and S-scrolls, the possibilities are endless. But there’s one technique still waiting to be uncovered—something that could elevate your designs to a whole new level. Will you dare to experiment further and reveal its secrets? Keep practicing, stay curious, and don’t be surprised if your next masterpiece surprises even you. The world of paper quilling is full of surprises—are you ready to discover them?