
TL;DR

Get tools and workshop supplies delivered free — and shop member deals
- Fast, free delivery on millions of items
- Access to Prime Big Deal Days deals on October 6–7
- Prime Video, Amazon Music and more included
BEHR Paint has released a DIY tutorial for constructing shoe storage using standard concrete blocks and plywood. The project offers a durable, low-cost alternative to metal racks, utilizing six blocks and three wood panels. It requires basic painting and assembly skills and can be completed without heavy-duty adhesives.
BEHR Paint has published a new DIY tutorial instructing homeowners to build a durable shoe storage solution using concrete blocks and plywood. The guide positions this method as a cost-effective alternative to traditional metal racks, utilizing standard 8-inch by 16-inch blocks that are widely available at major hardware retailers. This development matters for readers seeking budget-friendly organizational upgrades that offer greater structural stability than lightweight commercial furniture.
The project requires six standard concrete blocks and three pieces of plywood. According to the guide, the blocks should measure 8 inches by 8 inches by 16 inches, a common size sold at Home Depot for under $2 each. The plywood pieces must be 16 inches wide, with the length varying based on the desired shelf size. The tutorial recommends using BEHR Masonry, Stucco & Brick Paint for the blocks and Varathane Classic Wood Stain for the wood, though other brands may be substituted.
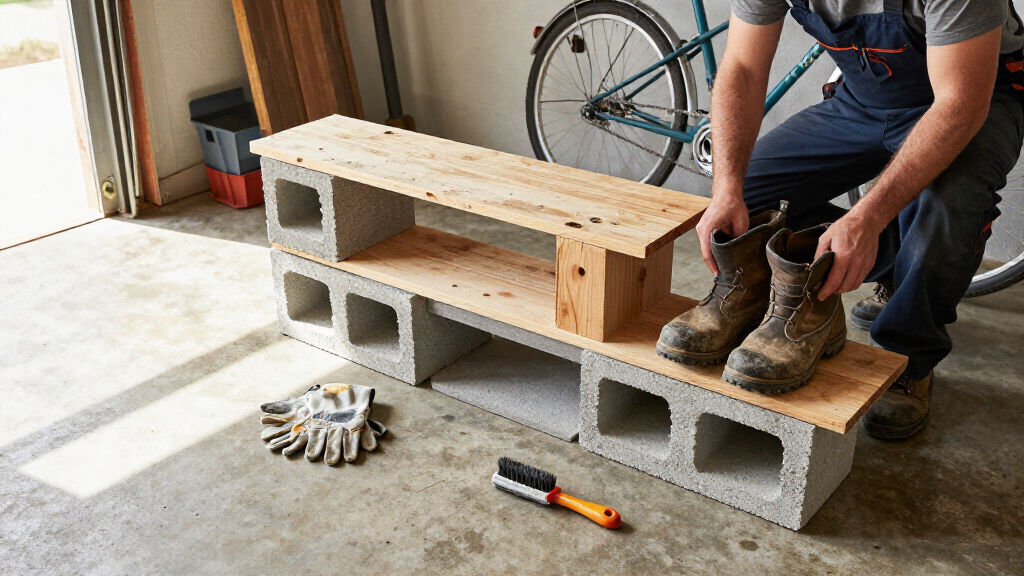
Assembly begins with painting the blocks and staining the plywood. The guide specifies that the openings of the blocks should be painted to ensure a finished look. Once dry, the structure is assembled directly in its intended location. A base layer of plywood is laid flat, followed by two vertical blocks on each end, with their holes facing forward. A second plywood panel is placed on top of these blocks. The remaining two blocks are laid horizontally on this second shelf, with their holes facing inward, before the final plywood panel is placed on top to complete the three-level unit.
The tutorial notes that Liquid Nails Extreme Heavy Duty Construction Adhesive can be used to secure the components, but the structure is described as sturdy even without it. The final design offers three levels of storage. The bottom two levels are intended for footwear, while the top level can serve as a surface for decorative items or a drop zone for keys and jewelry. The holes in the blocks can also be utilized as small storage spaces for items like shoes or accessories.
Cost and Durability Benefits Over Metal Racks
This DIY approach offers significant financial savings compared to purchasing specialized shoe furniture. With concrete blocks costing less than $2 each and plywood being a standard lumber purchase, the total material cost is likely under $25, excluding paint and stain. This contrasts sharply with metal racks, which can range from $20 to over $100 depending on quality and brand.
Beyond cost, the concrete blocks provide superior weight and stability. Unlike lightweight metal or plastic racks that may tip over or wobble under the weight of heavy boots, this structure is inherently stable due to the mass of the concrete. This makes it particularly suitable for high-traffic entryways or households with multiple pairs of heavy footwear. Additionally, the customizable nature of the project allows users to match the finish to their existing interior decor, a flexibility often lacking in mass-produced storage units.
As an affiliate, we earn on qualifying purchases.
Materials and Assembly Steps Explained
The trend of using industrial materials for home organization has gained traction in recent years, with concrete blocks and reclaimed wood becoming popular for their utilitarian aesthetic and durability. This specific project by BEHR Paint aligns with the broader movement toward DIY home improvement solutions that prioritize longevity over convenience.
The guide emphasizes that the project is accessible to beginners. It requires no specialized tools beyond a paintbrush, sander, and possibly a saw if the plywood needs cutting to length. The modular design allows for easy disassembly and relocation, making it a viable option for renters or those who move frequently. The tutorial also suggests budget-friendly accessories, such as Dollar Tree baskets for concealing shoes, further reducing the overall cost of the project.
“You can easily combine the materials to create a durable furniture piece that’s perfect for shoes.”
— BEHR Paint DIY Guide
Structural Limits and Safety Considerations
While the guide claims the structure is sturdy without adhesive, it does not specify the maximum weight capacity of the plywood shelves. Homeowners with heavy winter boots or large quantities of shoes may need to verify the load-bearing limits of their chosen plywood thickness. Additionally, the tutorial does not address anchoring the unit to the wall, which is a critical safety consideration in households with young children or pets who might climb or pull on the furniture.
It is also unclear how the concrete blocks will perform in humid environments, such as basements or bathrooms, where mold or mildew could develop on the porous surface. The guide recommends painting the blocks, but does not specify if a sealant is required for moisture resistance. Furthermore, the long-term durability of the plywood under constant shoe weight has not been tested or documented in the source material.
Customization and Maintenance Tips
After assembly, users are encouraged to customize the unit with baskets, bins, or curtains to conceal shoes and maintain a tidy appearance. The guide suggests using woven baskets for a natural look or tension rods and curtains for a more enclosed storage solution. Labeling the baskets can help organize shoes by family member, enhancing the unit’s functionality.
For maintenance, the painted concrete and stained wood should be wiped down regularly to remove dust and dirt. If the plywood shows signs of warping or wear, it can be sanded and restained or replaced without dismantling the entire structure. Users may also consider adding felt pads to the bottom of the blocks to prevent floor scratches, a step not mentioned in the original guide but recommended for hardwood or tile floors.
Key Questions
How much does this DIY shoe storage project cost?
The project is low-cost, with concrete blocks costing under $2 each and plywood being a standard lumber purchase. Total material costs, including paint and stain, are likely under $50, depending on the size of the plywood and the brands chosen.
Do I need adhesive to build this shoe rack?
According to the BEHR Paint guide, the structure is sturdy without adhesive due to the weight of the concrete blocks. However, Liquid Nails Extreme Heavy Duty Construction Adhesive can be used for additional stability, especially in high-traffic areas.
Can this unit be used outdoors?
The guide does not explicitly recommend outdoor use. While concrete blocks are weather-resistant, plywood may warp or rot if exposed to moisture unless it is marine-grade or heavily sealed. It is best suited for indoor use.
How many pairs of shoes can this unit hold?
The unit has three levels. The bottom two levels are intended for shoes. Assuming a standard shoe width of 4 inches and a plywood length of 4 feet, each level could hold approximately 12 pairs, for a total of 24 pairs across the two lower shelves.
Source: rss
Fall yard work Picks
leaf blowers
As an affiliate, we earn on qualifying purchases.