
To make a coaster set with a mini loom, start by gathering your supplies like yarn, scissors, and needles, then organize your workspace for easy access. Secure your loom, attach the warp threads tightly, and plan your color choices and patterns beforehand. Use simple weaving techniques to create your designs, and finish by securing the ends and adding a protective sealant. Keep experimenting with colors and styles—if you continue exploring, you’ll discover how to craft beautiful, personalized coasters.
Key Takeaways
- Gather and organize supplies, set up a clean workspace, and plan your color and pattern choices before starting.
- Secure the loom, attach warp threads tightly, and sketch your pattern to ensure even tension and cohesive design.
- Use simple weaving techniques like plain weave or twill, incorporate borders, and experiment with color blending.
- Secure yarn ends properly, trim edges neatly, and remove the coaster carefully to maintain a professional finish.
- Apply a protective sealant, allow drying, and clean gently to preserve and prolong the coaster set’s durability.
Gathering Supplies and Preparing Your Workspace

Before you begin weaving on your mini loom, it’s important to gather all the necessary supplies and set up a clean, well-lit workspace. Having everything organized helps you stay focused and makes the process smoother. Include decorative accents like colorful threads or small embellishments to inspire creativity and add personality to your projects. Keep your workspace tidy by arranging your tools—such as scissors, yarn, and needles—in easy reach. Proper workspace organization prevents frustration and saves time, ensuring you won’t need to search for supplies mid-project. A well-prepared area also helps you maintain focus and enjoy the process. Additionally, considering the color accuracy in your thread selections can enhance the visual appeal of your coaster set. Being aware of automation technologies in crafting tools can also streamline your weaving experience. Exploring sound design techniques can inspire creative ways to incorporate auditory elements into your crafting environment, making the process more engaging. Incorporating ergonomic tools can reduce fatigue during extended weaving sessions, promoting comfort and efficiency. Understanding the benefits of remote collaboration can also be useful if you decide to share your project ideas or seek advice online. Once your supplies are ready and your space is organized, you’re set to immerse yourself in your mini loom weaving adventure.
Setting Up Your Mini Loom
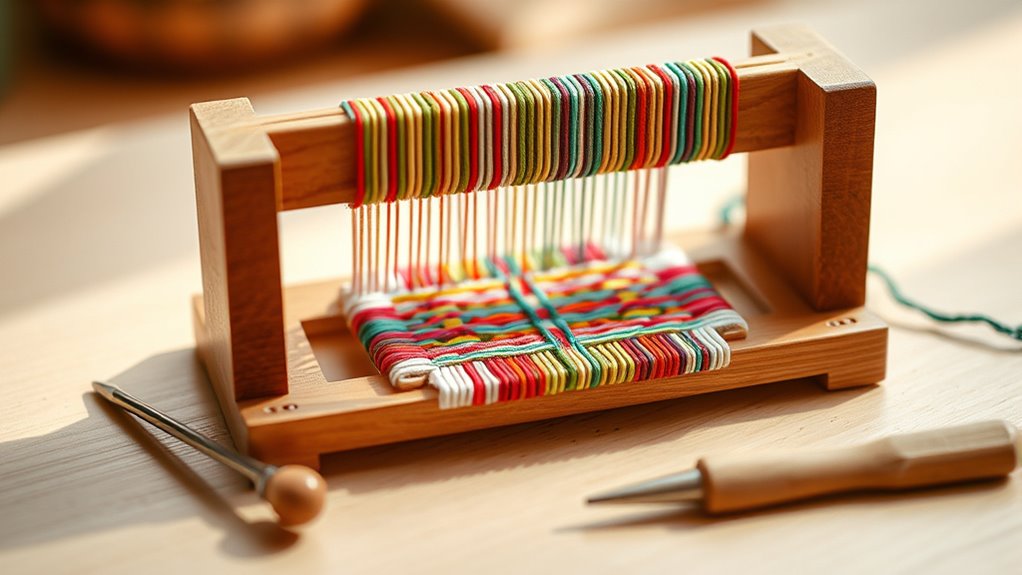
To get started, you’ll want to set up your mini loom properly so it’s ready for weaving. A good loom setup guarantees your project stays steady and your color combinations look their best. First, secure the loom’s frame on a flat surface. Second, attach the warp threads tightly, making sure they’re evenly spaced. Third, decide on your color combinations and plan your pattern, keeping the setup in mind. Fourth, double-check that the tension is consistent across all threads. This prep work makes weaving smoother and helps you create neat, even stitches. Proper loom setup is essential for achieving the desired look, especially when working with various color combinations. Additionally, maintaining consistent thread tension aligns with the concept of maximize space and organization, which can help ensure your project remains tidy and well-structured. Being aware of self-awareness and emotional regulation can also be beneficial in maintaining patience and focus during your weaving process. Moreover, understanding the importance of local sourcing and sustainability can inspire you to incorporate eco-friendly materials into your coaster set. Incorporating proper cleaning and maintenance of your tools can also aid in preserving the quality of your weaving supplies over time. Once your loom is ready, you’re all set to start weaving your coaster set.
Choosing Colors and Planning Your Pattern

Choosing the right colors and planning your pattern are essential steps that set the foundation for a visually appealing woven piece. Using color theory helps you select hues that complement each other, creating harmony and contrast. Think about warm and cool tones, or analogous and complementary colors, to achieve your desired effect. When planning your pattern, consider pattern symmetry—whether you want a balanced, mirrored design or an asymmetrical look. Sketching your pattern beforehand ensures consistency and helps you visualize how colors will interact. Keep your coaster set cohesive by repeating colors and patterns across each piece. Taking the time to choose thoughtful color combinations and plan your pattern results in a polished, attractive final product that showcases your craftsmanship.
Weaving Techniques for Beginners

Getting started with weaving is easier than you think. You’ll want to learn some basic patterns, choose the right yarn and tools, and master simple starting and finishing techniques. These steps help you create beautiful woven projects with confidence. Incorporating diverse designs can also add a creative touch to your coaster set, making each piece unique and personalized. Developing a growth mindset during your learning process encourages experimentation and persistence, leading to better results. Additionally, exploring different weaving techniques can inspire new patterns and elevate your craftsmanship. Paying attention to comfort and support solutions, such as choosing ergonomic tools, can also enhance your weaving experience. Embracing attention to detail ensures each coaster is crafted with precision and care.
Basic Weaving Patterns
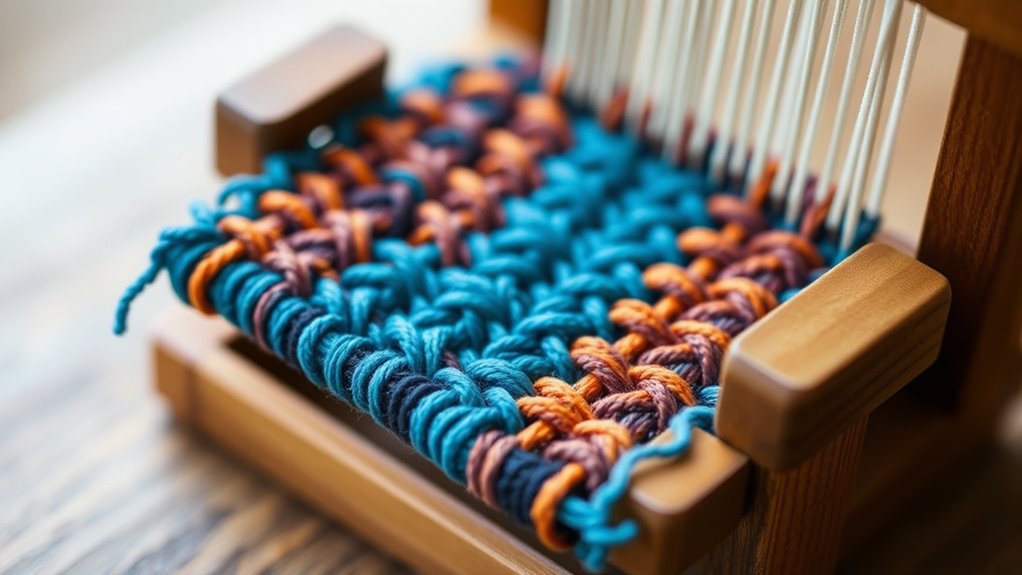
Starting with simple weaving patterns is a great way for beginners to build confidence and develop their skills. Basic patterns like plain weave, twill, and basket weave serve as a solid foundation. To add visual interest, you can incorporate decorative borders around your coaster edges. Experimenting with color blending techniques allows you to create smooth progressions and unique designs. Here are some key patterns to try:
- Plain weave: The simplest, crisscross pattern perfect for beginners.
- Twill: Diagonal lines that add texture and depth.
- Basket weave: Over and under multiple warp threads for a woven basket look.
- Color blending: Gradually shifting yarn colors to enhance patterns and borders.
Mastering these techniques helps you craft beautiful, personalized coasters with dynamic textures and color effects.
Choosing Yarn and Tools
When selecting yarn and tools for your mini loom weaving project, it’s important to prioritize ease of use and compatibility with your skill level. Choose yarn textures that are smooth and manageable, like cotton or acrylic, which glide easily through the warp and weft. Avoid overly fuzzy or coarse yarns until you’re more experienced, as they can be difficult to work with. For tools, pick simple, sturdy heddles and a small shuttle that fit comfortably in your hands. Regular tool maintenance, such as cleaning and storing properly, guarantees your tools stay in good condition and last longer. Here’s a quick guide to help you choose:
| Yarn Textures | Tool Maintenance |
|---|---|
| Cotton, acrylic | Keep tools clean and dry |
| Smooth and soft | Store in a safe, dry place |
| Avoid fuzzy yarns | Regularly check for damage |
Starting and Finishing Techniques
Once your yarn and tools are ready, you can begin weaving your project by learning the basic starting and finishing techniques. Proper loom tension guarantees your fabric stays even, so adjust it before starting. To begin your coaster:
- Secure the yarn at the back of the loom, making sure the tension is firm yet flexible.
- Start weaving by passing the weft yarn over and under the warp threads, maintaining consistent tension for smooth color blending.
- When you reach the desired length, finish by carefully removing the weft yarn and tying off the ends securely.
- To finish, trim excess yarn and secure loose ends with a knot or glue to prevent unraveling. These steps create a polished look and durable coaster.
Finishing and Securing Your Coasters
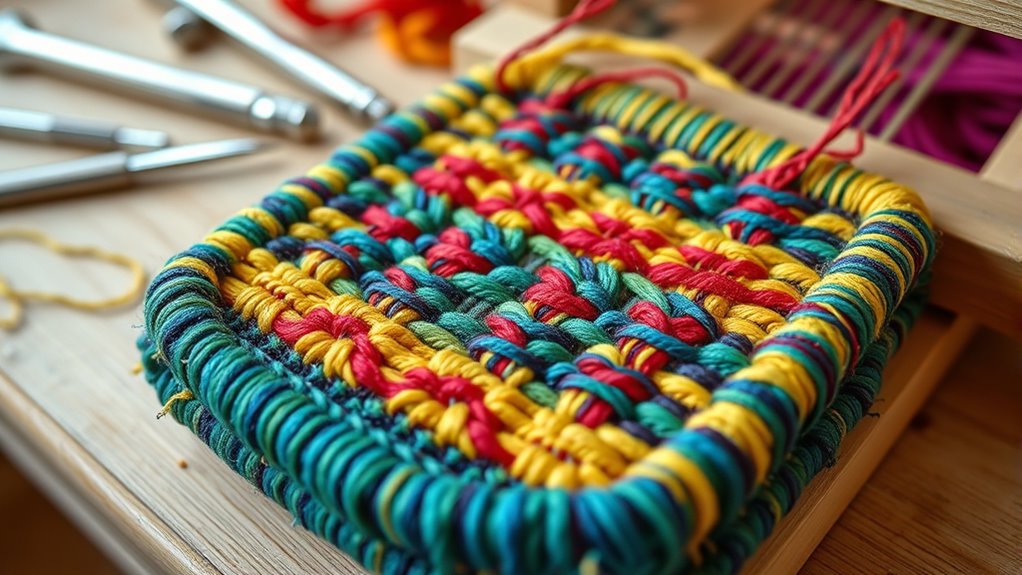
Once you’ve finished weaving, it’s important to secure your thread ends properly to prevent unraveling. Next, trim any excess material for a clean, professional look. Additionally, applying a protective finish can help keep your coasters durable and water-resistant. Using safe, non-toxic finishes can also be beneficial for ensuring your coasters are safe for everyday use around family and children. Choosing the right finishing techniques can further enhance the durability and appearance of your woven coaster set. Properly protecting your skin from UV rays is essential if you’re planning to use your coasters outdoors or in sunlight, ensuring both safety and longevity. Considering the benefits of juice cleansing can inspire you to incorporate more healthful habits into your routine.
Securing Thread Ends
To guarantee your woven coaster looks professional and stays intact, it’s important to properly secure the thread ends. Start by tying a secure ending knot to prevent unraveling. Next, maintain consistent thread tension as you finish to keep the weave even. Then, follow these steps:
- Tie a double knot with the ending knot for added security.
- Carefully weave the loose thread ends back into the existing weave for a clean finish.
- Use a needle to hide thread ends inside the coaster, if needed.
- Gently pull on the thread to check that knots are secure and tension remains consistent.
This process ensures your coaster stays neat and durable, giving it a polished look. Proper securing guarantees your work won’t unravel over time.
Trimming Excess Material
After securing the thread ends, trimming any excess material helps give your coaster a clean, professional finish. Begin with fringe trimming, snipping loose threads to create a tidy edge. Be careful not to cut too close to the woven section, as this could loosen your design. Once the fringe is even, focus on edge finishing. You can do this by gently trimming the perimeter of your coaster to smooth out any uneven edges or loose threads. This step ensures your coaster looks neat and prevents unraveling over time. Taking the time to trim excess material and refine the edges enhances the overall appearance. Proper fringe trimming and edge finishing make your coaster set look polished and ready for use or gifting.
Applying Protective Finish
Applying a protective finish to your woven coasters is essential for durability and a polished look. Sealant application helps safeguard your coasters against moisture, stains, and everyday wear. To guarantee effective surface protection, follow these steps:
- Choose a suitable sealant, like a clear acrylic spray or brush-on polyurethane.
- Work in a well-ventilated area and wear protective gloves.
- Apply the sealant evenly in light, multiple coats, allowing each to dry completely.
- Inspect your coasters for even coverage and touch up any missed spots.
This process not only enhances the appearance but also prolongs the life of your coasters by sealing the fibers. Proper surface protection makes your mini loom weaving project both functional and long-lasting.
Tips for Customizing and Caring for Your Weave

Customizing your mini loom weaving allows you to create unique designs that reflect your personal style. To achieve smooth color blending, experiment with combining different yarn shades and adjusting your weaving techniques. Maintaining consistent thread tension is key; too tight, and your weave becomes stiff, too loose, and it looks uneven. Regularly check and adjust tension as you work to keep your coaster set looking polished. Incorporate color theory elements into your finished pieces to enhance visual appeal and harmony. Incorporating vintage decor elements into your finished pieces can further elevate their rustic charm. When caring for your finished pieces, gently hand wash with mild soap to preserve the fibers and colors. Avoid harsh chemicals or excessive scrubbing, which can distort or fade your design. Store your weavings flat or upright to prevent warping. Additionally, understanding WWE Raw’s financial impact can inspire you to view your craft with a new perspective on value and investment. With proper care and attention to detail, your mini loom creations will stay vibrant and beautiful for years.
Frequently Asked Questions
How Long Does It Typically Take to Complete a Set of Coasters?
The time it takes to complete a set of coasters depends on your skill level and project planning. Usually, it takes about 2-4 hours for beginners, while experienced crafters might finish faster. To manage your time effectively, break the project into smaller steps and set specific goals. Good time management keeps you on track and guarantees you enjoy the process without feeling rushed.
Can I Use Different Materials Other Than Yarn for Weaving?
Sure, why not turn your coaster project into a wild experiment? You can definitely use alternative materials—think plastic, fabric scraps, or even metallic threads—to add creative textures. Just keep in mind, some materials might be trickier to weave or less durable. But hey, if you’re aiming for a one-of-a-kind coaster set, experimenting with various textures will make your craft truly stand out.
What Are Common Mistakes Beginners Make With Mini Loom Weaving?
When starting mini loom weaving, you might make common beginner mistakes like uneven tension or skipping warp threads. These mini loom errors often happen when you’re unfamiliar with the process or rushing. To avoid this, take your time, keep consistent tension, and double-check your setup. Practicing patience helps you learn faster and creates better-looking projects. Remember, mistakes are part of learning, so stay patient and enjoy the process!
How Do I Troubleshoot Uneven or Loose Weaving?
Imagine your woven coaster feels loose and uneven, like a sagging fabric. To fix this, you should check your tension adjustments, ensuring the yarn is snug but not overstretched. Also, review your threading techniques, making sure the yarn is properly seated in the warp and weft. Consistent tension and correct threading prevent loose, uneven weaving, so regularly tighten your yarn and keep your technique steady for a smooth, even finish.
Are There Any Safety Tips for Handling Small Weaving Tools?
When handling small weaving tools, always prioritize safety gear like scissors with rounded tips and finger protectors. Set up your workspace to be organized and clutter-free, reducing the risk of accidents. Keep tools away from children and pets, and work in a well-lit area to see clearly. Properly store your tools after use, and take your time to avoid slips or injuries. Your safety guarantees a fun, injury-free weaving experience.
Conclusion
Don’t worry if you’re new to weaving—this mini loom project is simple and fun! Even if you think your skills aren’t perfect, your coaster set will look charming and unique. With a little practice, you’ll create beautiful, functional pieces that add a personal touch to your space. So, give it a try—you might surprise yourself with how enjoyable and rewarding this craft can be!