
To build a photo transfer wood sign, start by selecting a high-quality, printed photo in reverse using a laser printer. Prepare your wooden surface by sanding and painting or leaving it natural. Apply gel medium or mod podge to adhere the photo face down, pressing firmly and letting it dry overnight. Gently moisten and rub away the paper to reveal your image, then seal the sign for durability. If you keep exploring, you’ll discover detailed tips to perfect your project.
Key Takeaways
- Prepare a smooth, sanded wooden surface and apply a light coat of paint or leave natural for the background.
- Use a high-resolution photo, print it in reverse with a laser printer, and coat the back with gel medium or mod podge.
- Carefully place the photo face down onto the wood, press to remove air bubbles, and let it dry overnight.
- Moisten and gently rub away the paper backing to reveal the transferred image, then seal with a clear finish for protection.
- Personalize your sign by adding stenciled borders, quotes, or embellishments for a unique, decorative touch.

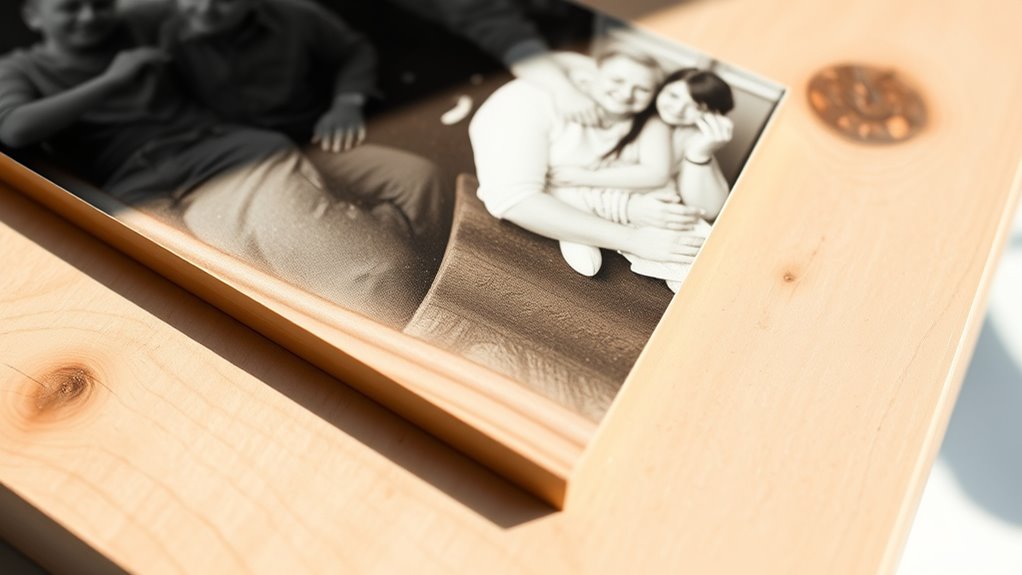
Creating a personalized photo transfer wood sign is a fun and rewarding DIY project that adds a charming touch to your home decor. When you immerse yourself in this craft, you’ll discover a variety of DIY techniques that make the process enjoyable and accessible, even if you’re new to woodworking or transfer methods. The key is understanding how to transfer your favorite photo onto wood smoothly and effectively. Start by choosing a high-resolution image and printing it in reverse on a laser printer, which is essential for the transfer process. This is one of the foundational DIY techniques you’ll rely on to guarantee your design turns out crisp and clear.
Once you have your image ready, you’ll want to prepare your wooden surface. Sand it lightly to remove splinters and create a smooth base. Wipe away dust and apply a coat of white or light-colored paint if you want a bright background, or leave it natural for a rustic look. After the paint dries, you’re set to transfer your photo. Using a gel medium or mod podge, spread a thin, even layer over the photo’s back and carefully place it face down on the wood. Press gently to eliminate air bubbles and guarantee good contact. Then, let it dry completely—usually a few hours or overnight.
The next step involves gently moistening the paper backing with a damp cloth and carefully rubbing it away, revealing your transferred image. This process can be tricky, but patience is vital. You’ll want to use gentle, circular motions to avoid damaging your design. Once you’re satisfied with the transfer, you can seal it with a clear acrylic spray or varnish to protect the image and add a finished look. This sealing step is a vital DIY technique that enhances durability and gives your sign a professional appearance. Additionally, understanding the importance of color accuracy can help ensure your transferred image looks vibrant and true to your original photo.
Now, to add your personal touch, consider incorporating creative ideas like embellishing the sign with stenciled borders, handwritten quotes, or decorative elements. You might use stencils and paint to frame your photo or add meaningful words that complement the image. Alternatively, you can attach small embellishments like ribbons, charms, or pressed flowers to make your sign uniquely yours. These creative ideas allow you to customize your project further and turn a simple photo transfer into a cherished piece of home decor.
Frequently Asked Questions
What Types of Photos Work Best for Transfer?
For the best transfer results, use high-quality photos with clear details and good contrast. Avoid blurry or low-resolution images, as they don’t transfer well. Opt for photos printed with laser printers, since inkjet images often smudge during transfer. Follow proper transfer techniques, like applying even pressure and allowing sufficient drying time. This guarantees sharp, vibrant images on your wood sign, making your project look professional and polished.
How Long Does the Photo Transfer Process Take?
The transfer technique takes approximately one to three hours, depending on your project’s complexity. Start by applying the transfer carefully, then allow ample drying time. The drying time varies with factors like humidity and temperature, so be patient. Rushing the process can result in smudges or incomplete transfers. You’ll want to give the photo transfer plenty of time to dry completely for the best, most beautiful finish.
Can I Customize the Sign Shape and Size?
Yes, you can customize the sign shape and size to fit your creative design. Many DIY kits and services offer various customization options, allowing you to choose from different shapes, dimensions, and styles. This flexibility helps you create a unique piece that perfectly matches your vision. Just specify your preferred shape and size when ordering or designing, and you’ll be able to craft a personalized, one-of-a-kind photo transfer wood sign.
What Type of Wood Is Recommended for Durability?
You should choose a hardwood like cedar or birch for durability, as they have a tight wood grain that resists splintering and warping. These woods also offer better moisture resistance, which helps your sign stay intact over time. Avoid softwoods that tend to absorb moisture more easily. Proper sealing and finishing can enhance durability further, ensuring your photo transfer wood sign remains beautiful and sturdy for years.
How Do I Seal and Protect the Finished Sign?
To seal and protect your finished sign, you should choose a suitable sealant option like polyurethane, polycrylic, or clear acrylic spray. Apply multiple thin coats, allowing each to dry thoroughly. These protective coatings will guard against moisture, UV rays, and scratches, ensuring your sign lasts longer. Remember to work in a well-ventilated area and follow the manufacturer’s instructions for best results.
Conclusion
Now that you’ve mastered the magic of making your photo transfer wood sign, remember: patience and precision pave the path to perfection. Each step you take transforms a simple board into a beautiful, beloved keepsake. So, stay steadfast, savor the process, and celebrate your craftsmanship. Because with careful effort and creative commitment, you create more than just décor—you craft cherished memories. Keep building, keep believing, and let your handiwork herald heartfelt happiness!