
To build a shadow box with memorabilia, start by planning your layout outside the frame to visualize the arrangement. Use acid-free backing and secure your items with photo corners or archival adhesives, ensuring each piece is well-supported without overcrowding. Incorporate depth and decorative props for visual interest, and choose UV-protective glass to shield your keepsakes. With proper mounting and materials, you’ll create a beautiful display that preserves and highlights your treasured memories—keep going to explore detailed techniques.
Key Takeaways
- Plan your layout by arranging memorabilia outside the shadow box to achieve a balanced and visually appealing composition.
- Use acid-free backing and secure items with archival-quality adhesives or photo corners to prevent deterioration.
- Attach 3D items with small stands, pins, or mounting putty to ensure stability without damage.
- Incorporate depth and layers within the shadow box to create a dynamic, three-dimensional display.
- Seal the frame with UV-protective glass and position it away from direct sunlight for long-term preservation.
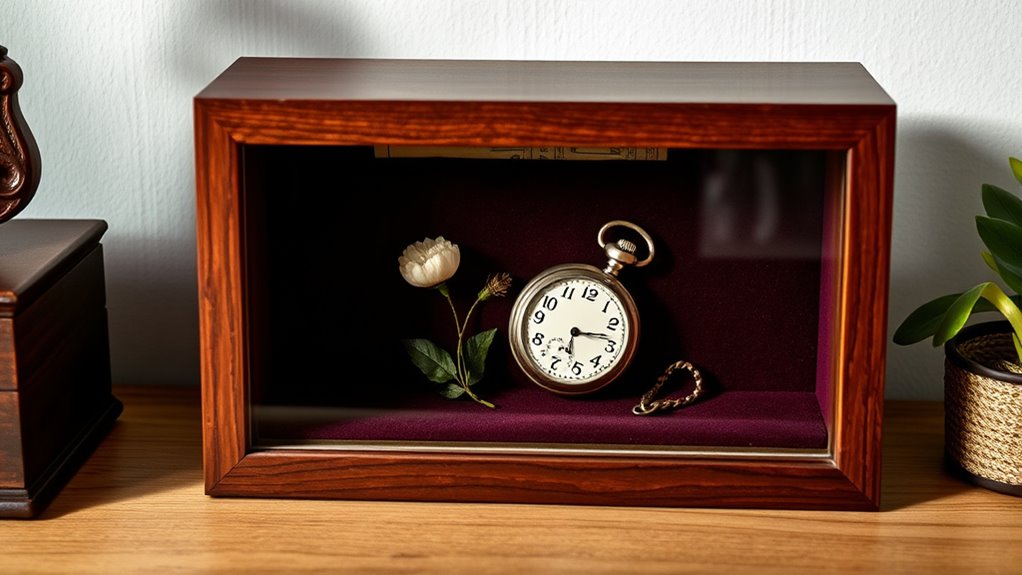
Creating a shadow box is a meaningful way to display your treasured memorabilia and preserve special memories. When you start building your shadow box, understanding shadow box techniques will help you create a visually appealing and durable display. These techniques involve careful planning, proper mounting, and thoughtful arrangement to showcase each item effectively. The goal is to balance aesthetics with protection, ensuring your keepsakes stay intact for years to come.
Memorabilia preservation is at the heart of making a successful shadow box. Before you begin, you should assess each item’s condition and decide how best to display it. Use acid-free backing materials to prevent deterioration and consider framing delicate pieces behind glass instead of directly attaching them to the backing. This not only shields your memorabilia from dust, moisture, and light but also keeps them in pristine condition. When mounting items, opt for archival-quality adhesives or mounting corners that won’t damage or discolor your keepsakes over time.
Assess item condition, use acid-free backing, and frame delicate pieces behind glass for long-lasting preservation.
As you assemble your shadow box, pay attention to the arrangement of your memorabilia. Start by laying out your items outside the box to visualize the overall composition. Think about creating a focal point—perhaps a cherished photograph or a significant artifact—and then arranging supporting items around it. Use different depths and layers to add dimension, giving your display a dynamic, three-dimensional effect. Incorporate small props or decorative elements that complement the memorabilia, enhancing the story you want to tell.
When attaching items inside the shadow box, take care to do so securely but gently. For flat items like photographs, use double-sided acid-free tape or photo corners. For three-dimensional objects, consider using small stands, pins, or mounting putty designed for memorabilia preservation. Avoid over-crowding the space; leaving some breathing room allows each piece to stand out and prevents the display from looking cluttered.
Finally, choose the right frame and glass to protect your display. UV-protective glass minimizes light damage, preserving the colors and details of your memorabilia. Make sure the frame is sturdy and complements the items inside. Once everything is in place, seal the shadow box securely to keep dust and pests out. Display it in a spot away from direct sunlight and extreme temperature changes to further safeguard your memories.
Frequently Asked Questions
What Is the Best Type of Frame for a Shadow Box?
You should choose a sturdy, deep shadow box frame made of wood or metal to best showcase your memorabilia. Look for styles that offer glass protection to keep your items safe from dust and damage. Consider shadow box styles with a secure backing and a clear glass front, which enhances visibility while safeguarding your collectibles. This ensures your display remains attractive and well-preserved over time.
How Do I Secure Fragile Memorabilia Inside the Shadow Box?
To secure fragile memorabilia inside your shadow box, start by carefully displaying delicate items, using a gentle adhesive or archival mounting corners to prevent damage. Then, add a protective backing like acid-free foam or mat board behind the items to keep them in place and shield them from dust and damage. Make sure everything is firmly secured but not pressed too tightly, preserving the integrity of your treasured memorabilia.
Can I Customize the Size of My Shadow Box?
Certainly, you can customize the size of your shadow box! By exploring custom size options, you get the perfect fit for your memorabilia. Resizing techniques like trimming mat boards or adjusting the depth help create a tailored display. With a bit of crafty creativity, you’ll craft a container that complements your collection perfectly, making your memorabilia more meaningful and magnificent. Customizing guarantees your shadow box fits your unique, special keepsakes seamlessly.
What Tools Are Needed for Assembling a Shadow Box?
To assemble a shadow box, you’ll need a craft knife or scissors for cutting your crafting background, and a ruler for precise measurements. Use a hot glue gun or double-sided tape to secure memorabilia inside. Consider lighting options like small LED strips or fairy lights to enhance your display. A screwdriver may be necessary if your shadow box has a frame that needs assembly, making your project both functional and visually appealing.
How Do I Clean and Maintain the Shadow Box Over Time?
Think of your shadow box as a treasured garden needing gentle care. To keep it shining, regularly dust with a soft cloth and use cleaning techniques like a slightly damp cloth for glass. Avoid harsh chemicals that could harm your memorabilia. Follow preservation tips such as avoiding direct sunlight and humidity. These simple steps will help your keepsakes stay vibrant and protected, turning your shadow box into a lasting memory garden.
Conclusion
As you finish your shadow box, you’ll notice how the memorabilia perfectly fits together, almost like it was meant to be. It’s funny how small keepsakes can bring back big memories, reminding you of moments you didn’t realize you’d forgotten. Just like finding that missing piece in a puzzle, creating this shadow box feels like a happy coincidence, turning simple objects into a treasured display. Now, you’ve got a personalized masterpiece that’s as meaningful as it is beautiful.