
To create Halloween window silhouettes with contact paper, pick dark-colored contact paper like black for best impact. Trace spooky designs such as bats, ghosts, or pumpkins onto the paper and carefully cut out the shapes. Peel off the backing and stick the silhouettes onto clean, sunlit windows for nighttime visibility. Make sure to position them for maximum effect and press firmly to avoid bubbles. If you’re curious about more tips and ideas, keep exploring to turn your windows into haunted scenes.
Key Takeaways
- Use dark-colored contact paper to create spooky Halloween silhouettes like bats, ghosts, or pumpkins for windows.
- Trace or freehand cut your chosen designs onto contact paper, then peel and stick onto clean window surfaces.
- Secure silhouettes in areas with maximum sunlight exposure for striking nighttime visibility.
- Easily remove and store silhouettes after Halloween for reuse or seasonal updates.
- Combine contact paper silhouettes with additional decorations for a layered haunted house effect.
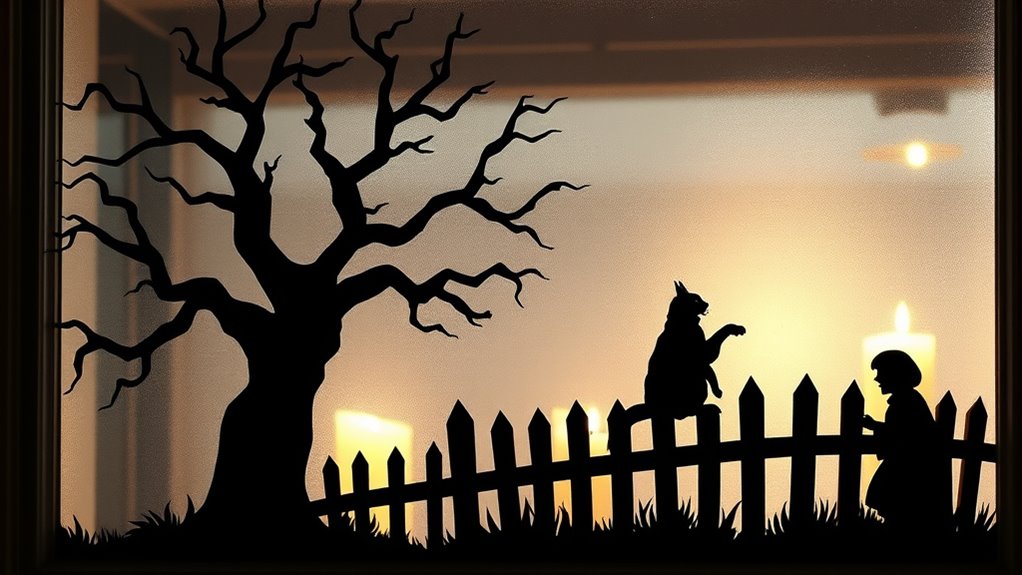
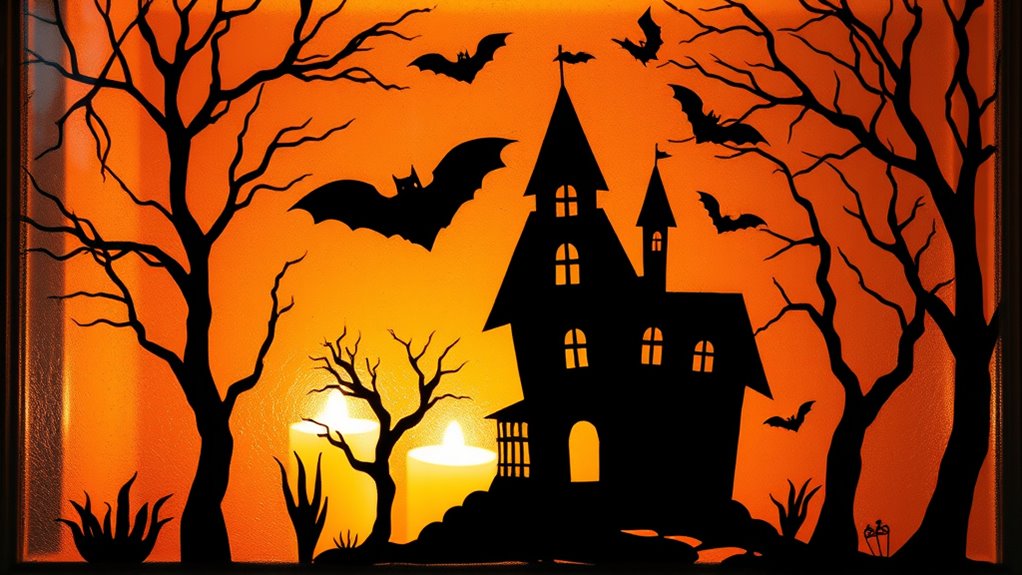
Halloween window silhouettes are a simple yet effective way to transform your home into a spooky scene. With just a bit of contact paper and some creativity, you can create striking images that catch the eye of anyone passing by. Whether you’re aiming for a haunted house vibe or just want to add a touch of eerie charm, window silhouettes are an easy project that makes a big impact. You can even incorporate DIY pumpkin decorating or spooky ghost crafts into your overall Halloween decor to make your display uniquely yours. These silhouettes give your space a haunted feel without the hassle of complex setups or expensive decorations.
First, gather your supplies. You’ll need contact paper—preferably black or dark-colored for that silhouette effect—scissors, a pencil, and some printed templates or freehand designs. Once you pick your design, you simply cut out the shapes from the contact paper. For a classic Halloween look, silhouettes of bats, witches, or haunted houses work well. But for something more playful, you can cut out pumpkins or friendly ghosts. Using templates makes it easier to get precise shapes, especially if you’re new to contact paper crafts. Just trace the design onto the backing of the contact paper, cut out the shape, and peel off the backing to stick it on your window.
Gather supplies, trace designs, cut shapes, peel, and stick for festive Halloween window silhouettes.
When applying your silhouettes, choose a window that gets plenty of sunlight during the day so they shine through at night. Clean the glass thoroughly beforehand, so the contact paper adheres smoothly without bubbles or wrinkles. Position your cutouts where they’ll have the most visual impact, maybe near the top of the window for a floating ghost or along the sides for a framing effect. Press firmly to ensure good adhesion, and if you want to add some extra flair, incorporate DIY pumpkin decorating by placing small carved pumpkins nearby or hanging paper bats for added depth. If you’re feeling more crafty, make spooky ghost crafts using tissue paper or fabric to complement your silhouettes, creating a layered, haunted scene.
The beauty of using contact paper for window silhouettes is that they’re removable and reusable. After Halloween, you can peel them off easily without damaging your windows, storing them for next year’s spooky season. Plus, these silhouettes are perfect for DIY projects—so feel free to experiment with different shapes and themes each year. Whether you’re creating a chilling haunted house or a cheerful pumpkin patch, your window silhouettes will set the mood and impress your visitors. With a little effort, you’ll have a hauntingly beautiful display that showcases your creativity and gets everyone in the Halloween spirit. Incorporating anime-themed decorations can also add a fun, unexpected twist to your Halloween setup.
Frequently Asked Questions
Can Contact Paper Be Reused for Window Silhouettes?
Yes, you can reuse contact paper for window silhouettes if it has good contact paper durability. Reusable contact paper is designed to peel off cleanly without tearing or leaving residue, making it perfect for multiple uses. To maximize its lifespan, handle it carefully when removing and storing it flat. Keep in mind that over time, contact paper may lose some adhesion, so check for any peeling or damage before reusing.
What Tools Are Best for Cutting Contact Paper?
You should use sharp cutting tools like craft knives or precision scissors for cutting contact paper. Craft knives give you clean, detailed cuts, especially for intricate window silhouettes, while sharp scissors are great for larger, simpler shapes. Always work on a cutting mat or a safe surface to protect your workspace. These tools help you achieve precise, crisp edges, making your Halloween decorations look professional and polished.
How Long Do Halloween Window Silhouettes Last Outdoors?
Your Halloween window silhouettes can last outdoors for about two to four weeks, depending on weather conditions. To guarantee durability, you should perform weather considerations and durability testing before applying them. Strong winds, rain, and sun exposure can cause the contact paper to peel or fade faster. Applying a weatherproof sealant or choosing contact paper designed for outdoor use can extend their lifespan, keeping your spooky display looking great throughout the season.
Are There Eco-Friendly Contact Paper Options Available?
You can find eco-friendly contact paper options that are biodegradable and made from sustainable materials. These greener choices let you decorate without feeling like you’re throwing money away or harming the environment. Many brands now offer biodegradable options, so you don’t have to settle for less. It’s a win-win, allowing you to enjoy festive window silhouettes while staying kind to the planet. Just look for labels emphasizing eco-friendly materials and biodegradable features.
How Can I Remove Contact Paper Without Damaging Windows?
To remove contact paper without damaging your windows, start by softening the adhesive with warm water or a gentle window cleaning solution. Gently peel back the edges, using your fingers or a plastic scraper if needed. For stubborn spots, apply rubbing alcohol or adhesive remover carefully, then wipe clean. Always test a small area first to avoid any damage, ensuring a smooth adhesive removal process.
Conclusion
Now that you know how to craft captivating Halloween window silhouettes, you’re ready to create spooky scenes that surprise and delight. With simple supplies and a splash of skill, you’ll transform your windows into wickedly wonderful wonderlands. So, seize your scissors, stick with the steps, and summon your spooky spirit. Your spooky, sensational silhouettes will surely stand out, spooking and sparking smiles all season long. Happy haunting and happy Halloween!