
To instantly improve photos of your handmade pieces, use bright, bold colors against neutral backgrounds to make them pop, and shoot in natural light during golden hour for soft, even illumination. Experiment with angles and framing based on the rule of thirds to highlight details and textures. Keep backgrounds simple and avoid clutter to focus attention on your work. Continuing with these tips will help you discover even better photography skills for your craft.
Key Takeaways
- Use bright, contrasting colors and simple backgrounds to make handmade pieces stand out instantly.
- Capture images in natural light during the golden hour for soft, even illumination.
- Frame the subject using the rule of thirds to create balanced and engaging compositions.
- Focus on highlighting textures and details to showcase craftsmanship effectively.
- Keep backgrounds uncluttered and minimize distractions to draw attention directly to the piece.
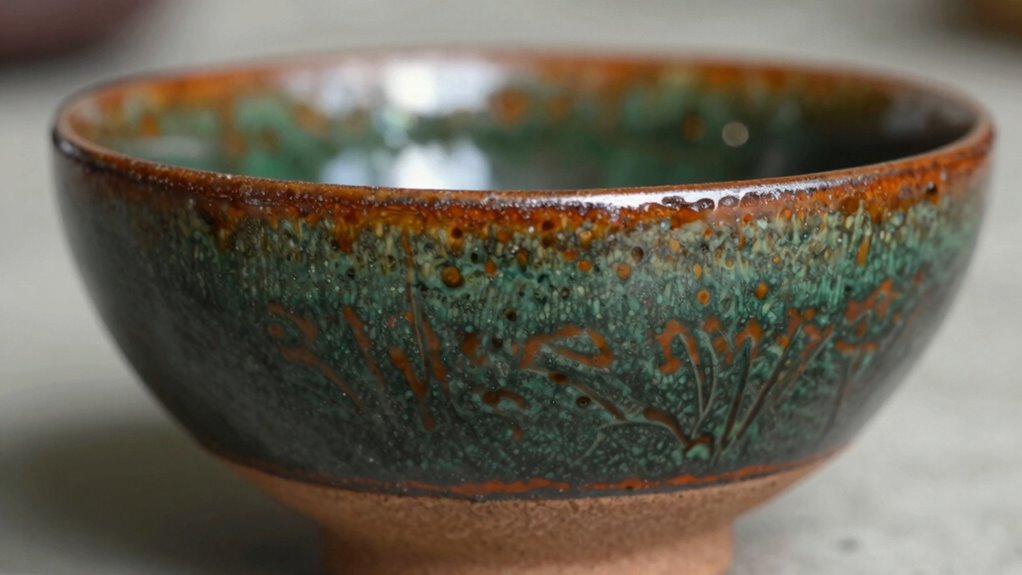
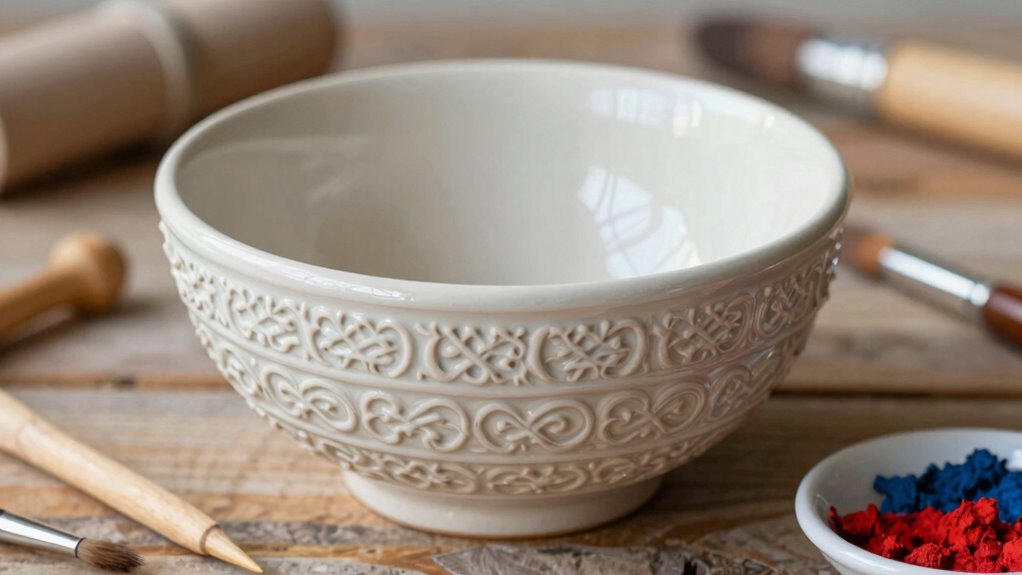
Capturing the beauty of handmade pieces on camera can be challenging, but with a few simple tips, you can make your creations look instantly more appealing. One of the most important factors is understanding how to use color contrast effectively. Bright, bold colors can make your piece pop, especially when placed against a neutral background. Conversely, muted tones or pastel shades work well if you want a soft, delicate feel. Think about pairing complementary colors—like blue and orange or purple and yellow—to create visual interest and draw the viewer’s eye. Avoid cluttering the shot with too many competing hues, which can distract from your craft’s details. Instead, focus on highlighting the color palette that best represents your work and makes it stand out.
Lighting techniques are equally critical for capturing your handmade pieces at their best. Natural light is often your best friend because it produces soft, even illumination that enhances textures and colors without harsh shadows. Aim to shoot during the golden hour—early morning or late afternoon—when sunlight is warm and diffused. If natural light isn’t an option, invest in softbox lights or ring lights to mimic this effect. Position your light source at a 45-degree angle to your piece to create gentle shadows that add dimension without overwhelming the details. Avoid overhead lighting that can flatten the image or create unflattering glare, especially on shiny surfaces. Experiment with different angles and distances until you find the perfect balance that showcases your craft’s texture, color, and intricate details. Additionally, understanding how to optimize your camera settings can make a significant difference in the quality of your photos. Learning about lighting techniques can further elevate your photography and ensure your handmade pieces look their best across various conditions. Incorporating composition principles like the rule of thirds can also help you frame your shot more effectively and draw attention to your craft’s unique features. Practicing different photography techniques and understanding lighting conditions can help you develop a consistent style that truly highlights your handmade work.

Torjim Softbox Photography Lighting Kit, 16'' x 16'' Professional Softbox Lighting Kit with 85W 3000-7500K LED Bulbs, Studio Lights for Photography/Video Recording/Live Streaming/Portraits Shooting
【Illuminate Your Creativity】 Torjim softbox lighting kit is made of high-quality PET fabric and a foldable nylon cover,…
As an affiliate, we earn on qualifying purchases.
As an affiliate, we earn on qualifying purchases.
Frequently Asked Questions
What Lighting Conditions Best Enhance Handmade Items for Photography?
You should shoot your handmade items in natural light, ideally near a window or outdoors, to enhance their details and colors. Aim for soft shadows, which occur during overcast days or with diffuse light, to prevent harsh contrasts. Avoid direct sunlight, as it can create unwanted glare and sharp shadows. Natural light with gentle shadows brings out the textures and craftsmanship, making your handmade pieces look more appealing and professional in photos.
How Can I Prevent Glare or Reflections on Shiny Surfaces?
To prevent glare or reflections on shiny surfaces, you must tame that blinding shine! Use matte finishes to diffuse light and eliminate harsh reflections. Applying anti-reflection coatings or placing your piece at a slight angle can dramatically reduce unwanted glare. You could also use a polarizing filter on your camera to cut reflections and glare, giving your handmade creation a flawless, glare-free look that truly stands out in photos.
What Camera Settings Are Ideal for Capturing Handmade Crafts?
You should set your camera to a low ISO for clarity and use a tripod to guarantee camera stability, preventing blur. Adjust the aperture to a smaller f-stop (like f/8 or f/11) to get sharp focus across your craft. Use natural or diffused lighting to reduce glare. These settings help you capture detailed, well-lit images of handmade crafts instantly, highlighting their textures and colors beautifully.
How Do Background Choices Affect the Overall Look of Photos?
Your background choices greatly influence your photos’ overall look by emphasizing texture contrast and color harmony. A textured background adds depth, making your handmade pieces pop, while a complementary color palette creates visual harmony. Choose backgrounds that contrast with your craft’s textures and colors without overpowering them. This balance draws viewers’ eyes directly to your work, highlighting craftsmanship and enhancing the photo’s aesthetic appeal instantly.
Are There Specific Props That Improve Handmade Piece Photography?
Yes, specific props can greatly enhance your handmade piece photography. Focus on props selection that complements your piece’s style and colors, like textured fabrics or natural elements. Use styling techniques such as layering and strategic placement to create a balanced composition. Props like vintage tools or plants add context and interest, making your photos more engaging. These choices help tell a story and make your handmade creations stand out instantly.

UBeesize 12'' LED Ring Light with 62'' Tripod Stand, Selfie Ring Light for Video Recording, Live Streaming, TikTok & YouTube, Compatible with iPhone & Android (Black)
【12” Powerful LED Ring Light with 240 LEDs】This upgraded 12-inch ring light features 240 high-efficiency LEDs delivering 10W…
As an affiliate, we earn on qualifying purchases.
As an affiliate, we earn on qualifying purchases.
Conclusion
So, next time your handmade masterpiece looks more “abstract art” than “photo-ready,” just remember: maybe it’s not the craft, but your camera’s attitude. With a little patience and some quick tricks, you’ll have images that actually showcase your talent—rather than just your messy workspace. Because in the end, if your photos can’t do your work justice, perhaps it’s time to reconsider whether your true masterpiece is just your stubborn refusal to learn. Happy shooting!
neutral background photography backdrop
As an affiliate, we earn on qualifying purchases.
As an affiliate, we earn on qualifying purchases.

JOILCAN Mini Tripod for Camera, 25" Tabletop Camera Tripod, Portable Travel Tripod with Phone/Tablet Holder, Lightweight Aluminum Tripods for DSLR Phone Spotting Scope
【Versatile Shooting Angles】Small camera tripod is equipped with a stable and smooth 3-way pan head, giving you a…
As an affiliate, we earn on qualifying purchases.
As an affiliate, we earn on qualifying purchases.