
Looking for fun DIY craft ideas to try this weekend? You can create personalized mason jar lanterns, upcycle T-shirts into stylish totes, and paint unique plant pots. Make decorative dreamcatchers, design custom photo wall art, or craft a chandelier from recycled bottles for a chic touch. For kids, finger paint art is perfect. Want to add greenery? Try building a concrete plant stand or an herb garden in cinder blocks. Keep exploring for more inspiring projects!
Key Takeaways
- Explore personalized wall art, gallery walls, and vintage book page decor for unique home displays.
- Upcycle old T-shirts into tote bags or transform pallets into rustic furniture for eco-friendly projects.
- Create decorative candle holders, plant stands, and herb gardens with simple molds and reclaimed materials.
- Use painting, embroidery, and resist techniques to craft vibrant wall hangings and textured artwork.
- Incorporate kid-friendly crafts like washable finger paints and natural embellishments for family fun.
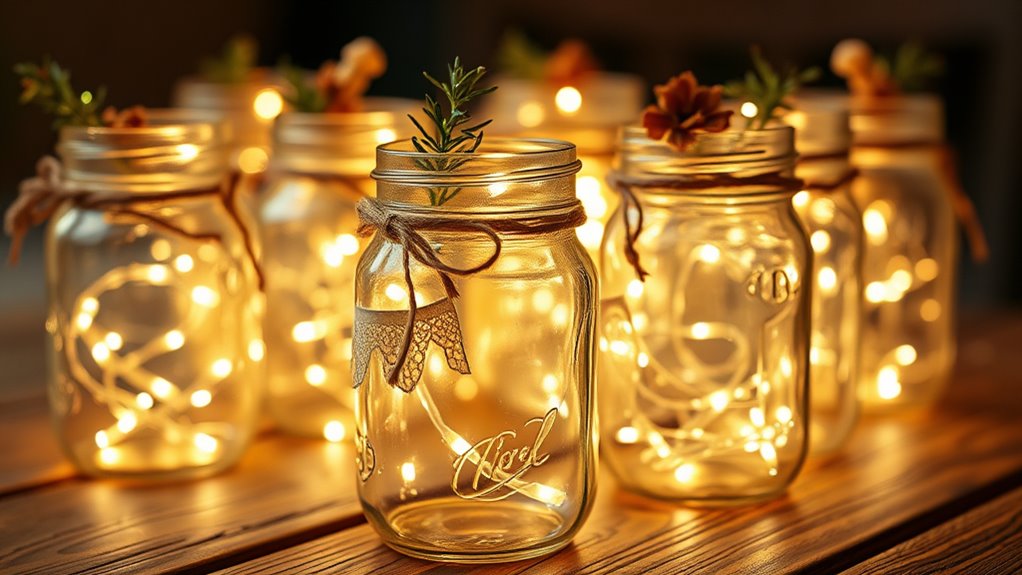
Personalized Mason Jar Lanterns
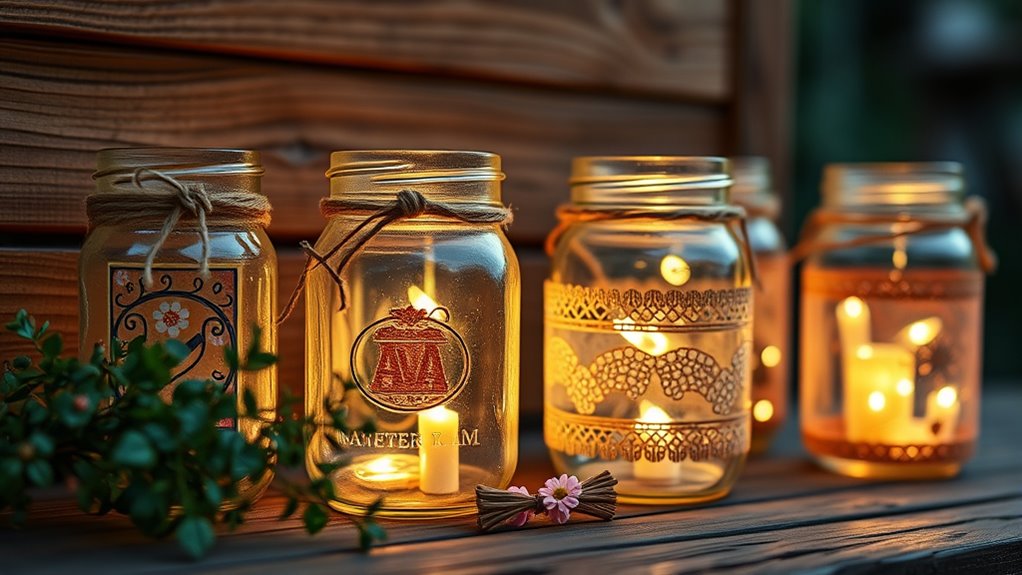
Creating personalized mason jar lanterns is a fun and easy way to add a cozy glow to any space. You start by gathering plain mason jars and choosing decorative elements like paint, twine, or stickers to customize them.
Use glass paint or markers to create designs or write messages that reflect your style. You can also wrap the jars with twine or ribbon for a rustic look.
Place a tea light or LED candle inside to illuminate your creation. For extra flair, consider adding small embellishments like dried flowers or stickers before sealing the jar.
These lanterns make great decorations for parties, outdoor spaces, or cozy nights at home. With a little creativity, you’ll have charming, personalized lighting in no time.
Upcycled T-Shirt Tote Bags
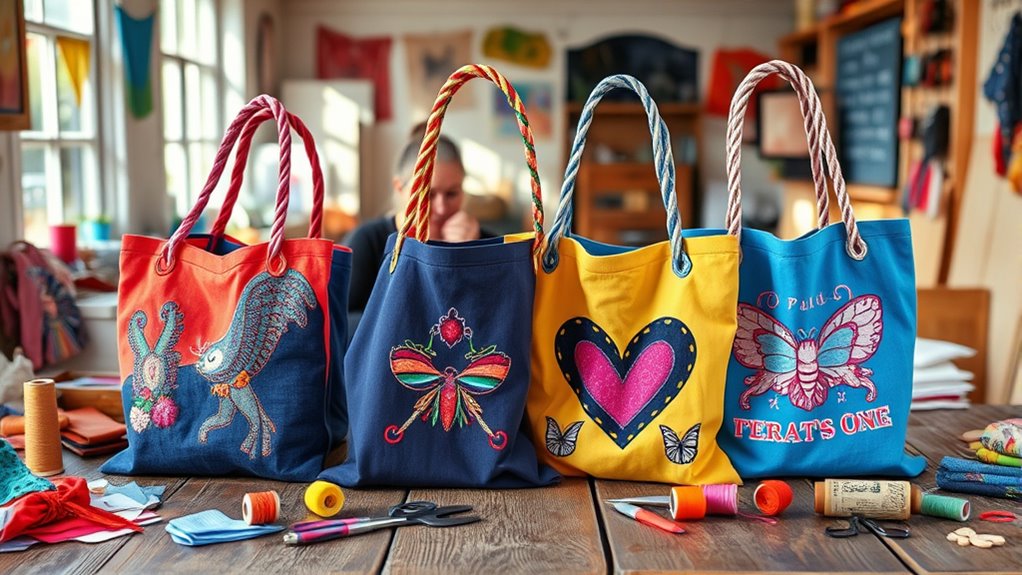
Upcycled T-shirt tote bags are a stylish and eco-friendly way to repurpose old clothing. You can transform your worn-out or favorite T-shirts into functional, reusable bags with just a few simple steps.
Create eco-friendly, stylish tote bags from old T-shirts with simple, fun DIY steps.
This project not only reduces waste but also creates a unique accessory that shows off your personal style. To get started, gather an old T-shirt, scissors, and some basic sewing supplies or fabric glue.
You can customize your tote with added decorations like patches or fabric paint for extra flair. This project is perfect for a quick weekend craft, allowing you to craft something practical while helping the environment.
Plus, it’s easy to make multiple bags for yourself or as thoughtful gifts for friends. When selecting your T-shirt, consider the durability of the fabric to ensure your tote holds up with regular use.
Hand-Painted Plant Pots
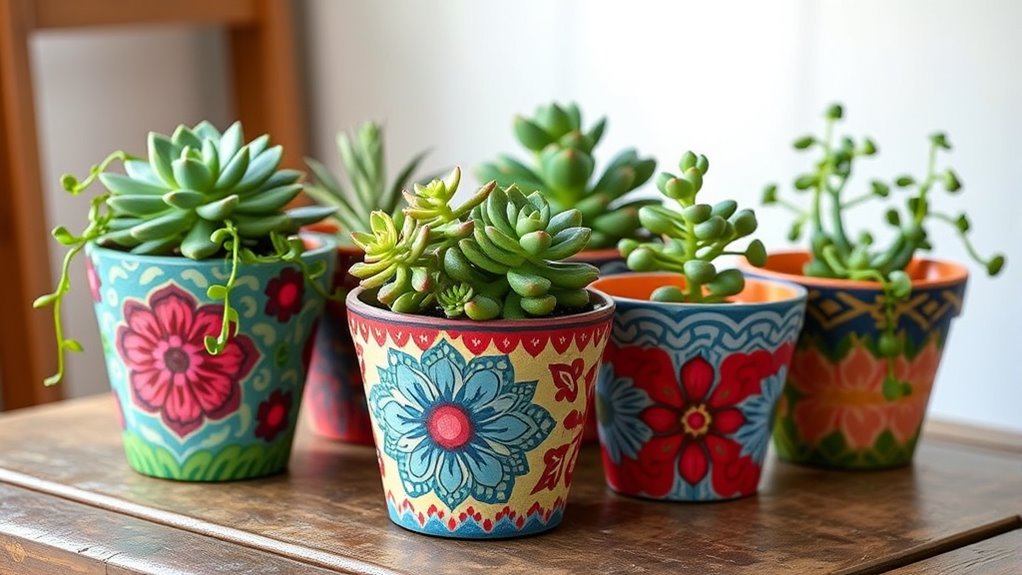
Have you ever wanted to add a personal touch to your home decor? Hand-painted plant pots are perfect for that. Grab plain terracotta or ceramic pots and let your creativity run wild. Use acrylic paints to create vibrant patterns, quotes, or designs that reflect your style. This project is simple and allows you to showcase your personality in your greenery display. Plus, customizing your pots can make your space stand out and feel more unique. Engaging in creative practice can also make the process more enjoyable and fulfilling. Incorporating aesthetic elements inspired by nature can further enhance your designs and create a cohesive look. Paying attention to payment security ensures your online transactions remain safe while purchasing art supplies or tools online. Additionally, visiting stores like Joanns Craft Store can provide you with a wide selection of supplies and store hours to plan your crafting sessions effectively.
Decorative Dreamcatchers
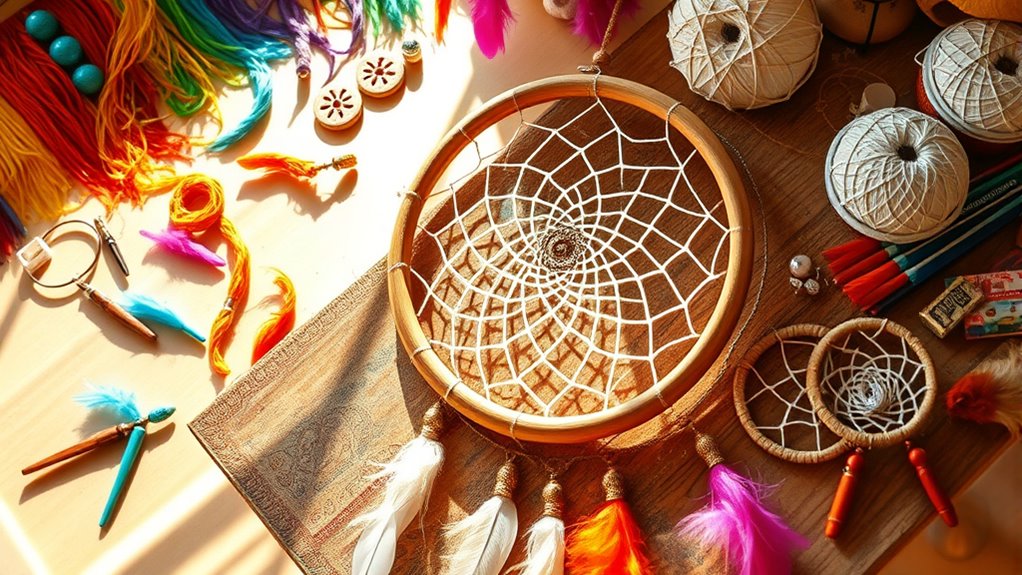
Ever wondered how to add a touch of bohemian charm to your space? Decorative dreamcatchers are a perfect DIY project to achieve that. You can customize them with colorful beads, feathers, and intricate web designs that match your style.
Hang them near your bed, windows, or even in your living room to create a calming vibe. Making your own dreamcatcher is simple and fun, and it allows you to showcase your creativity. Plus, you get a unique piece that reflects your personality.
To get started, gather some basic supplies and follow your own design ideas. This weekend, transform plain materials into a beautiful, meaningful decoration.
- Choose a hoop size and material
- Tie colorful threads or yarn for the web
- Add beads and feathers for embellishment
- Experiment with different patterns
- Hang your finished dreamcatcher in your favorite spot
Custom Photo Wall Art
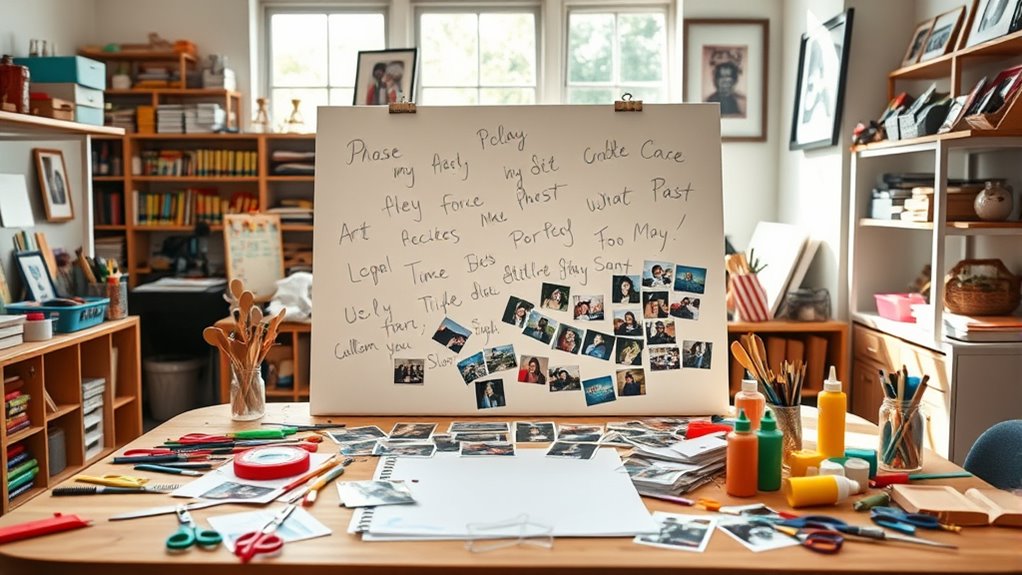
You can transform your space by showcasing personal photos in creative ways that reflect your style. Experiment with different arrangement techniques, like grid layouts or eclectic clusters, to add visual interest. Incorporating visual storytelling can make your photo wall even more impactful and meaningful.
Personal Photos Display Ideas
Looking to transform your space with meaningful decor? Personal photos are a perfect way to add warmth and personality. You can create a stunning display by mixing different frame styles and sizes for an eclectic look. Consider grouping photos in a grid for a clean, organized vibe, or hanging them in a casual cluster for a relaxed feel. Use string lights or fairy lights to highlight your favorite shots. Incorporate other elements like small shelves or corkboards to add variety. You might also create a timeline of memories along a hallway or stairway. Play with symmetry or asymmetry to match your style. Remember, the key is to showcase moments that mean something to you, making your space uniquely yours. Additionally, understanding residency requirements in your area can help you plan your DIY projects around your moving or renovation schedule. Incorporating family moments into your decor can make your space feel more welcoming and personal. To further enhance your display, experimenting with remote work inspired themes can create a modern and functional aesthetic. Using vetted supplies can ensure your DIY project is both safe and durable. Incorporating automation technologies can also help streamline your setup and maintenance.
Creative Arrangement Techniques
Transforming a collection of personal photos into mesmerizing wall art requires more than just hanging frames randomly. You need creative arrangement techniques to turn your space into a visual story. Consider grouping photos by theme, color, or size for a cohesive look. Play with different layouts, such as symmetrical grids or eclectic clusters, to match your style. Use a mix of frame styles and finishes for added interest, or create a gallery wall with a mix of art and photos. Planning your layout on the floor first can save time. Here’s a quick guide:
| Arrangement Style | Best For | Tips |
|---|---|---|
| Grid | Symmetry | Use painter’s tape for alignment |
| Cluster | Eclectic | Vary sizes for depth |
| Linear | Modern | Keep spacing consistent |
| Freeform | Artistic | Let creativity flow |
DIY Scented Candles
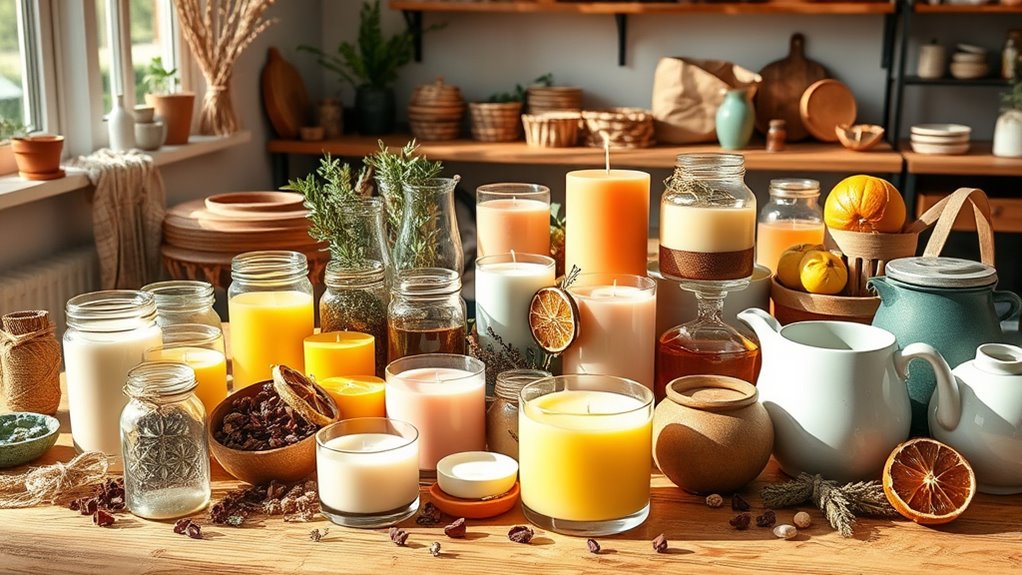
To create the perfect scented candle, start by choosing fragrance oils that match your mood or season. Next, find a mold that fits your style and guarantees a smooth, even burn. Getting these details right will make your DIY candles both beautiful and fragrant. Consider using high-quality ingredients to ensure the best scent throw and candle longevity. Incorporating mind-body awareness can add a layer of intentionality and mindfulness to your crafting process, making it more meaningful and personalized. Practicing mindfulness techniques during your project can enhance focus and foster a sense of calm throughout the process. Additionally, understanding keto diet basics can help you stay energized and focused if you decide to enjoy your candles while practicing your craft.
Choosing Fragrance Oils
Have you ever wondered how to choose the perfect fragrance oils for your homemade candles? Picking the right scent can elevate your creation and set the mood.
First, consider the mood or atmosphere you want—calming, energizing, or cozy. Next, choose oils with strong, true scents that won’t fade when heated. Pay attention to the oil’s flash point; lower flash points may burn off quickly. Understanding the importance of active listening and empathy can help you select fragrances that resonate emotionally with your intended ambiance.
Test small amounts first to see how the scent develops. Additionally, research supporting tests can help you determine which fragrances maintain their integrity during burning. Understanding the benefits of high-quality oils can guide you toward better selections. Ultimately, opt for high-quality, skin-safe oils, especially if your candles will be used frequently. Additionally, selecting oils with a suitable scent profile can help create a harmonious blend that enhances your candle’s ambiance. Remember that the horsepower of electric dirt bikes can range from 10 to 20, offering a quick and powerful performance similar to traditional gas bikes, which can inspire your own energetic and lively candle designs.
Perfecting Candle Mold
Ever wonder how the right candle mold can make or break your DIY scented candles? Choosing the perfect mold is essential for achieving professional-looking results. You want molds that are heat-resistant, easy to release, and match your style.
Silicone molds are popular because they’re flexible and non-stick, making removal simple. Metal or ceramic molds can give a more classic appearance but may require a release agent. Before pouring, confirm your mold is clean and dry.
Consider using a spray or coating to prevent sticking, especially with intricate designs. Also, think about the size and shape that best showcase your scent and decor.
Using appropriate materials in your candle molds can also affect heat conduction and overall finish. With the right mold, you’ll create beautiful, perfectly shaped candles that impress every time.
Rustic Wooden Picture Frames
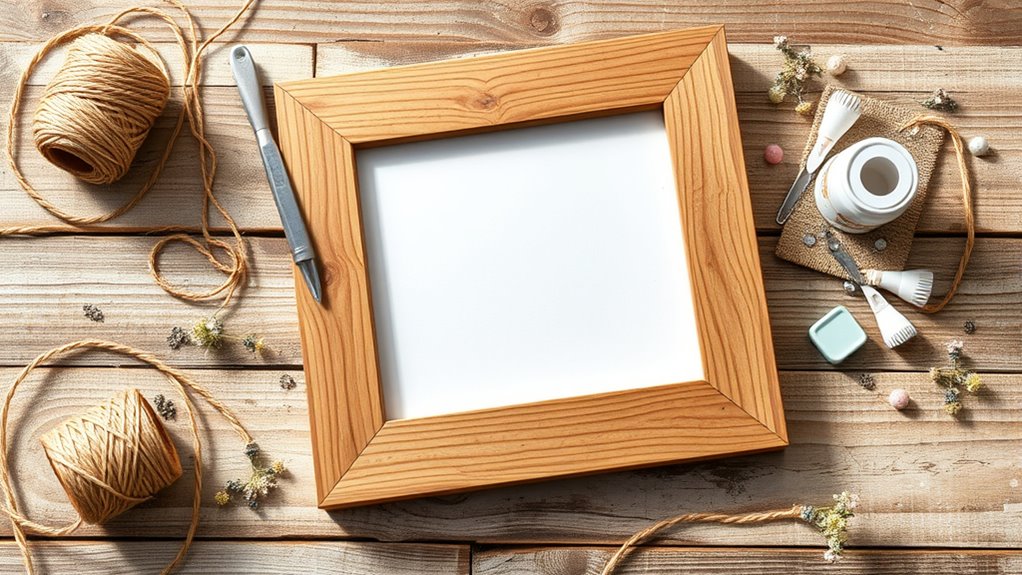
Rustic wooden picture frames add charm and warmth to any space, making them a popular choice for DIY decor projects. You can customize them to match your style, using reclaimed wood or new timber for a genuine rustic look.
Rustic wooden picture frames bring cozy charm and customizable warmth to your home decor.
To start, gather your wood, nails, and a saw. Sand the edges for a smooth finish, then assemble your frame with nails or wood glue.
Add personal touches like distressed paint, twine accents, or decorative metal corners. You can even incorporate natural elements such as small branches or dried flowers for extra character.
These frames work beautifully in living rooms, bedrooms, or hallways, showcasing your favorite photos with a cozy, handcrafted vibe. Your finished piece will be a unique, heartfelt addition to your decor.
Colorful Macramé Wall Hangings
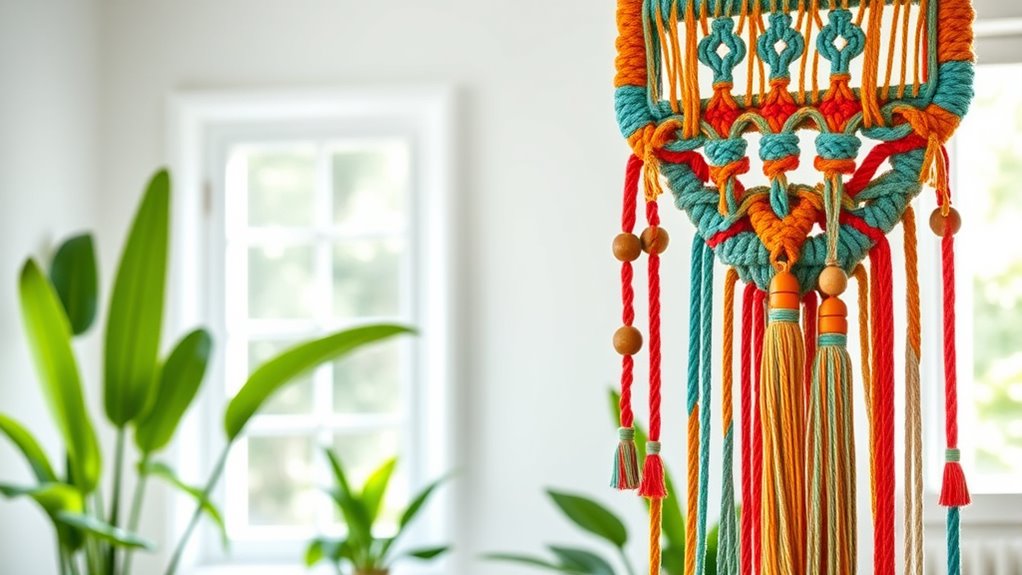
Colorful macramé wall hangings offer a vibrant and textured way to personalize your space, complementing the rustic charm of wooden frames. With their intricate knots and lively hues, they instantly add visual interest to any room.
You can choose bright, bold colors or softer pastel shades, depending on your style. Creating your own macramé piece is simple: select colorful cords, follow knotting patterns, and experiment with different lengths and textures.
Hanging a large, eye-catching piece above your sofa or bed instantly transforms your decor. Plus, it’s a fun, relaxing project to tackle over the weekend.
Whether you keep it minimalist or go for a boho-inspired design, these hangings inject personality and color into your home effortlessly.
Fairy Light Mason Jars
Fairy light Mason jars are a charming and versatile way to add a warm, inviting glow to any space. You can use them as cozy nightlights, table centerpieces, or outdoor decor.
Personalize your jars by wrapping fairy lights around the inside or gluing decorative elements like twine or faux flowers to the outside. Fill them with small ornaments, shells, or seasonal items for extra flair.
For a rustic touch, leave the jar’s lid intact and attach a handle or ribbon. These jars are perfect for creating ambiance at parties or relaxing evenings.
Plus, they’re easy to make and budget-friendly. With a little creativity, your fairy light Mason jars can transform any room into a magical retreat.
- Wrap lights around the inside or outside
- Add decorative touches like twine or flowers
- Fill with seasonal items or small keepsakes
- Attach handles or ribbons for a rustic look
- Use as nightlights, centerpieces, or outdoor decor
Painted Rock Garden Markers
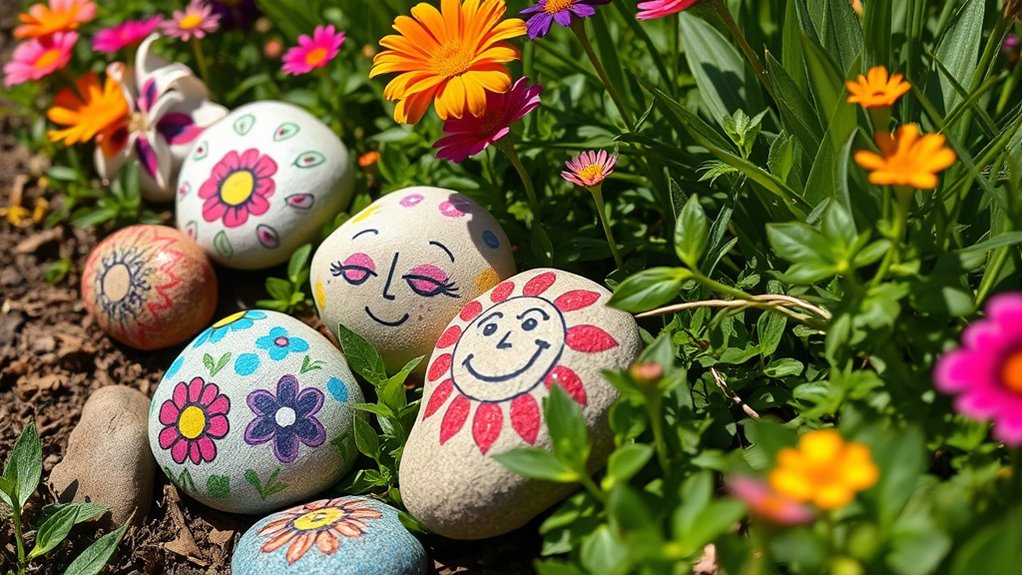
Start by choosing smooth, natural stones that fit your garden’s style. Then get creative with your paint designs to make each marker unique.
Once you finish painting, apply a sealant to protect your artwork from weather and wear.
With these steps, your painted rock garden markers will add charm and durability to your outdoor space.
Selecting Natural Stones
Have you ever wondered how to choose the perfect natural stones for painted rock garden markers? Picking the right stones guarantees your markers are durable and attractive.
Look for stones with a smooth, flat surface, making them easier to paint and label. Consider size: small enough to handle comfortably but large enough to withstand weather.
Opt for stones with vibrant colors or interesting textures to add visual appeal. Avoid overly porous stones that absorb paint or break easily.
Check for stability—flat bottoms help keep your markers steady in the ground. Finally, select stones that complement your garden’s aesthetic.
Designing With Paints
Wondering how to make your painted rock garden markers truly stand out? The key is in your paint choices and techniques. Bright, contrasting colors catch the eye, while fine-tip brushes help add detailed designs or lettering. Use acrylic paints for vibrant hues and weather resistance. Consider adding patterns like polka dots, stripes, or floral motifs to personalize each marker. To inspire your creativity, here’s a quick guide:
| Paint Type | Best Use | Tips |
|---|---|---|
| Acrylic | Bright, weatherproof designs | Use thin layers, dry between coats |
| Permanent Markers | Fine details and lettering | Perfect for detailed writing |
| Chalk Paint | Soft, matte finish | Ideal for rustic looks |
Experiment with colors and styles to match your garden’s personality!
Sealing for Durability
Once you’ve finished painting your garden markers, sealing them properly guarantees your artwork lasts through the elements. A good sealant protects against rain, sun, and wear, keeping your designs vibrant.
Choose a waterproof, clear sealer suitable for outdoor use. Apply it in thin, even coats, allowing each layer to dry completely before adding the next.
Using a spray sealant makes the process quicker and ensures even coverage, while brush-on sealants give you more control. Remember to work in a well-ventilated area and wear protective gear.
For best results, seal the markers once or twice. Proper sealing transforms your painted rocks into durable, eye-catching garden markers that stand up to weather and time.
- Use a waterproof spray sealant for even coverage
- Apply multiple thin coats for better protection
- Allow each coat to dry fully before the next
- Work in a well-ventilated space
- Reapply sealant annually for longevity
Fabric Scrap Garland
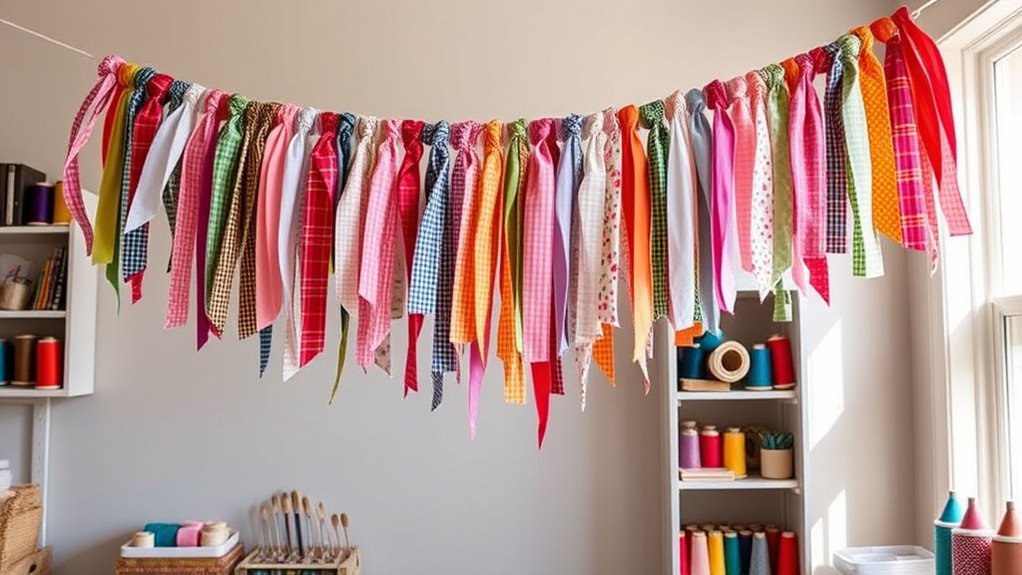
Creating a fabric scrap garland is a simple and colorful way to add a personal touch to any space. To make one, gather fabric scraps in various colors and patterns. Cut them into strips or shapes of your choice.
Create a vibrant, personalized decor by assembling fabric scraps on a string—easy, fun, and budget-friendly.
Next, cut a length of twine or ribbon long enough for your desired display. Attach each fabric piece by folding it over the twine and securing with a knot or sewing.
Space the scraps evenly for a balanced look, or cluster them for a more eclectic vibe. Hang your garland on a wall, across a window, or along a mantel to brighten up your room.
This project is quick, budget-friendly, and you get to showcase your favorite fabrics in a fun, decorative way.
Handmade Soap Bars

Have you ever considered making your own soap bars at home? It’s a fun and rewarding project that lets you customize scents, colors, and textures. Plus, homemade soap makes a thoughtful gift or a luxury treat for yourself.
To get started, gather natural oils, lye, and essential oils. You’ll need to carefully mix and pour your soap mixture into molds. As it cools, you can add dried herbs, flower petals, or exfoliants for a personal touch.
Here are some tips to elevate your soap-making game:
- Use colorful natural clays for vibrant effects
- Incorporate skin-nourishing ingredients like oatmeal or honey
- Experiment with layered or swirled designs
- Add a personal label or packaging for gifting
- Store your soap in a cool, dry place to cure properly
Vintage Book Page Wall Decor
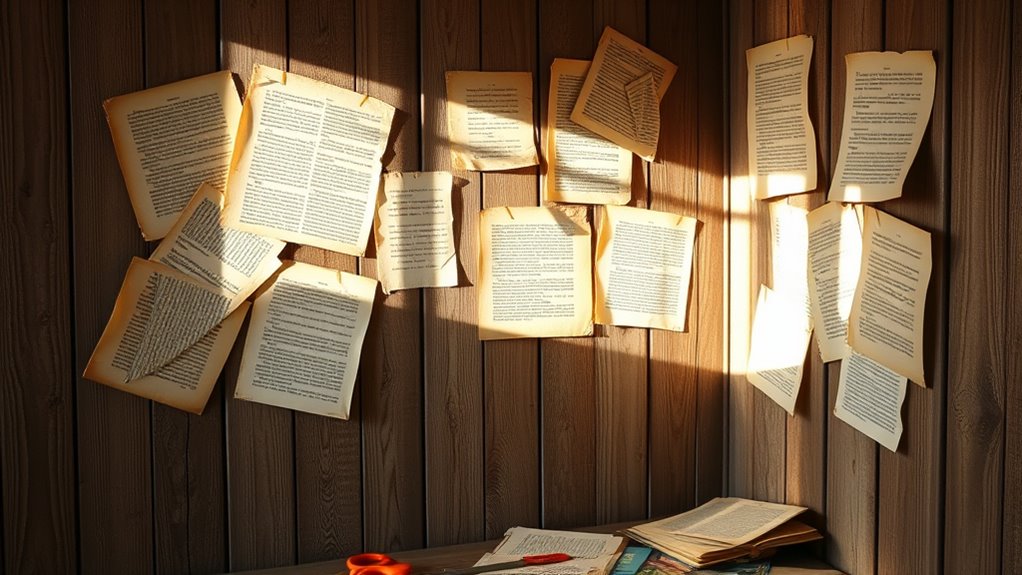
Vintage book page wall decor creates a unique, stylish focal point in any room.
You can arrange torn pages in frames or as wallpaper for an artistic touch.
Consider different display ideas to showcase your favorite literary fragments creatively.
Stylish Book Art
Transforming old book pages into stylish wall art offers a unique way to add vintage charm to your space. Start by selecting pages with interesting text or illustrations that resonate with your decor.
You can create eye-catching displays by arranging pages in different shapes, like hearts or stars, or framing them as standalone pieces. Consider combining pages with other vintage elements, such as antique keys or lace, for a curated look.
Use simple tools like scissors, glue, and frames to bring your design to life. This project is easy to customize, whether you want a minimalist look or a cluttered, eclectic vibe.
The result is a personalized, artistic statement piece that sparks conversation and adds a nostalgic touch to any room.
- Choose pages with meaningful or attractive content
- Experiment with different shapes and arrangements
- Incorporate other vintage or textured items
- Use frames or mount directly on the wall
- Mix and match for a gallery wall effect
Display Ideas
Looking for stylish ways to showcase your vintage book pages? Consider turning them into wall decor that adds character to your space. Frame individual pages or create a collage by arranging several in matching frames. You can also mount pages directly onto a corkboard or a painted canvas for a casual look.
For a more eclectic vibe, try overlapping pages in a shadow box or creating a layered gallery wall. Incorporate vintage frames or distressed wood for a rustic touch. To keep things organized, stick to a color theme or specific book genres.
This display method not only highlights your love for books but also makes a unique, conversation-starting art piece. With a little creativity, your vintage pages can transform your wall into a charming visual story.
Embroidered Hoop Art
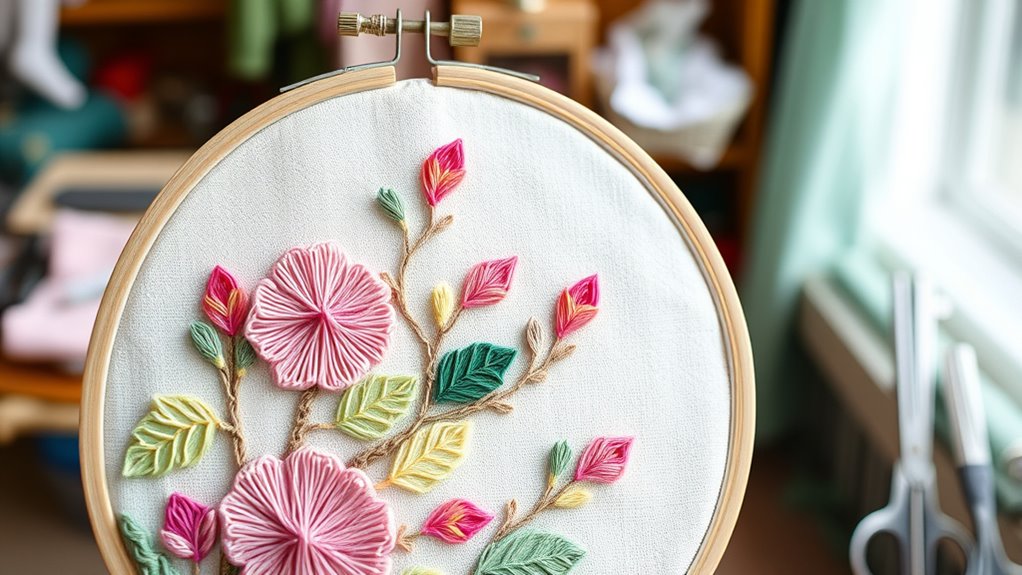
Have you ever wanted to add a personalized touch to your home decor? Embroidered hoop art makes it easy! You can create beautiful, custom pieces that reflect your style and brighten up any room. Choose a simple design or get creative with patterns and colors. All you need is a hoop, fabric, embroidery floss, and a needle.
Start by sketching your design on the fabric, then carefully stitch it in. Once finished, tighten the hoop, trim excess fabric, and hang your artwork. It’s a fun, relaxing project that delivers instant gratification. Plus, it’s easy to change out designs for different seasons or moods.
Whether you’re a beginner or experienced, embroidered hoop art adds charm and personality to your space.
- Choose inspiring quotes or motifs
- Use vibrant or pastel threads
- Incorporate textured stitches
- Mix fabrics for layered effects
- Frame or hang directly from the hoop
Tape Resist Painted Canvas
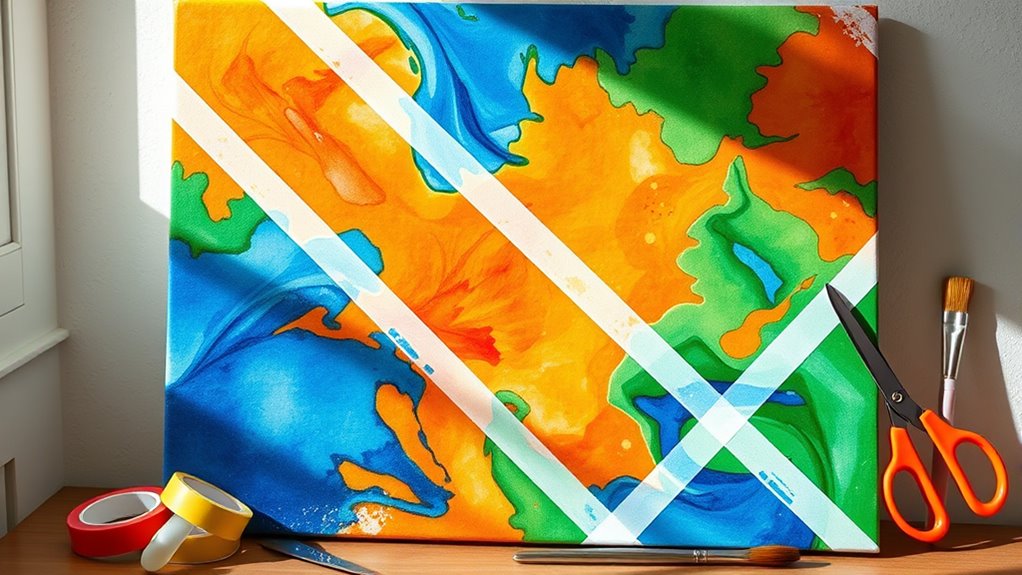
Start by choosing the right tape to create clean, crisp lines on your canvas.
Then, apply the tape strategically to form your desired design before painting over it.
Once the paint dries, carefully peel away the tape to reveal your unique, resist-inspired artwork.
Choosing the Right Tape
Wondering how to select the best tape for your tape resist painted canvas? The right tape makes a big difference in achieving clean, crisp lines.
Look for painter’s tape or masking tape designed for delicate surfaces; these prevent paint bleed and damage.
Consider the tape’s width—wider tape creates bold lines, while narrower tape offers more detail.
Check for low-tack adhesives to avoid tearing your canvas or lifting paint.
Make sure the tape is easy to remove without leaving residue.
Ultimately, choose a tape that’s flexible enough to conform to curves or textured surfaces.
- Use painter’s or masking tape for clean edges
- Opt for low-tack adhesive to prevent damage
- Select wider tape for bold, defined lines
- Pick flexible tape for curves and textured surfaces
- Ensure easy removal without residue
Applying Tape Strategically
To achieve clean, sharp lines in your tape resist painted canvas, it’s essential to apply the tape strategically. Start by planning your design carefully, sketching it lightly with a pencil if needed.
Place the tape along the areas where you want the paint to resist, ensuring each edge is pressed down firmly to prevent paint from seeping underneath. Use small pieces or strips to create geometric patterns or intricate shapes, adjusting as you go.
For straight lines, use a ruler or masking tape to guide your placement. Be precise with your tape placement, especially at corners and edges, to maintain crisp borders.
Take your time to smooth out air bubbles and wrinkles to prevent bleeding. Proper tape application is key to achieving a professional-looking finish.
Painting and Revealing
Once you’ve applied your tape and painted over the canvas, the excitement comes with revealing the design. Carefully peel away the tape to uncover the crisp, clean lines beneath. The contrast between the painted areas and the exposed canvas creates a striking, modern look.
To enhance your artwork, consider adding a splash of metallic paint or a light varnish for extra shine. You might also experiment with different color combinations or layer multiple colors for depth. Remember to handle the tape gently to avoid smudging your design.
This technique is perfect for creating geometric patterns, abstract art, or even personalized gifts. With patience and precision, you’ll produce a stunning piece that showcases your creativity and attention to detail.
Wooden Pallet Coffee Table
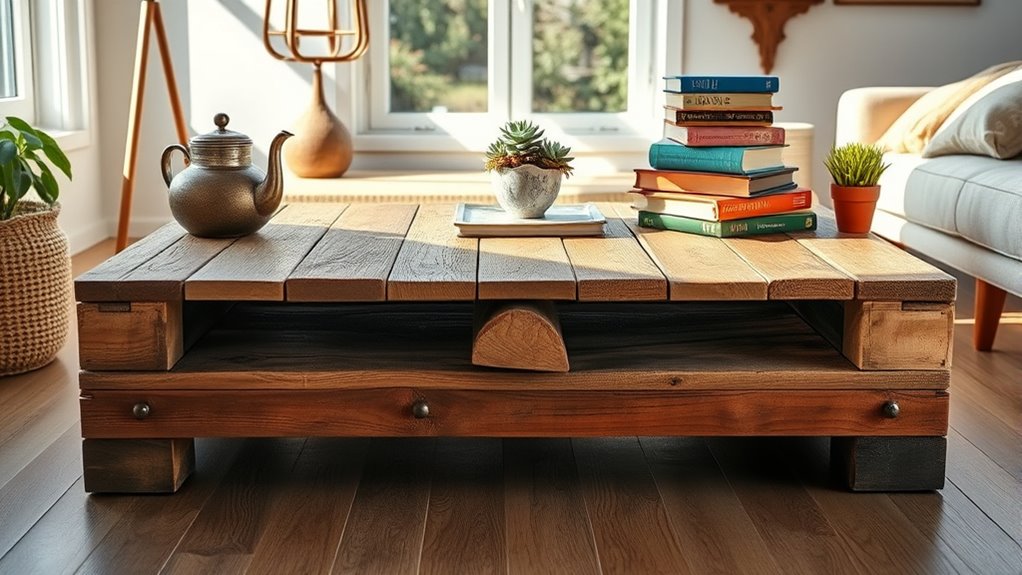
Creating a wooden pallet coffee table is a simple and budget-friendly project that adds rustic charm to any living space. You’ll love transforming reclaimed pallets into a functional centerpiece. Start by disassembling the pallets, sanding the wood, and assembling the pieces into a sturdy table. Finish with a protective coat to enhance durability. This project not only saves money but also gives you a sense of pride.
| Feelings You’ll Experience | Why It Matters |
|---|---|
| Excitement | Turning raw materials into art |
| Satisfaction | Creating something useful with your hands |
| Pride | Showcasing your unique, handcrafted piece |
| Relaxation | Enjoying the process and the result |
| Inspiration | Motivating future DIY projects |
Chandelier From Recycled Bottles
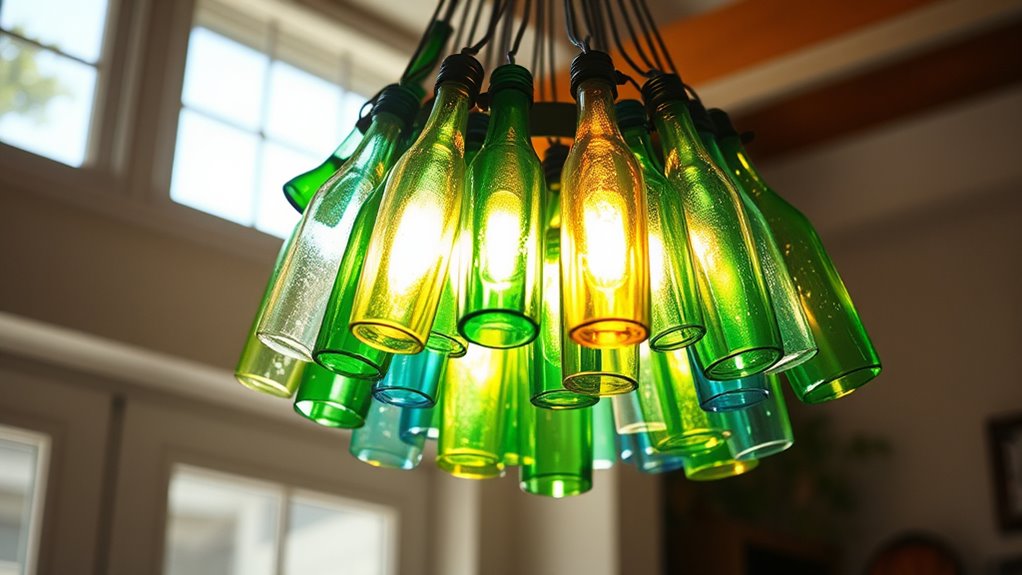
Transforming recycled bottles into a stunning chandelier is an eco-friendly way to add a unique focal point to your home. Start by collecting clean, empty bottles in different shapes and sizes. Cut the bottoms off and sand the edges for safety. You can paint or decorate the bottles to match your decor.
Create an eco-friendly, eye-catching chandelier by repurposing clean bottles into a colorful, stylish light display.
Use wire or fishing line to hang the bottles at varying lengths for visual interest. Attach a light fixture or LED string lights inside or around the bottles for illumination. This project is customizable—try different colors, patterns, or arrangements.
Not only will you reduce waste, but you’ll also create a conversation piece that’s both stylish and sustainable.
- Gather various bottle shapes and sizes
- Use wire or fishing line for hanging
- Decorate with paint or decals
- Install LED string lights or bulbs
- Arrange for a balanced, eye-catching display
Kid-Friendly Finger Paint Art
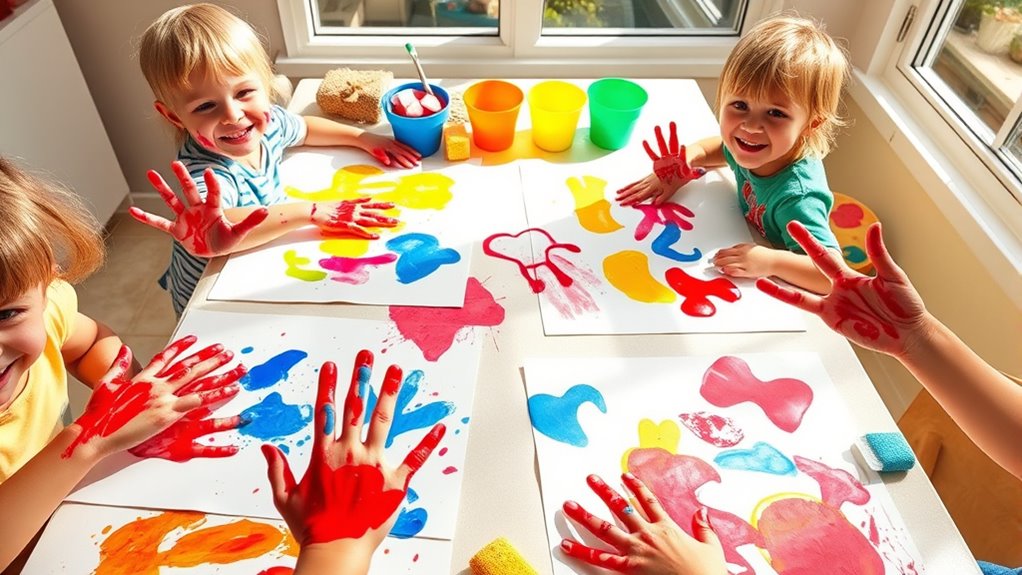
If you’re looking for a fun and mess-free way to introduce your kids to art, kid-friendly finger paint is a perfect choice. These paints are specially made to be safe and washable, so you don’t have to worry about stains or toxicity.
You can set up a simple painting station with paper and vibrant colors, encouraging your kids to explore their creativity. Finger painting helps develop their fine motor skills and hand-eye coordination while letting them express themselves freely.
Plus, it’s easy to clean up—just wash their hands and surfaces afterward. You can also add fun elements like glitter or stamps to make the activity more exciting.
With kid-friendly finger paint, you’re turning art time into an enjoyable, mess-free experience.
Concrete Plant Stands

A concrete plant stand is a sturdy and stylish way to elevate your indoor or outdoor plants, adding both functionality and aesthetic appeal to your space. Making your own stand allows you to customize the size, shape, and finish to suit your decor. You can use simple tools like a mold, cement, and decorative elements to craft a unique piece.
A DIY concrete plant stand adds style and durability to your indoor or outdoor greenery.
Personalize your stand with paint, mosaic tiles, or embedded stones for extra flair. Building your own concrete plant stand is cost-effective and satisfying, giving you a durable piece that enhances any space.
- Choose a mold shape (circular, square, or geometric)
- Mix and pour cement into the mold
- Add decorative stones or glass for texture
- Let it cure for 24-48 hours
- Finish with paint or sealant
DIY Herb Garden in Cinder Blocks
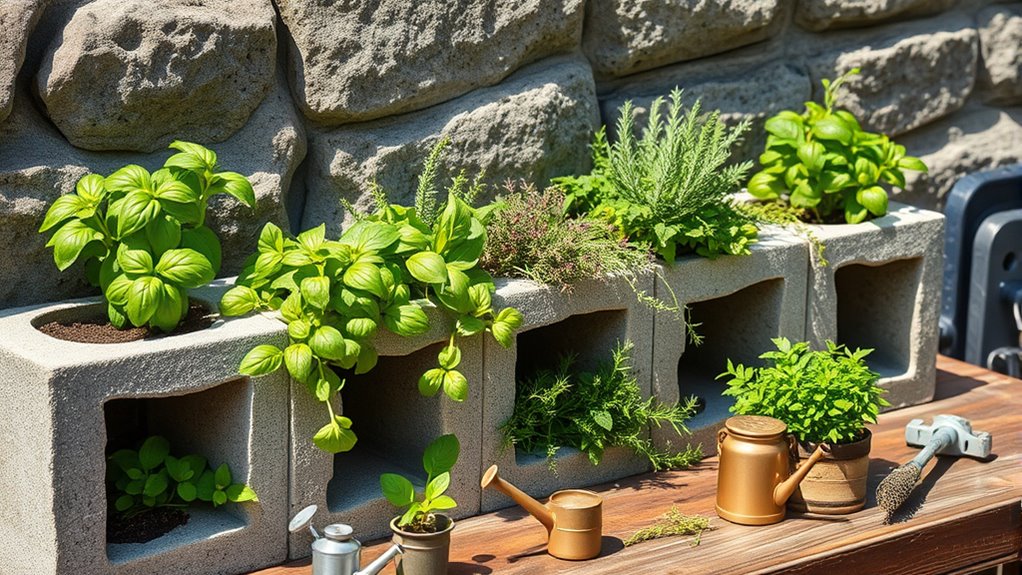
Ever thought about creating a simple and practical herb garden using cinder blocks? It’s an easy project that adds charm and functionality to your space. First, choose a sunny spot and arrange the cinder blocks in your preferred layout. Fill the top cavities with good soil, then plant your favorite herbs like basil, parsley, or cilantro. You can also stack blocks to create a vertical garden or add a wooden shelf for extra plants. This setup allows for easy watering and maintenance, plus it’s customizable to fit your space. Plus, cinder blocks are affordable and durable, making this a great weekend project.
| Benefits | Tips |
|---|---|
| Low cost | Use non-toxic paint if decorating |
| Easy to assemble | Ensure proper drainage in cavities |
Frequently Asked Questions
What Are Some Eco-Friendly Materials for DIY Crafts?
When you’re looking for eco-friendly materials for DIY crafts, you can choose items like recycled paper, cardboard, and scrap fabric.
Natural materials such as bamboo, cork, and jute are sustainable options.
You might also use leftover paint, biodegradable glues, and plant-based dyes.
These choices help reduce waste and environmental impact, making your projects more eco-conscious while still being fun and creative.
How Can I Personalize DIY Projects for Gifts?
Think of your gift as a blank canvas waiting for your personal touch. To personalize your DIY projects, add heartfelt touches like handwritten notes, custom engravings, or unique embellishments that reflect the recipient’s personality.
Use their favorite colors or motifs to make it special. By tailoring each detail, your gift becomes a heartfelt story, turning a simple craft into a cherished keepsake that shows how much you care.
What Safety Tips Should I Consider for Kids’ Crafts?
When working on kids’ crafts, you should prioritize safety. Always supervise children closely, especially around scissors, hot glue, or small parts to prevent accidents.
Use non-toxic, washable supplies and confirm proper ventilation if using paint or glue.
Keep a first aid kit nearby for minor injuries.
Teach kids to handle tools carefully, and set clear boundaries to maintain a safe, fun crafting environment.
Which Crafts Are Suitable for Beginners?
When choosing crafts suitable for beginners, focus on projects that require minimal tools and simple techniques. You can try painting, making friendship bracelets, or decorating picture frames. These activities are easy, fun, and safe for beginners, especially kids.
Make sure you gather all necessary supplies beforehand, follow instructions carefully, and supervise children to prevent accidents. Starting with straightforward crafts boosts confidence and keeps everyone engaged and happy.
How Do I Choose the Right Tools for DIY Projects?
Imagine you’re a painter with a blank canvas—choosing the right tools is like selecting the perfect brushes and colors. To pick wisely, consider your project’s needs and research recommended supplies.
Start with basic tools, then upgrade as your skills grow. Trust your instincts and read reviews, like listening to a trusted guide.
With the right tools in hand, your DIY projects will come alive with confidence and creativity.
Conclusion
This weekend is the perfect time to get creative with these DIY crafts. Did you know that engaging in hands-on projects can boost your mood and reduce stress by up to 20%? Whether you’re making personalized lanterns or upcycling old T-shirts, you’ll not only craft beautiful items but also enjoy the mental health benefits. So grab your supplies and start transforming everyday objects into stunning, personalized decor—your home and mind will thank you!