
Explore a variety of easy DIY wall art ideas to instantly refresh your space, from creating bold abstract canvas prints and framing beautiful nature photos to designing geometric patterns with tape, crafting cozy macramé hangings, and composing watercolor quotes. You can also experiment with tape resist techniques, yarn-wrapped pieces, and personalized calendars or message boards. With simple supplies and a little creativity, you can make stunning wall decor—stick around to discover more inspiring ideas to transform your room effortlessly.
Key Takeaways
- Explore canvas art techniques like abstract, watercolor quotes, or faux tile murals to create vibrant focal points.
- Use framed prints, photos, and collages for personalized wall displays with meaningful images and decorative touches.
- Incorporate geometric patterns with tape, washi tape, or string art for modern, eye-catching designs.
- Make textile wall hangings such as macramé or fabric tapestries for textured, bohemian-inspired decor.
- Combine DIY projects like upcycled frames, stencil art, or decal murals to add unique, budget-friendly elements to your walls.

DEYEGELEA 3-Pack 2'x5.5' Ft Gridwall Panel Display Stands Heavy Duty Floor Standing Retail Display Rack with Triangle Base for Retail Art Show with 20 Hooks
Movable Floorstanding Design: The innovative triangle-base design enhances stability and allows for easy mobility. Customize your display layout...
As an affiliate, we earn on qualifying purchases.
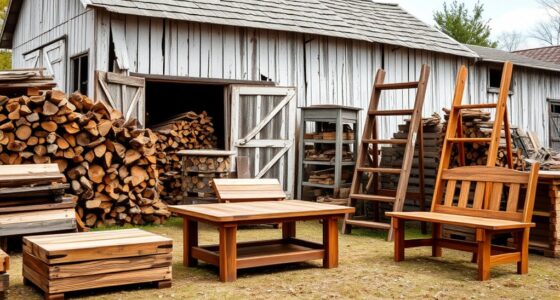
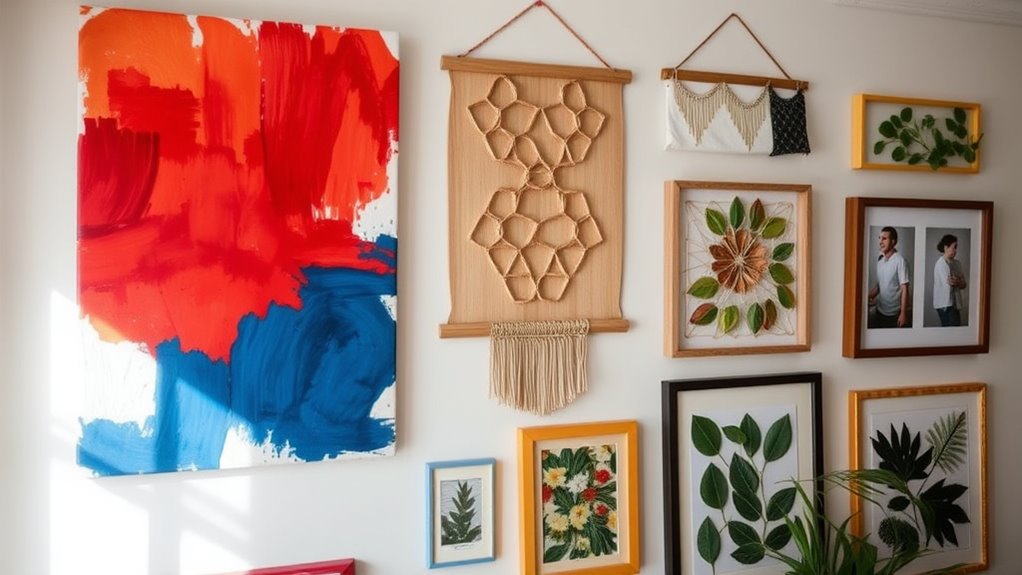
Abstract Canvas Prints With Bold Colors
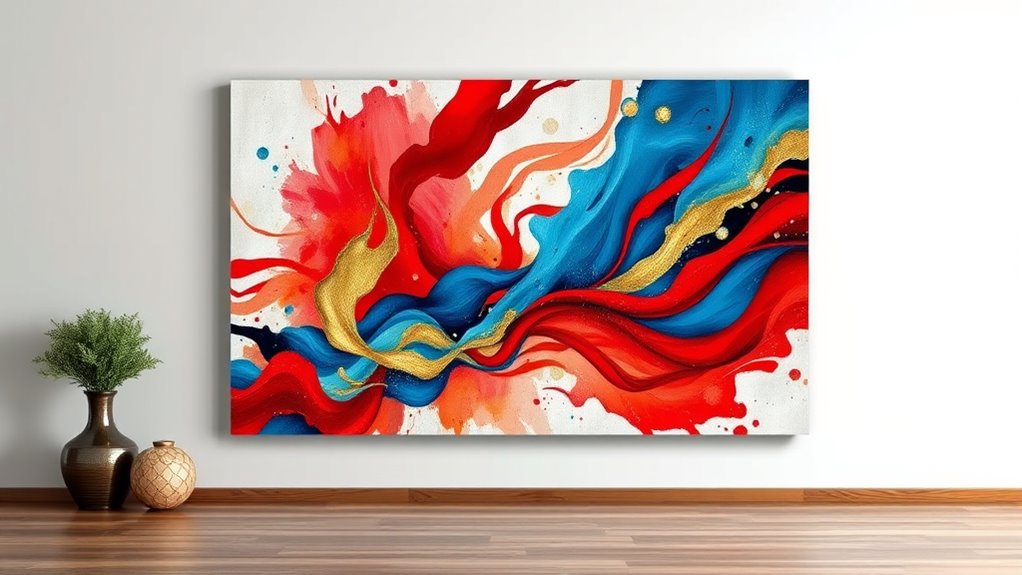
Have you ever considered transforming a blank wall into a vibrant focal point? Creating abstract canvas prints with bold colors is an exciting way to do it. You don’t need to be an artist—just pick your favorite bright hues and get creative. Start by choosing a canvas size that suits your space, then experiment with brushstrokes, splashes, or geometric shapes. Use acrylic paints for quick drying and vibrant finishes. Let your imagination run wild—layer colors, blend them, or keep sharp contrasts. Once you’re satisfied, let it dry completely. Hang your artwork where it will catch the eye, and enjoy the burst of energy it brings to your room. Bold, abstract art can make any space feel lively and personalized. To ensure your artwork remains vibrant over time, consider protecting your canvas with a clear sealant. Additionally, choosing the right canvas material can help preserve the brightness and prevent fading over time. Incorporating UV-resistant coatings can provide extra protection for your artwork against sun damage. For added durability, selecting high-quality paints can also contribute to the longevity of your abstract art.

DEYEGELEA 2'x5.5' Ft Gridwall Panel Display Stands Heavy Duty Floor Standing Retail Display Rack with Triangle Base for Retail Art Show With 10 Hooks
Movable Floorstanding Design: The innovative triangle-base design enhances stability and allows for easy mobility. Customize your display layout...
As an affiliate, we earn on qualifying purchases.
Framed Botanical Prints From Nature Photos
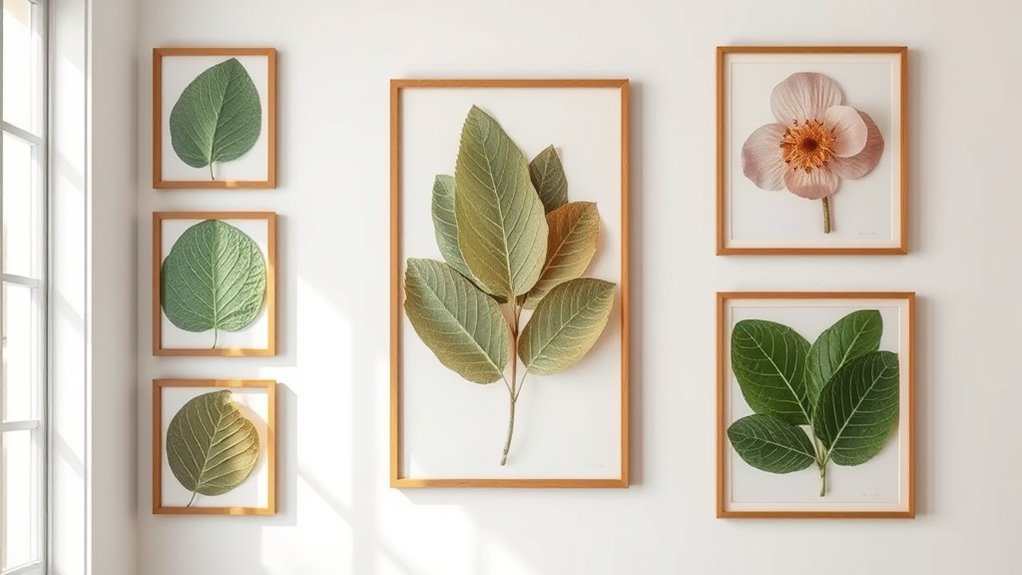
Transforming your favorite nature photos into framed botanical prints is a simple and elegant way to bring the outdoors inside. Start by selecting high-quality images of leaves, flowers, or trees that inspire you. Then, print them in sizes that fit your space, ensuring vibrant colors and sharp details. To enhance your prints, consider using natural or neutral-toned frames that complement the botanical theme. Here are some ideas to elevate your project:
- Choose black or white frames for a classic look.
- Use matting to add depth and focus to each print.
- Arrange multiple prints in a gallery wall for visual interest.
- Incorporate artistic elements like textured papers or botanical illustrations to enrich your displays. Adding automation techniques such as digital printing or designing custom layouts can also help personalize your art pieces. Incorporating trendy framing styles can further modernize your display and make it stand out. Understanding the history of pinball machines can inspire creative ways to design themed wall art, blending vintage charm with modern decor. Exploring various eco-friendly crafting methods can help make your project more sustainable and aligned with your values. This easy DIY project adds a touch of nature and sophistication to any room, making your space feel fresh and inviting.

Grid Wall Display Panel Heavy-Duty Foldable, 2ft x 5ft Black Wire Wall Grid 1-Pack with 10 Hooks, Spring-Loaded Pins( Flat Base) for Retail Display Racks,Vendor Booth Display Stand, Trade Exhibits
Heavy-Duty & Sturdy Construction: Crafted from robust steel, this display risers offers exceptional stability and durability.Its reinforced flat...
As an affiliate, we earn on qualifying purchases.
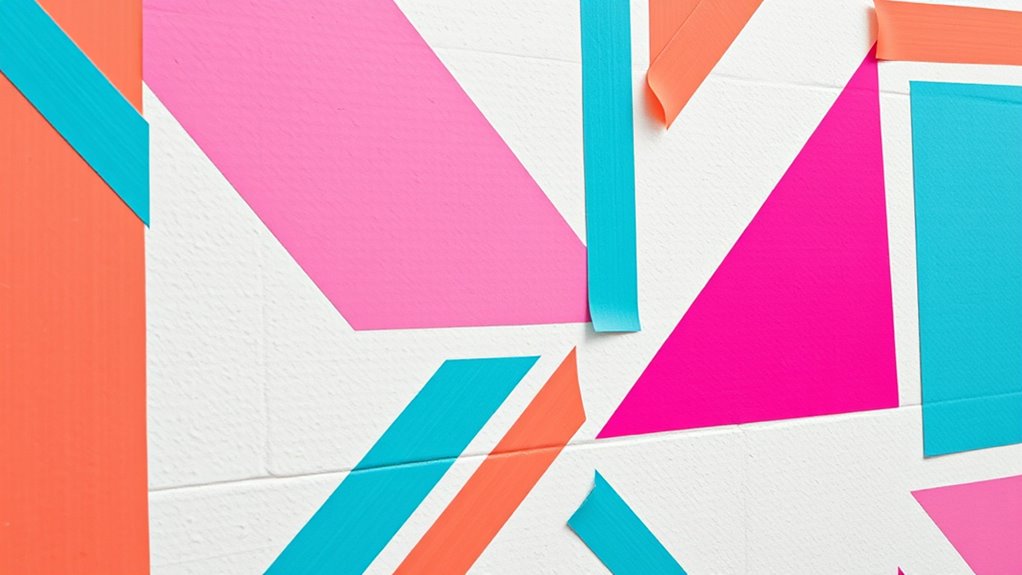
Geometric Wall Hangings Using Tape and Paint
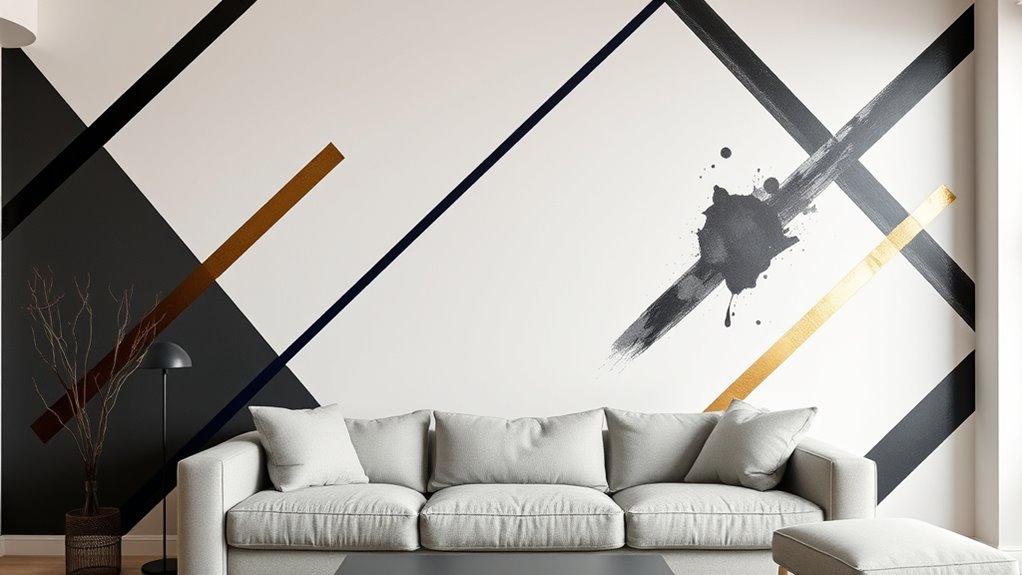
Creating geometric wall hangings with tape and paint is an easy way to add modern, eye-catching decor to your space. Start by choosing a blank wall and selecting tape in your preferred color or pattern. Use painter’s tape to outline geometric shapes like triangles, squares, or hexagons, ensuring sharp, clean edges. Once the tape is in place, fill in the shapes with your chosen paint colors, letting each section dry before removing the tape for crisp lines. For a more dynamic look, experiment with overlapping shapes or asymmetrical designs. This project is quick, affordable, and customizable, making it perfect for adding a contemporary touch to any room. Plus, it’s easy to update by repainting or rearranging the tape for a fresh new look whenever you want. Incorporating decorative wall art can also enhance the overall aesthetic and make your space feel more personalized. Using creative design techniques inspired by home decor trends can help you achieve a more polished and cohesive look. Additionally, exploring different color combinations can further elevate your geometric wall hangings to suit your personal style. Incorporating various materials like metallic paints or textured tape can add unique visual interest to your designs.

Foldable Grid Wall Panel Display Stand 6FT x 2FT, 1-Pack Gridwall Panel with 16 Hooks & Braked Wheels, Wire Grid Display Rack for Art Fairs, Craft Shows, Retail Booth, Kitchen, No Tools Setup, Black
Versatile Display & Storage: this black metal grid panel with 16 hooks, Each grid square measures 4" x...
As an affiliate, we earn on qualifying purchases.
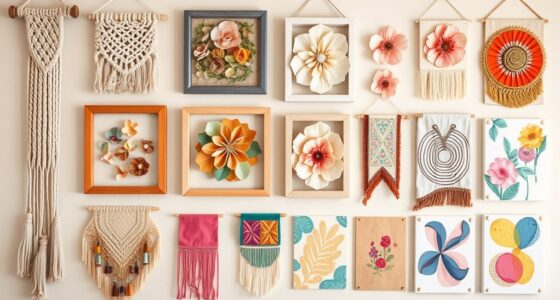
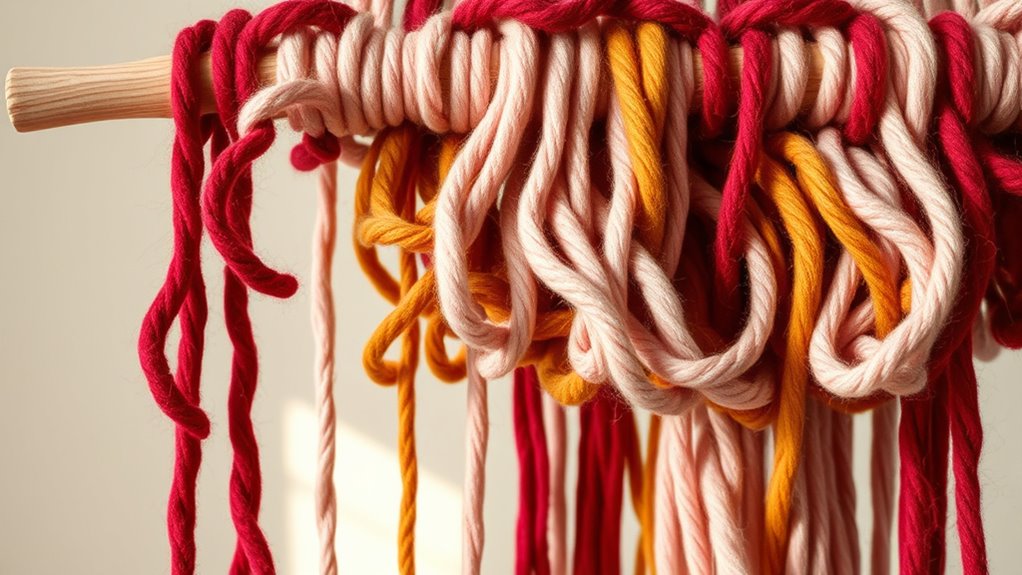
DIY Macramé Wall Decor

Adding texture and warmth to your walls can be as simple as crafting your own macramé decor. With some basic materials and a little patience, you can create stunning pieces that showcase your style. To get started, pick a color scheme that complements your room. Then, follow these steps:
- Cut and knot your cords into desired patterns, such as square knots, spiral designs, or fringes.
- Attach your finished piece to a wooden dowel or metal ring for hanging.
- Experiment with different lengths and textures to add visual interest.
- Incorporate mixed media elements like beads or fabric scraps to enhance the design and add depth to your piece.
Macramé wall decor offers endless customization options, allowing you to make something truly unique. Plus, it’s a relaxing craft that adds a cozy, handcrafted touch to any space.
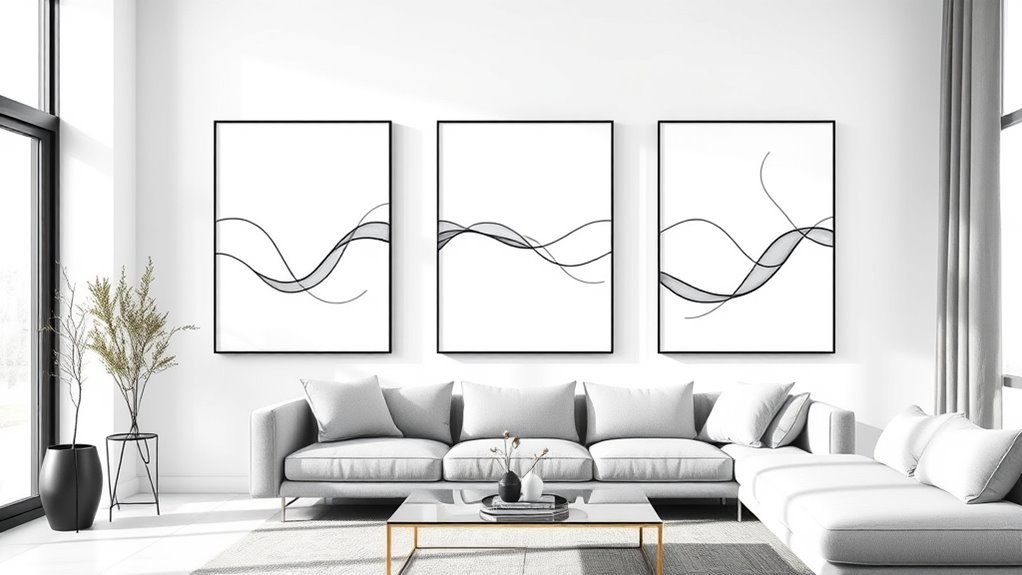
Gallery Wall With Personal Photos and Artworks
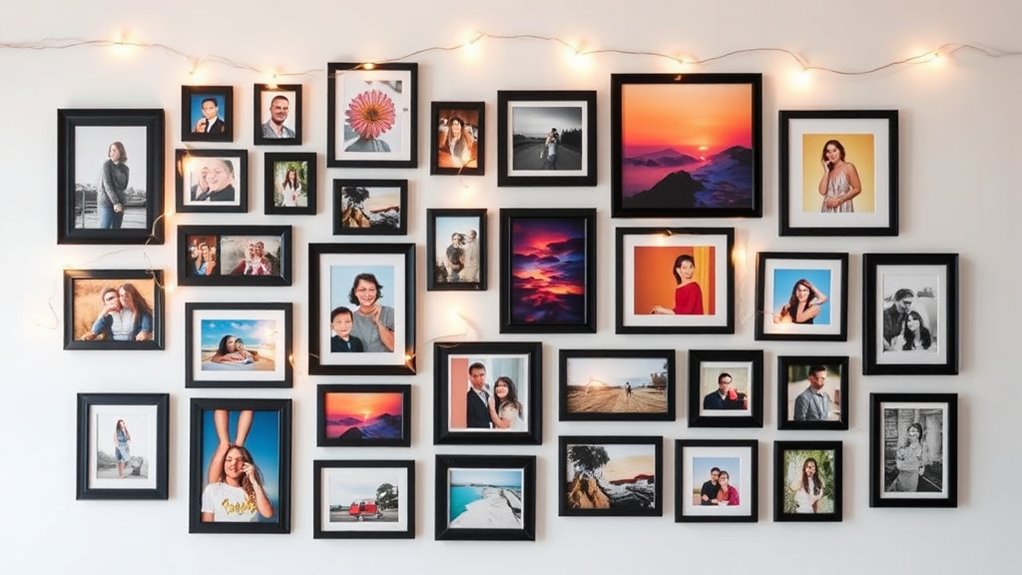
Start by selecting meaningful photos and artworks that reflect your personality and memories. Mix different frame styles to add visual interest and keep the display dynamic. Before hanging, plan your layout carefully to guarantee balance and cohesion in your gallery wall. Incorporate vintage decor items to enhance the rustic charm and create a more authentic farmhouse ambiance. Additionally, understanding divorce process steps can be helpful if you are considering a fresh start or need legal guidance for your home environment. Considering safety and durability in your chosen decor can ensure your display remains attractive and secure over time. Exploring home decor & design inspiration can further refine your aesthetic choices and help you create a personalized space. For example, selecting durable frames and materials can contribute to the long-term stability of your gallery wall.
Curate Meaningful Photos
A gallery wall that features personal photos and artworks transforms your space into a meaningful display of memories and passions. To curate these photos effectively, start by selecting images that tell a story or evoke special feelings. Then, consider their arrangement to create a balanced visual flow. Finally, think about the size and framing to add consistency or contrast.
Here are three ways to enhance your gallery wall:
- Choose a theme or color palette for cohesion.
- Mix black-and-white with color photos for visual interest.
- Incorporate small mementos or artwork for variety and depth.
Mix Frame Styles
Mixing frame styles can bring unexpected charm and personality to your gallery wall, making it more dynamic and visually engaging. Don’t be afraid to combine different materials, shapes, and finishes—wood, metal, or vintage frames can all work together. Varying frame sizes also adds depth and interest, guiding the eye across your display. Incorporate personal photos alongside artwork or prints to create a meaningful, curated look. The key is to balance the mix; choose frames that complement each other through color or style to avoid visual chaos. This approach allows you to showcase your personality and taste, transforming a simple wall into a vibrant, eclectic showcase of memories and creativity. Ultimately, mixing frame styles makes your gallery wall unique and truly yours.
Plan Layout Strategically
Planning your gallery wall layout carefully guarantees that personal photos and artwork coexist harmoniously and create a cohesive display. To do this effectively, consider these steps:
- Arrange layouts on the floor first: Lay out your frames on the floor to experiment with spacing and positioning before hanging.
- Choose a focal point: Decide on a central piece or area to anchor your display, guiding the arrangement of other photos and artworks.
- Mix sizes and orientations thoughtfully: Combine different frame sizes and orientations to add visual interest while maintaining balance.
String Art With Wooden Backing
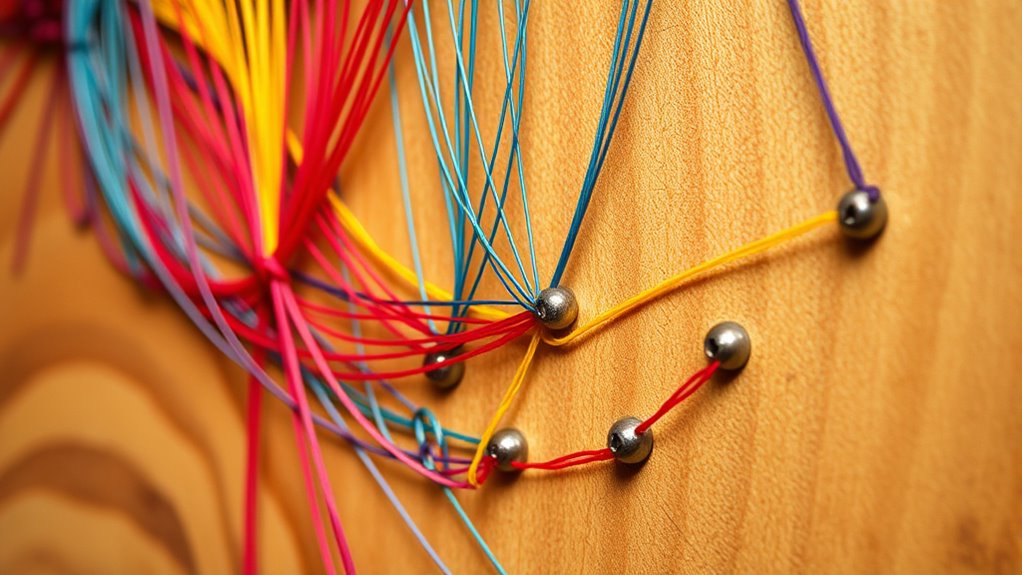
String art with wooden backing transforms simple nails and thread into stunning wall decor that adds texture and personality to any space. To start, choose a sturdy wooden board that complements your design style. Sketch your pattern lightly with a pencil, then hammer nails along the outline, spacing them evenly. Next, select colorful or neutral threads to weave around the nails, creating shapes, words, or intricate designs. Tension is key—pull the thread tight but not too tight, to keep your design neat. Once finished, you can seal the wood with a clear finish for durability or leave it natural for a rustic look. This project is easy to customize, making it perfect for personalizing your home with unique, handcrafted wall art. Incorporating customization options into your project can help you connect with a specific audience and enhance engagement.
Painted Mason Jar Wall Sconces
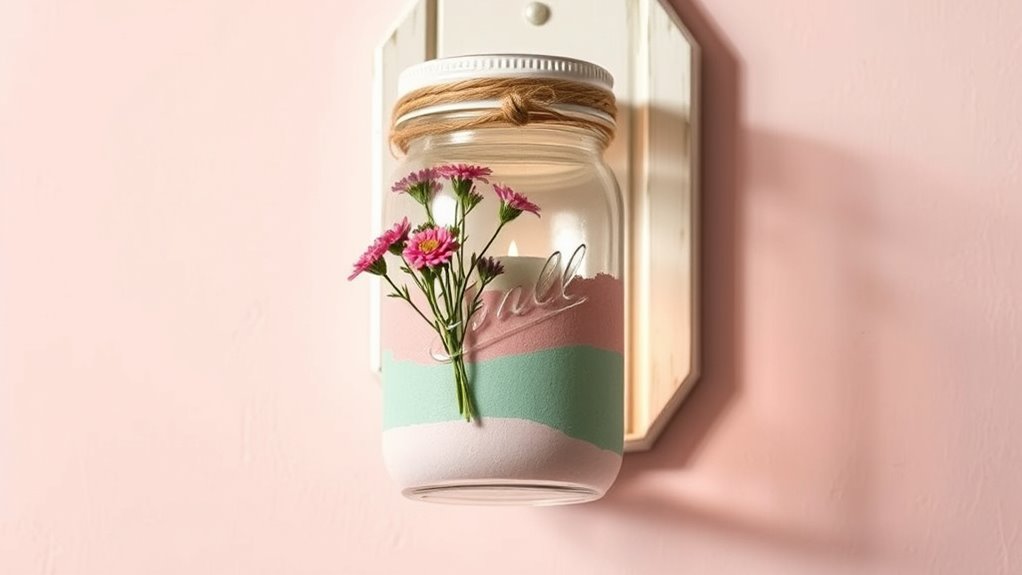
Choosing the right colors and styles can make your painted mason jar sconces stand out, so think about how they complement your decor. Proper lighting placement enhances their charm and brightness, creating a cozy atmosphere. Keep these tips in mind to maximize their visual impact and functionality in your space.
Color Choices and Styles
Have you ever considered how color choices can transform simple mason jars into stunning wall sconces? The right colors can set the mood and enhance your decor style. To make your DIY project stand out, think about these options:
- Bold and Bright – Use vibrant hues like turquoise or coral to create a lively focal point.
- Soft and Neutral – Opt for pastel shades or whites for a calm, minimalist look.
- Metallic Accents – Incorporate gold, silver, or copper paints for a chic, modern touch.
Choosing colors that complement your existing decor will make your sconces more cohesive. You can also experiment with patterns or color blocking to add visual interest. Remember, the style you select should reflect your personality and match the ambiance you want to create.
Lighting and Placement Tips
When installing painted mason jar wall sconces, proper lighting placement is key to highlighting their beauty and creating the desired ambiance. Position the sconces at eye level or slightly above to ensure the light is evenly distributed and accentuates the painted jars. Consider placing them on either side of a mirror, artwork, or doorway for balanced illumination. Use warm-toned bulbs to enhance the painted details and foster a cozy atmosphere. Avoid placing them too close to the ceiling or floor, which can cause uneven lighting or shadows. Adjust the height and angle to direct light where you want it most, such as on a specific wall feature or surface. Thoughtful placement elevates your DIY project, making your painted mason jar sconces a true focal point.
Washi Tape Wall Art for a Pop of Color

Washi tape offers an easy and affordable way to add vibrant color and personality to your walls. With its variety of patterns and shades, you can create eye-catching designs without much effort. To get started, pick a color scheme that matches your decor. Then, follow these ideas:
- Geometric Shapes – Use washi tape to outline triangles, squares, or circles for a modern, abstract look.
- Stripes and Borders – Add horizontal or vertical stripes along a wall or frame a section with tape for a bold accent.
- Custom Wall Quotes – Spell out words or phrases using tape, giving your space a personalized touch.
These simple techniques instantly brighten your room while being easy to remove or change.
DIY Faux Tile Murals With Decals or Paint
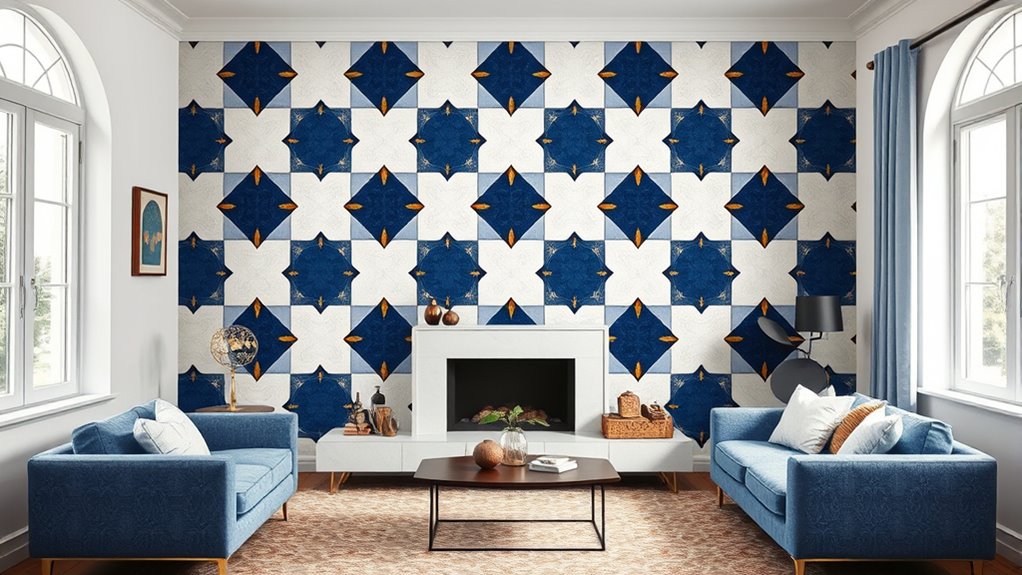
Adding faux tile murals to your walls is an easy way to achieve the stylish look of real tiles without the expense or hassle. You can use decals or paint to mimic the intricate patterns of subway tiles, Moroccan designs, or geometric mosaics. Start by choosing a pattern that complements your space and style. If you prefer a quick update, decals offer a variety of designs you can stick directly onto the wall. For a more personalized touch, paint your own tiles using painter’s tape for clean lines and stencils for detailed patterns. Whether you opt for decals or paint, this project transforms a plain wall into a stunning focal point.
| Method | Benefits |
|---|---|
| Decals | Easy to apply, removable, mess-free |
| Paint | Customizable, long-lasting |
| DIY Stencils | Precise patterns, affordable |
| Ready-made | Instant transformation |
Upcycled Frame Collage
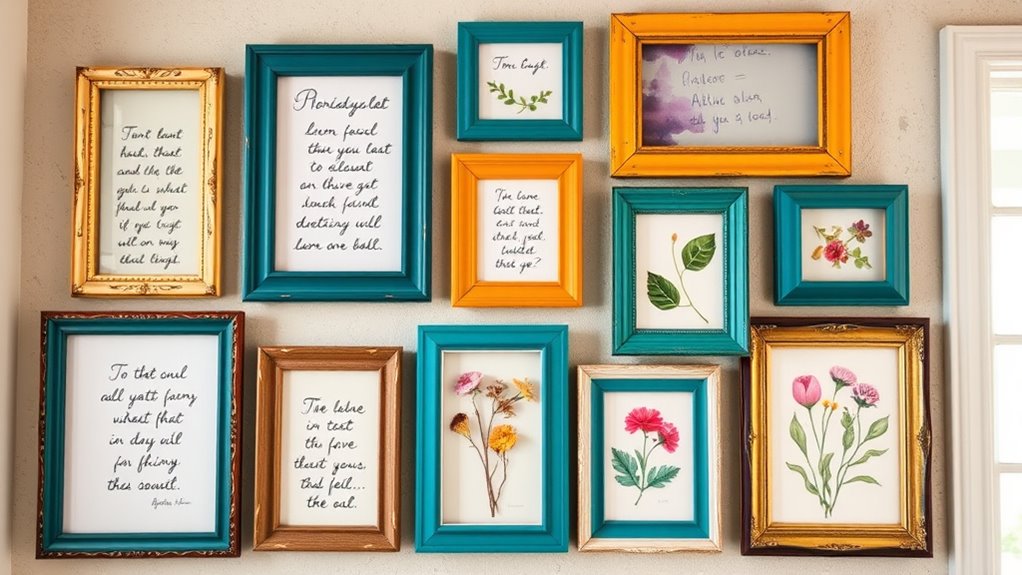
Start by gathering vintage frames that catch your eye and fit your style. Experiment with different collage layouts to find one that feels balanced and appealing. Add personal touches like photos, artwork, or meaningful mementos to make your upcycled frame collage truly unique.
Gather Vintage Frames
Gathering vintage frames is a fun and creative way to create a striking upcycled frame collage. Start by searching thrift stores, flea markets, or your own attic for unique frames with character. Don’t shy away from mismatched shapes, sizes, or colors—these add visual interest. Once you collect a variety of frames, consider giving them a fresh coat of paint or distressing the edges for a shabby chic look. Here are some tips to get started:
- Focus on different styles and finishes to create contrast.
- Look for frames with interesting details or ornate designs.
- Mix and match sizes to add depth and dimension to your collage.
With a little effort, your vintage frames will become a beautiful, personalized wall display.
Arrange Collage Layouts
Wondering how to create a cohesive and visually appealing upcycled frame collage? Start by laying out your frames on the floor or a large table to experiment with arrangements. Mix and match sizes and orientations, but keep a balanced look by spacing them evenly. Consider creating a central focal point, then build outward to maintain harmony. Use painter’s tape to mark the wall beforehand, helping you visualize placement without committing. Aim for a grid or organic pattern, depending on your style. Keep in mind that symmetrical layouts feel orderly, while asymmetrical ones add a dynamic touch. Once satisfied with the arrangement, secure each frame to the wall carefully. This method ensures your collage looks intentional and engaging.
Add Personal Touches
Once you’ve arranged your frames into a balanced layout, it’s time to personalize your collage by adding meaningful touches. This step makes your wall art uniquely yours. Start by selecting items that hold sentimental value or reflect your personality.
- Incorporate mementos – include ticket stubs, postcards, or small keepsakes inside or around the frames.
- Add decorative elements – use stickers, hand-lettered quotes, or small charms to enhance each frame’s story.
- Use creative backgrounds – paint or decorate the frames’ backing with colors, patterns, or textured papers to add depth and interest.
These touches turn a simple collage into a heartfelt display that resonates with you and your space.
Minimalist Line Art Prints
Minimalist line art prints are a popular choice for adding a sleek, modern touch to any wall. They use clean, simple lines to create striking images that evoke emotion without clutter. These prints are versatile, fitting into various decor styles, from contemporary to Scandinavian. You can choose abstract shapes, elegant portraits, or nature-inspired designs. To deepen your understanding, consider this table:
| Simplicity | Focus | Versatility |
|---|---|---|
| Clear lines | Emphasizes form | Fits any space |
| Minimal detail | Sparks imagination | Enhances decor |
| Modern appeal | Evokes emotion | Easy to customize |
With minimalist line art, your space becomes both stylish and meaningful, showcasing your taste with effortless elegance.
Hand-Painted Watercolor Quotes
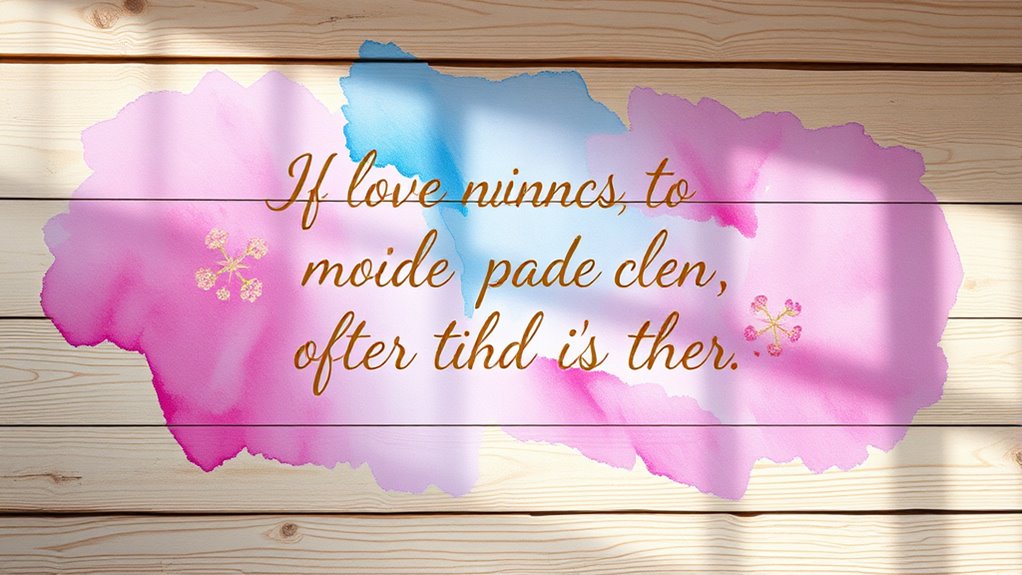
Hand-painted watercolor quotes add a personalized and vibrant touch to your wall decor. They combine inspiring words with beautiful, fluid colors that brighten any space. To create your own, start by choosing a meaningful quote or phrase that resonates with you. Then, use watercolor paints and a brush to carefully paint the words onto high-quality paper or canvas. Here are some ideas to get you started:
- Select a font style that complements your decor—bold, cursive, or minimalist.
- Experiment with blending colors around the text for a soft, dreamy background.
- Add small decorative elements like floral motifs or abstract shapes to enhance the design.
This DIY project allows you to craft a truly unique piece that motivates and decorates simultaneously.
Tape Resist Wall Art With Stencils
Tape resist wall art with stencils is an easy and effective way to create sharp, clean designs on your walls. First, choose your stencil and secure it with painter’s tape, ensuring it lies flat. Apply a contrasting paint over the stencil, then carefully remove the tape before the paint dries. This method prevents smudging and gives defined edges. To add variety, try layering different shapes or colors for a dynamic look.
| Step | Action | Tip |
|---|---|---|
| 1 | Secure stencil with tape | Use painter’s tape for clean edges |
| 2 | Apply paint evenly | Use a sponge or brush for control |
| 3 | Remove tape carefully | Do while paint is still wet |
| 4 | Repeat or layer designs | Create complex patterns easily |
Yarn-Wrapped Wall Hangings
Yarn-wrapped wall hangings are a simple and creative way to add texture and color to your space. You can customize them to match your decor by choosing different yarn colors and shapes. To create one, start with a basic frame—like a dowel or embroidery hoop—and wrap yarn around it in your desired pattern. This project is easy to scale up or down based on your space and skill level.
Create personalized wall art by wrapping yarn around a simple frame in your favorite colors and patterns.
Here are some ideas to get you started:
- Wrap the entire frame evenly for a sleek, modern look.
- Create geometric patterns by wrapping sections in contrasting colors.
- Add tassels or beads for extra texture and visual interest.
This versatile craft lets you express your style effortlessly.
Customized Wall Calendar or Message Board

A customized wall calendar or message board adds both functionality and personal style to your space. You can design a calendar that reflects your personality with your favorite colors, photos, or artwork. Use a blank canvas or a framed corkboard to create a versatile message board for notes, reminders, or inspirational quotes. Incorporate decorative elements like washi tape, stickers, or handwritten lettering to make it unique. This DIY project not only keeps you organized but also transforms a practical item into a focal point. Hang it in your kitchen, office, or entryway for easy access and daily motivation. Personal touches make your space feel more inviting and tailored to your lifestyle. It’s a simple, budget-friendly way to add both function and flair.
Frequently Asked Questions
What Are the Best Tools for Beginners in DIY Wall Art Projects?
For beginners, the best tools are simple and easy to use. You’ll want a good set of paintbrushes, painter’s tape, and a level to keep your designs straight. A utility knife or craft knife helps with cutting stencils or paper. Don’t forget some painter’s drop cloths to protect your space. With these tools, you can confidently start your wall art projects and create stunning results without feeling overwhelmed.
How Do I Choose the Right Colors for My Wall Art?
Did you know that color can influence mood and perception? When choosing colors for your wall art, consider the atmosphere you want to create. Opt for calming tones like blues and greens for relaxation, or vibrant reds and yellows for energy. Think about your room’s existing decor and lighting. Trust your instincts—pick colors that resonate with you and make you feel happy every time you see your art.
Can I Create DIY Wall Art Without Artistic Skills?
Absolutely, you can create DIY wall art without artistic skills. You don’t need to be a pro; simple projects like painted quotes, collages, or stenciled patterns are perfect for beginners. Use stencils, tape, or printable templates to guide you. Focus on your favorite colors and personal touches. With patience and creativity, you’ll craft beautiful, unique art that enhances your space and boosts your confidence in your artistic abilities.
How Do I Securely Hang Heavy DIY Wall Art Pieces?
Think of hanging heavy art like anchoring a ship; you need the right tools. Use heavy-duty wall anchors or toggle bolts, and guarantee your hooks are rated for the weight. Measure carefully, mark your spots, and drill straight to avoid slips. If unsure, double-check the weight capacity of your hardware. With patience and precision, your artwork will stay secure, standing tall like a monument to your effort.
What Are Eco-Friendly Materials for DIY Wall Decor?
When choosing eco-friendly materials for your DIY wall decor, you should look for sustainable options like reclaimed wood, bamboo, or recycled metal. You can also use natural fibers such as jute or hemp for added texture. Avoid plastics and synthetic fabrics, opting instead for biodegradable or upcycled materials. These choices not only look great but also help reduce your environmental footprint while adding a unique, personal touch to your space.
Conclusion
Think of your wall as a blank canvas waiting for your unique story. Each DIY project is like planting a seed—nurture it with creativity, and watch your space bloom with personality. Just as a gardener tends to vibrant flowers, your effort transforms plain walls into a vibrant garden of art. So, grab your tools and let your imagination grow—your perfect wall masterpiece is just a DIY away.