If your acrylic paintings look messy with smoke marks or streaks, try using masking tape properly. It creates a clean barrier, prevents paint seepage, and keeps lines sharp. Make sure you press the tape firmly along the edges, remove it at a sharp angle before the paint fully dries, and choose the right low-tack tape designed for acrylics. Mastering these masking tricks helps achieve a neat, professional look, and you’ll discover more tips to perfect your technique below.
Key Takeaways
- Use high-quality painter’s masking tape designed for acrylics to create clean, sharp edges and prevent paint seepage.
- Ensure surfaces are thoroughly cleaned and dry before applying tape to improve adhesion and reduce smudges.
- Press tape firmly along edges with a smoothing tool or fingernail to prevent dust and paint bleeding underneath.
- Remove masking tape slowly at a 45-degree angle once paint is dry or slightly tacky to avoid smudging or smoke marks.
- Apply thin, even coats of acrylic paint and allow each layer to dry fully before adding more to prevent uneven drying and haze.
Why Smoke Marks Appear When Painting Acrylics

When painting with acrylics, smoke marks often appear unexpectedly, and understanding why is key to achieving a clean finish. These marks happen because acrylic transparency allows underlying layers or dust particles to show through, creating streaks or haze. If you don’t work quickly enough, the paint can dry unevenly, leading to visible smoke-like streaks during color blending. Additionally, when you layer colors without proper drying time, the wet edges might trap dust or cause uneven mixing, which looks like smoke. Knowing this, you can control how you blend colors and manage the transparency of your acrylics. By understanding how transparency affects the paint’s appearance, you’ll be better equipped to prevent smoke marks and achieve smoother, more professional-looking results. Understanding acrylic properties can help artists select the right techniques to minimize these issues.
Furthermore, using appropriate layering techniques and working in a controlled environment can significantly reduce dust contamination and uneven drying, helping you attain a cleaner finish. Implementing proper cleaning methods for your workspace can further prevent dust from settling on wet paint surfaces, ensuring a smoother final result. Additionally, paying attention to ambient humidity levels can influence drying times and reduce the likelihood of smoke marks forming during the painting process.
How Masking Tape Prevents Smoke Marks and Streaks

Masking tape is a powerful tool to prevent smoke marks and streaks in acrylic painting because it creates a clean barrier between your paint and areas you want to keep untouched. Its durability ensures it stays in place during your work, preventing paint seepage that can cause smoke marks. Proper surface preparation techniques, like cleaning and drying your surface, enhance tape adhesion and minimize issues. To visualize, consider this table:
| Surface Type | Tape Durability | Preparation Tip |
|---|---|---|
| Smooth Canvas | High | Clean with alcohol |
| Rough Paper | Moderate | Light sanding |
| Glass | Very high | Wipe with damp cloth |
| Wood Panel | High | Sand lightly |
| Plastic Surface | Moderate | Use adhesion promoter |
This ensures your masking tape performs *ideally*, preventing streaks and smoke marks. Additionally, understanding the adhesion properties of different tapes can help you select the best option for your specific project. Proper application techniques also play a crucial role in achieving a clean finish and minimizing residue. Using the right surface preparation methods can significantly improve tape adhesion, which is essential for a flawless result and avoiding smoke marks.
Furthermore, selecting the appropriate tape type for your surface can make a noticeable difference in the outcome of your painting project. Recognizing the surface texture helps in choosing the right tape to ensure better adhesion and cleaner lines.
Choosing the Best Masking Tape for Acrylic Painting

Are you unsure which masking tape works best for your acrylic projects? Choosing the right masking tape is essential for clean, sharp lines in acrylic painting. Look for tapes with these features:
- Low-tack adhesive to prevent paint bleed and damage to your surface.
- Painter’s masking tape designed specifically for acrylics, ensuring easy removal without residue.
- Flexible, crepe paper backing that conforms well to curves and textured surfaces.
- Selecting tapes with local tradition in mind can enhance your artistic process, as regional craft practices often influence optimal material choices.
Using the proper masking tape can also prevent paint bleed and help maintain crisp edges in your artwork.
In addition, choosing tapes that are compatible with your surface will help preserve the integrity of your artwork and make removal easier.
Opt for tapes labeled as suitable for acrylic painting, as they offer better adhesion without tearing or lifting paint. Avoid painter’s tapes meant for other mediums, which might not perform well with acrylics. Picking the right masking tape makes your acrylic artwork look professional and clean.
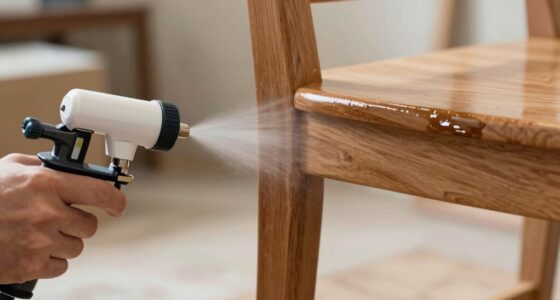
How to Apply Masking Tape for Sharp, Clean Lines

To achieve sharp, clean lines in your acrylic painting, applying masking tape carefully is essential. Start by pressing the tape down firmly along the edge you want to protect, ensuring good edge sealing to prevent paint bleed. Use a fingernail or a smoothing tool to press along the tape’s edge, making sure it adheres tightly. When you’re finished painting, remove the tape slowly and at a sharp angle to minimize paint lifting or smudging. This careful tape removal preserves crisp lines and prevents smudges from developing. For best results, do the tape removal before the paint fully dries, allowing for a cleaner edge. Proper edge sealing combined with precise tape removal techniques guarantees sharp, professional-looking lines in your acrylic artwork. Additionally, paying attention to adherence techniques can help enhance the seal and improve overall results. Ensuring that the tape adheres well can also prevent paint bleed, which is crucial for maintaining crisp, clean lines. A proper surface preparation can also significantly improve tape adhesion and overall painting results. Incorporating adequate surface cleaning prior to taping can further enhance adhesion and reduce the risk of paint seepage. Moreover, using high-quality masking tape designed for delicate surfaces can make your painting process easier and more precise.
Common Masking Mistakes That Can Ruin Your Acrylic Look

One common mistake that can ruin your acrylic look is neglecting to properly prepare the surface before applying masking tape. This oversight can cause uneven edges and disrupt your color blending, resulting in messy brush strokes. To avoid this, make certain the surface is clean and dry. Additionally, understanding the importance of surface preparation—a fundamental of practical air-based cooking—can help achieve cleaner, sharper results. Proper surface prep ensures better adhesion and precision. Be mindful of these pitfalls: 1. Rushing the masking process can lead to gaps, causing smudged lines or uneven paint application. 2. Applying masking tape too tightly or too loosely distorts the edge, ruining sharp lines. 3. Not pressing down the tape firmly allows paint to seep underneath, ruining your clean separation and affecting color blending. Paying attention to adhesion quality can significantly improve your masking results and overall finish. Additionally, ensuring the surface is free of oils or residues can greatly enhance tape adhesion and prevent lifting during painting. Incorporating surface cleanliness as part of your preparation routine can further improve the accuracy and appearance of your acrylic work.
Tips for Removing Masking Tape Without Smudging

Removing masking tape smoothly is essential to preserving your clean edges and preventing smudges. To achieve this, peel the tape back slowly at a 45-degree angle, rather than pulling it straight away. This gentle approach minimizes the risk of paint smudges or lifting fresh paint. If you notice any paint starting to lift, pause and wait a few moments for the paint to dry fully before continuing. Using a craft knife to score along the edges before tape removal can also help break the bond and reduce paint disturbance. Avoid rushing the process, as haste increases the chance of smudging. With patience and careful technique, you’ll keep your lines sharp and your finished piece looking professional. Additionally, understanding the importance of proper tape removal techniques can help you achieve the best results and maintain a clean, professional finish. Incorporating proper tools like a craft knife or a specialized remover can further improve your results and reduce the risk of damage.
Creative Masking Techniques for Unique Effects

You can use masking to add interesting textures and patterns to your acrylic paintings. Try applying tape or stencils creatively to create unique effects that stand out. Experimenting with these techniques will help you achieve more dynamic and personalized artwork. Incorporating fundamental techniques into your masking practice can further enhance your results and expand your creative possibilities. Additionally, understanding the importance of workspace organization can make the masking process cleaner and more efficient, reducing the risk of unwanted smoke marks or smudges. Paying attention to material selection can also improve your masking outcomes by ensuring cleaner edges and easier removal. Mastering cleaning methods can further prolong the lifespan of your masking tools and maintain your workspace’s tidiness.
Masking for Texture
Masking for texture opens up a world of creative possibilities that can transform a seemingly messy acrylic painting into a striking work of art. By using masking techniques, you can preserve areas of textured surfaces while adding depth and interest. Start by choosing masking patterns that mimic natural textures, such as stippling or crosshatching. Next, experiment with layered masking to create complex textures:
- Apply masking fluid in irregular shapes for rough surfaces.
- Use masking tape to carve out sharp-edged patterns.
- Combine both techniques for a layered, textured effect. These methods allow you to control where the paint stays transparent and where it covers, enhancing the tactile quality of your work. Masking for texture helps you highlight the physical surface and adds dynamic visual interest to your acrylics.
Creating Unique Patterns
Creating unique patterns with masking techniques allows you to break free from uniform textures and introduce unexpected visual effects into your acrylic paintings. By experimenting with various brush techniques and color blending, you can achieve intricate designs that stand out. Use masking to create negative space, then layer colors to develop depth and contrast. Incorporate different brush strokes—stippling, dry brushing, or feathering—to add texture and movement. Masking also helps in controlling sharp edges or soft *gradations*, giving your artwork a distinctive look. Here’s a quick guide to pattern ideas:
| Pattern Type | Masking Technique | Effect |
|---|---|---|
| Geometric | Tape or stencils | Sharp, clean lines |
| Organic | Freehand masking | Natural, flowing shapes |
| Abstract | Spattering | Random textures |
| Layered | Multiple maskings | Depth and complexity |
Troubleshooting Smoke Marks That Still Show Up

If smoke marks still appear after your painting, it’s time to check your masking techniques. Ensuring your masks are properly applied prevents unwanted marks from seeping through. Additionally, applying the paint correctly helps avoid uneven spots that can make smoke marks more visible.
Proper Masking Techniques
Even when you think you’ve applied masking properly, smoke marks can still sneak through and ruin your finish. To avoid this, focus on precise masking techniques that ensure clean color blending and surface preparation. First, always clean and sand the surface thoroughly to remove dust and oils, creating a smooth base for masking. Second, use quality painter’s tape designed for fine lines, pressing it down firmly to prevent leaks. Third, tape in multiple thin layers rather than one thick strip, which helps prevent gaps and uneven edges. Proper masking isn’t just about covering areas; it’s about creating a seamless transition between colors and surfaces. When done carefully, these steps minimize smoke marks and give your project a polished, professional look.
Correct Paint Application
When smoke marks still appear despite careful masking, the issue often lies in your paint application technique. To avoid this, focus on proper brush techniques, applying thin, even coats to prevent buildup. Use smooth, consistent strokes to guarantee a seamless finish, avoiding heavy layers that can seep underneath masks. Pay attention to color blending; blend shades carefully while the paint is wet to create a smooth transition, reducing harsh lines that may accentuate smoke marks. Avoid overworking the surface, as excessive brushing can disturb underlying layers. Let each coat dry thoroughly before applying the next. This careful approach minimizes the risk of residual marks and guarantees your project looks clean and professional, even in challenging areas.
Extra Tips for a Neat, Professional Acrylic Finish

Achieving a neat, professional acrylic finish requires careful attention to detail and proper techniques. To improve your results, focus on key steps. First, master smooth color blending by working wet-on-wet, which minimizes harsh lines and creates seamless progressions. Second, use controlled brush strokes, applying gentle pressure to avoid streaks and uneven textures. Third, keep your brushes clean and properly loaded with paint to prevent muddy colors and preserve crisp edges. Additionally, practice blending colors gradually to maintain consistency and avoid overworking areas. By paying attention to these tips, you’ll enhance the overall neatness of your work, resulting in a polished, professional appearance. These simple adjustments can make a significant difference in how your acrylic paintings look.
Final Tips for Keeping Your Acrylic Paintings Looking Flawless

To keep your acrylic paintings looking flawless, it’s essential to protect and preserve your work throughout the drying and finishing stages. Focus on refining your brush stroke techniques to avoid unintended marks or streaks. Use smooth, confident strokes and avoid overworking areas, which can cause muddiness. When blending colors, work quickly and seamlessly to create smooth gradations , preventing harsh lines and uneven textures. Applying a clear varnish once your painting is completely dry will enhance color vibrancy and provide a protective layer against dust and damage. Keep your workspace clean to avoid accidental smudges. Finally, handle your artwork with care, and store it in a stable environment to maintain its pristine appearance over time.
Frequently Asked Questions
Can Different Types of Masking Tape Affect Smoke Mark Prevention?
Yes, different masking tapes can affect smoke mark prevention because their adhesive strength varies, impacting how well they seal edges. Tapes with strong adhesive may prevent smoke marks better, but they can also damage surfaces or leave residue. Additionally, tape transparency matters—clear tapes help you see your work clearly, ensuring precise masking. Choosing the right tape ensures a cleaner acrylic look and reduces smoke marks effectively.
How Long Should Masking Tape Be Left on Before Painting?
Think of masking tape as the quiet guardian of your masterpiece, patiently holding back chaos. You should leave it on for at least 30 minutes to an hour before painting, allowing the adhesive to settle into the surface. Timing considerations are essential—remove the tape slowly along a straight line to prevent smudges. For best results, follow tape removal tips like pulling at a 45-degree angle to keep your work crisp and clean.
Is It Necessary to Use Specialized Masking Tape for Delicate Surfaces?
Yes, using specialized masking tape for delicate surfaces is essential. Standard masking tape may damage or peel off the surface, but masking tape designed for delicate surfaces offers better surface compatibility. It adheres securely without leaving residue or causing damage. Always choose the right masking tape to protect your surfaces, ensuring clean lines and a professional finish without risking any damage or mess.
Can Humidity or Temperature Impact Smoke Mark Formation?
Sure, humidity effects and temperature influence how smoke marks appear, turning your artwork into a weather forecast. When humidity rises, it’s like inviting moisture to the party, making smoke settle unevenly. Cold temperatures can cause sneaky condensation, creating unpredictable marks. So, keep your studio climate-controlled; otherwise, your masterpiece might end up more like a moody weather report than the pristine work you envision.
Are There Alternative Masking Methods to Tape for Cleaner Lines?
Yes, there are masking alternatives to tape that you can try for cleaner lines in painting. You might use frisket or liquid mask, which are flexible and conform to curves easily. These painting techniques help prevent paint bleeding and give you sharp edges. Applying these options carefully guarantees a professional finish, especially when working with acrylics. Experimenting with different masking methods can improve your results and make your artwork look more polished.
Conclusion
Now that you know how masking tricks can prevent smoke marks, you’re all set to create sleek, professional-looking acrylics. Remember, even Picasso would’ve appreciated a clean edge or two! With the right tape and techniques, your paintings will look sharp and polished—no smoke marks in sight. Keep experimenting, stay patient, and don’t forget: a little masking magic can turn a messy mess into masterpiece. Happy painting!