To weave a mini wall loom tapestry, start by choosing your fibers, like wool for softness or cotton for vibrant detail, and select a pattern such as plain weave or geometric motifs. Experiment with tension and fiber combinations to create interesting textures and visual effects that reflect your style or inspiration. Personalize your design with bold colors or intricate patterns for a unique piece. Keep exploring various techniques, and you’ll discover how to craft a beautiful, handcrafted tapestry—there’s more to learn as you go!
Key Takeaways
- Select appropriate fibers (wool, cotton, acrylic, silk) based on desired texture, color, and visual interest for your tapestry.
- Choose a simple weaving pattern like plain weave or twill to guide yarn arrangement and structure.
- Adjust tension according to fiber type to ensure an even, professional finish in your woven piece.
- Incorporate design elements inspired by dog breeds or motifs to personalize and add visual depth.
- Experiment with fiber combinations and pattern variations to develop unique textures and artistic expression.
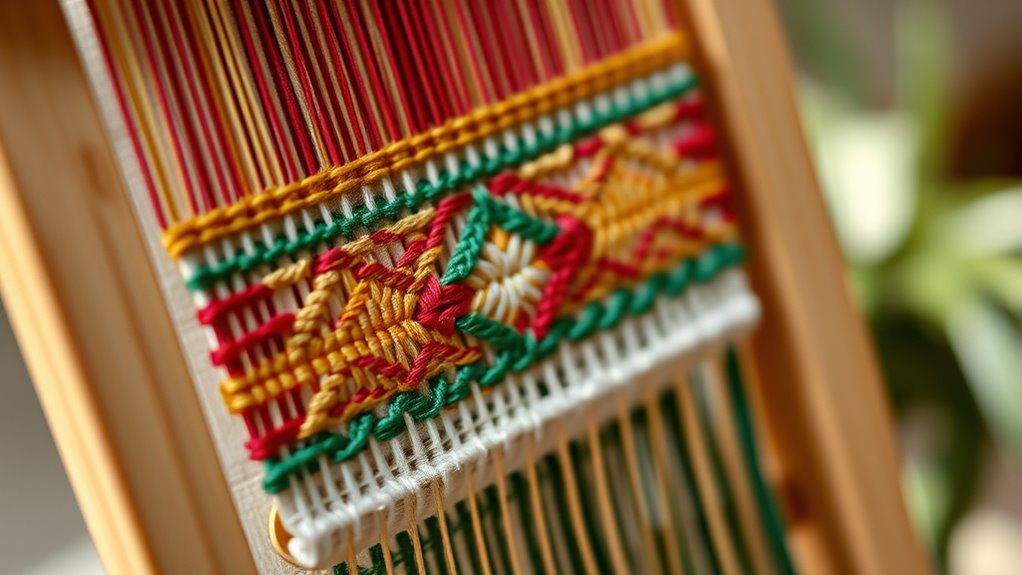
Creating a mini wall loom tapestry is a rewarding project that allows you to develop your weaving skills while adding a personalized touch to your decor. When starting out, one of the most exciting decisions you’ll make is choosing the fiber types you’ll incorporate into your tapestry. Different fibers bring unique textures, colors, and durability to your piece. Wool offers warmth and a soft feel, making it ideal for cozy, textured designs. Cotton is smooth and versatile, perfect for detailed patterns and vibrant colors. Acrylic fibers can add brightness and resilience, while silk provides a luxurious sheen. Mixing these fiber types can give your tapestry depth and visual interest, so don’t hesitate to experiment with different combinations to see what resonates with your aesthetic. Incorporating dog breeds known for their distinctive coat types can also inspire your fiber choices and textures.
Choosing the right fibers—wool, cotton, acrylic, or silk—adds texture, color, and personality to your mini tapestry.
Once you’ve selected your fibers, the next step is to choose your weaving patterns. Weaving patterns serve as the foundation of your tapestry’s design, guiding your yarns into intricate or simple arrangements. For beginners, basic patterns like plain weave or tabby are straightforward and provide a sturdy structure. As you become more confident, you can explore more complex patterns such as twill, herringbone, or even geometric motifs. These patterns allow for creative expression, as you can vary the direction, color, and tension of your yarns to create unique visual effects. Keep in mind that your choice of weaving pattern impacts the overall texture and appearance of your tapestry, so consider how the pattern complements your fiber choices and the aesthetic you aim to achieve.
As you weave your mini tapestry, pay attention to tension and consistency. Using different fiber types in the same project requires adjusting your tension to ensure a uniform look. Thicker fibers like wool might need looser tension, while thinner cotton can be pulled tighter for crisp lines. Weaving patterns also influence how tight or loose your yarns should be—tight weaves create a dense, durable tapestry, while looser ones give a more relaxed, airy feel. Take your time to test small sections of your chosen pattern and fiber combination. This practice helps you understand how they interact and allows you to make adjustments before committing to the entire piece.
Ultimately, weaving your mini wall loom tapestry is about exploring your creativity through fiber choices and pattern design. The process offers endless possibilities for personalization, whether you opt for bold colors, subtle textures, or intricate motifs. With careful selection of fiber types and weaving patterns, you’ll craft a piece that’s not only visually appealing but also a reflection of your artistic expression. As you become more comfortable, you’ll find new techniques and combinations that elevate your weaving projects, turning a simple tapestry into a cherished, handcrafted decor piece.
Frequently Asked Questions
What Are the Best Materials for Mini Wall Loom Tapestries?
You should choose fiber options like cotton, wool, or acrylic, as they’re easy to work with and durable. These materials also offer a variety of color choices, allowing you to create vibrant or subtle designs. Cotton provides smoothness, wool adds texture, and acrylic is budget-friendly. Picking the right fiber options and color choices will help you craft a beautiful, personalized mini wall loom tapestry that fits your style perfectly.
How Long Does It Typically Take to Complete a Tapestry?
On average, it takes about 10 to 20 hours to complete a mini wall loom tapestry, but this varies with your skill level. Beginners might spend closer to 20 hours, while experienced weavers can finish in around 10. Notably, a survey found that 65% of hobbyists prefer weaving projects that last under 15 hours. Your time estimation depends on complexity, materials, and how quickly you work, so adjust accordingly.
Can Beginners Easily Learn to Weave on a Mini Loom?
Yes, beginners can easily learn to weave on a mini loom. Simple weaving techniques and beginner tips make it accessible, even if you’ve never tried weaving before. Start with basic patterns, keep your tension even, and take your time. The small size makes it manageable and less intimidating, so you can quickly develop your skills and enjoy creating your own mini wall tapestry with confidence.
How Do I Care for and Preserve My Woven Tapestry?
To care for your woven tapestry, regularly dust it with a soft brush or cloth to prevent dirt buildup. For example, if you display it in a sunny room, dust it weekly to keep it vibrant. Pay special attention to fringe maintenance by gently untangling any knots or frayed threads. Avoid direct sunlight and moisture, which can cause fading or mildew, ensuring your tapestry stays beautiful for years.
Are There Any Recommended Design Patterns for Beginners?
If you’re a beginner, start with simple geometric patterns or floral motifs. These designs are straightforward, helping you learn basic weaving techniques without feeling overwhelmed. Choose patterns with clear lines and repetitive shapes to build your confidence. As you gain experience, you can experiment with more complex designs. Focus on practicing consistency and tension, and don’t be afraid to use tutorials or guides to help you along the way.
Conclusion
Now that you’ve woven your mini wall loom tapestry, you’ve truly caught the weaving bug. With each thread, you’ve crafted a piece that’s uniquely yours—like a seed planted in your creative garden. Remember, the more you practice, the better you’ll get at weaving your dreams into reality. So, keep your loom handy and your imagination flowing; soon enough, you’ll be turning out masterpieces that brighten any space, proof that patience and passion make magic happen.