
To paint terracotta pots like a pro, start by cleaning and sanding the surface for better paint adhesion. Choose quality acrylic or outdoor paints with fine brushes or sponges for detailed designs. Apply a suitable primer to guarantee durability, then use your selected paints to create patterns, adding highlights or accents as desired. Seal the finished piece with a waterproof, protective coat. If you keep exploring, you’ll discover all the tips and tricks to perfect your technique.
Key Takeaways
- Prepare the surface by cleaning, soaking, and lightly sanding the terracotta pot for optimal paint adhesion.
- Choose high-quality, weather-resistant acrylic paints and appropriate brushes or spray tools for smooth application.
- Use painter’s tape, stencils, or sponges to create clean patterns and add texture or details.
- Apply primer before painting to ensure durability and a professional finish.
- Seal the finished design with a waterproof, clear topcoat to protect against weather and wear.
Gathering the Right Supplies and Preparing Your Workspace
Before you begin painting your terracotta pots, it is essential to gather all the necessary supplies and set up a clean, well-ventilated workspace. Start by collecting your paints, brushes, and any additional tools like stencils or sponges. Choose high-quality acrylic or outdoor paint for durability. Have a palette or tray ready for mixing colors. You’ll also need protective gear like gloves and a mask to safeguard against fumes and splatters. Clear your workspace of clutter and work in a well-ventilated area to avoid inhaling fumes. Lay down newspaper or a drop cloth to protect surfaces. Ensuring everything is organized beforehand helps you work efficiently and keeps your project neat. Proper preparation sets the foundation for a smooth painting experience. Additionally, understanding color accuracy and how to calibrate your paints can help achieve vibrant, professional-looking results. For added comfort, consider using essential oils for respiratory health to improve air quality in your workspace and promote easier breathing during your project. It’s also beneficial to incorporate proper ventilation techniques to enhance safety while working with paints and fumes. Incorporating a best vacuum expert recommended air purifier can further improve indoor air quality and remove lingering fumes from your workspace.
Cleaning and Prepping the Terracotta Surface
Before you start painting, you need to clean your terracotta pot thoroughly. Remove dirt and debris, then soak it in water to loosen stubborn grime. Once dry, lightly sand the surface for a smooth, even finish. Incorporating digital literacy programs can also inspire creative ways to personalize your pots with painted designs. Additionally, understanding water parks can provide fun inspiration for colorful and playful designs on your pots. Exploring air purifier features can help ensure your workspace remains free from dust and paint fumes, making your project safer and more enjoyable. Learning about hydrotherapy techniques can also motivate relaxing, water-themed artwork on your pots. Recognizing the dog breeds can inspire specific themes or motifs to incorporate into your painted designs.
Remove Dirt and Debris
To guarantee your terracotta pots are ready for painting, start by removing any dirt and debris from their surfaces. Use a stiff brush or a damp cloth to scrub away loose soil, dust, and cobwebs. Pay close attention to crevices and textured areas where dirt can hide. Rinse the pot with water to wash away stubborn grime and loose particles. Make sure the surface is completely clean and dry before moving on.
- Remove loose dirt with a stiff brush
- Wipe off dust with a damp cloth
- Scrub stubborn spots gently
- Rinse thoroughly with water
- Dry the surface completely before painting
Soak for Better Cleaning
Soaking your terracotta pots can considerably boost the cleaning process by loosening stubborn dirt and mineral deposits. Fill a bucket with warm water and submerge the pots completely, ensuring all surfaces are covered. Let them soak for at least 30 minutes; this softens any hardened grime and makes scrubbing easier. For tough stains, add a bit of mild dish soap or white vinegar to the water. After soaking, use a stiff brush or sponge to scrub the surfaces, paying attention to crevices and textured areas. Rinsing thoroughly removes loosened dirt and residue, leaving the pots clean and ready for painting. Soaking not only simplifies cleaning but also helps prepare the terracotta for a smooth, even finish once you start painting. Incorporating odor control features from portable camping toilets can help keep your workspace fresh during longer projects.
Sand for Smooth Finish
Have you ever noticed tiny bumps or rough patches on your terracotta pots after cleaning? These imperfections can make your paint job look uneven. To achieve a smooth finish, lightly sand the surface with fine-grit sandpaper. This removes residual dirt, rough spots, and gives the pot a uniform texture. Understanding regional variations in materials can also help you choose the best type of sandpaper for your project. Additionally, selecting appropriate preparation methods is essential for ensuring a professional-looking result. Being aware of clay composition can influence how you approach surface prep and sanding. Using the right surface preparation techniques can further enhance paint adhesion and durability. Sanding helps create a matte surface, making paint stick better and look flawless. Take your time and be precise for the best results.
Applying a Primer for Better Paint Adhesion
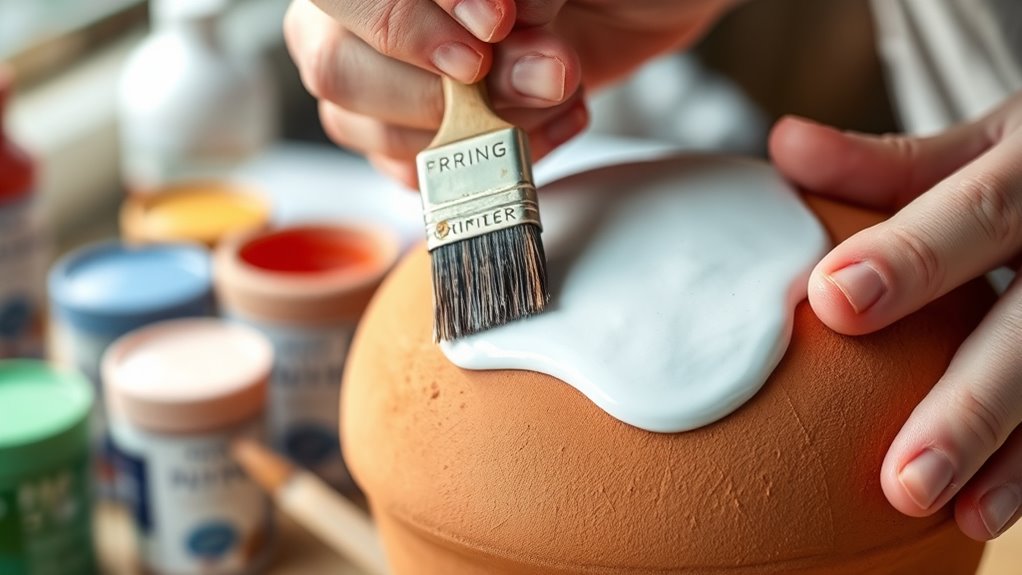
To guarantee your paint adheres well, you need to choose the right primer for your terracotta pot. Make sure to prepare the surface properly by cleaning and smoothing it before applying the primer. A proper surface prep can significantly improve paint adhesion and overall finish. Additionally, selecting a primer suitable for porous surfaces can further enhance adhesion and durability. Then, apply even coats carefully to get a smooth, lasting finish. Using a high-quality primer can further improve adhesion and durability. Being aware of cybersecurity vulnerabilities during the process can help prevent disruptions or issues with your painting project. Choosing a primer that features HEPA filtration or other advanced technologies can also help in creating a cleaner painting environment by reducing airborne particles and allergens during your project.
Choose Suitable Primer Type
Choosing the right primer is essential for ensuring your paint sticks well to terracotta pots. To get the best results, you need a primer that suits the material and your desired finish. For porous terracotta, opt for a bonding or masonry primer that penetrates deeply. If you plan to paint with bright or dark colors, choose a primer that offers good coverage and prevents staining. Oil-based primers work well for sealing and durability, while water-based primers are easier to clean and environmentally friendly. Consider using a primer with stain-blocking properties if the pot has any marks or discoloration. Proper surface preparation is crucial to achieve a professional-looking finish. Selecting the appropriate primer can also help prevent paint chipping and ensure a longer-lasting paint job. Picking the right primer helps create a smooth, even surface, ensuring your paint adheres properly and lasts longer.
Prepare the Terracotta Surface
Before applying your chosen primer, it’s important to prepare the terracotta surface properly. Begin by cleaning the pot thoroughly to remove dirt, dust, and any loose particles. Use a damp cloth or gentle scrub brush and let it dry completely. If the surface has any stains or previous coatings, lightly sand those areas to create a smooth, even surface and improve primer adhesion. Wipe away any dust or debris from sanding with a clean, damp cloth. If necessary, apply a gentle wash with a mixture of water and mild soap, then rinse and dry thoroughly. Proper preparation guarantees the primer bonds well, leading to a longer-lasting, professional-looking painted finish. Skipping these steps may cause paint to peel or chip prematurely.
Apply Even Coats Properly
Applying an even coat of primer is essential for ensuring your paint adheres smoothly and lasts longer. To achieve this, use a quality brush or spray for uniform coverage. Keep your strokes light and steady, avoiding drips and thick layers that can cause uneven texture. Work in small sections, overlapping slightly to prevent missed spots. Make sure the surface is dry before applying the primer, and don’t rush the process. If needed, lightly sand any rough patches once the primer is dry for a smoother finish. Remember, patience now saves you time later. Proper application of the primer sets the foundation for a professional-looking paint job that resists chipping and peeling.
- Use a high-quality primer suited for terracotta
- Apply in thin, even layers with a brush or spray
- Work in small sections, blending as you go
- Keep strokes light to avoid drips
- Let each coat dry completely before adding another
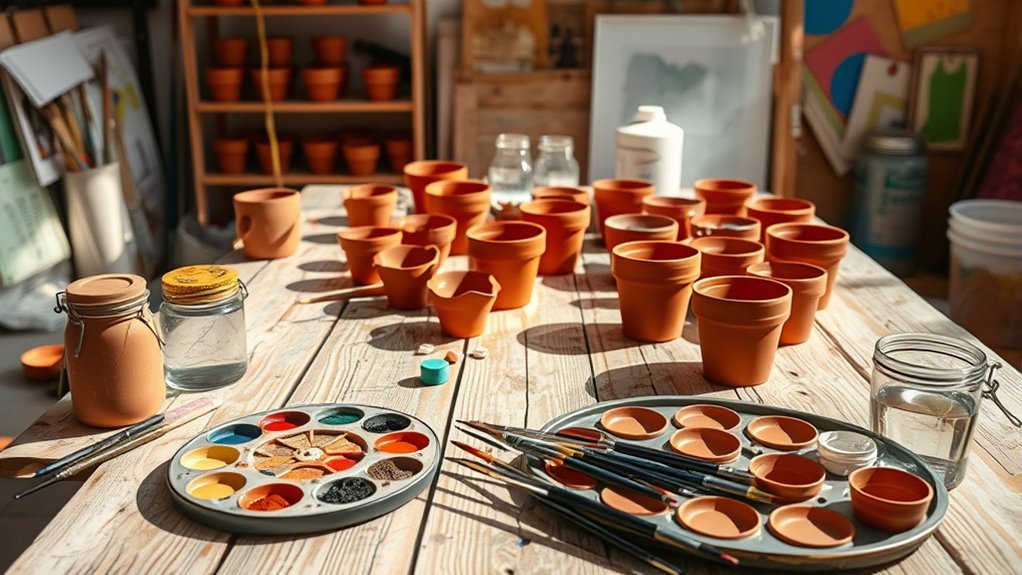
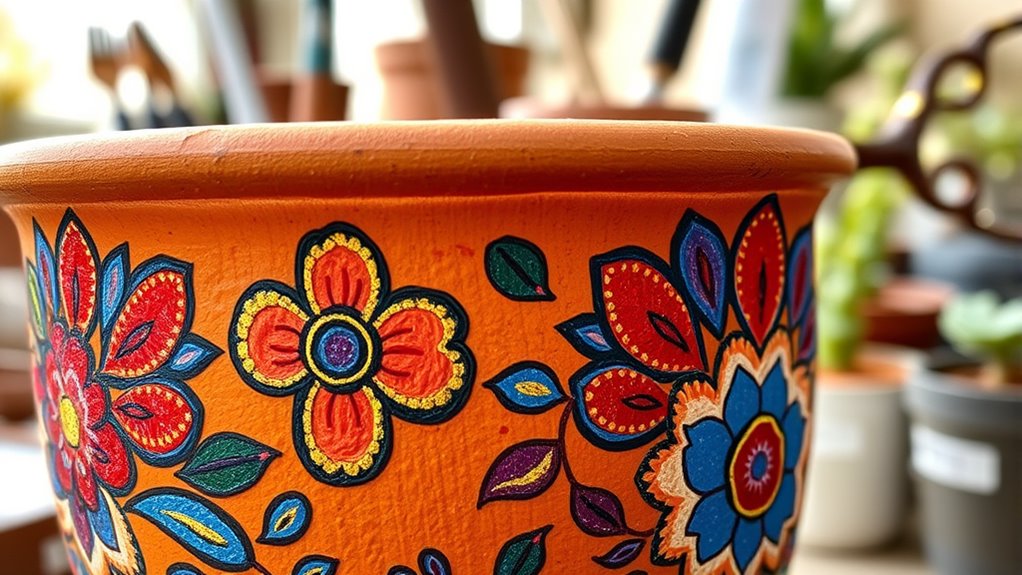
Choosing the Perfect Paints and Tools for Your Design
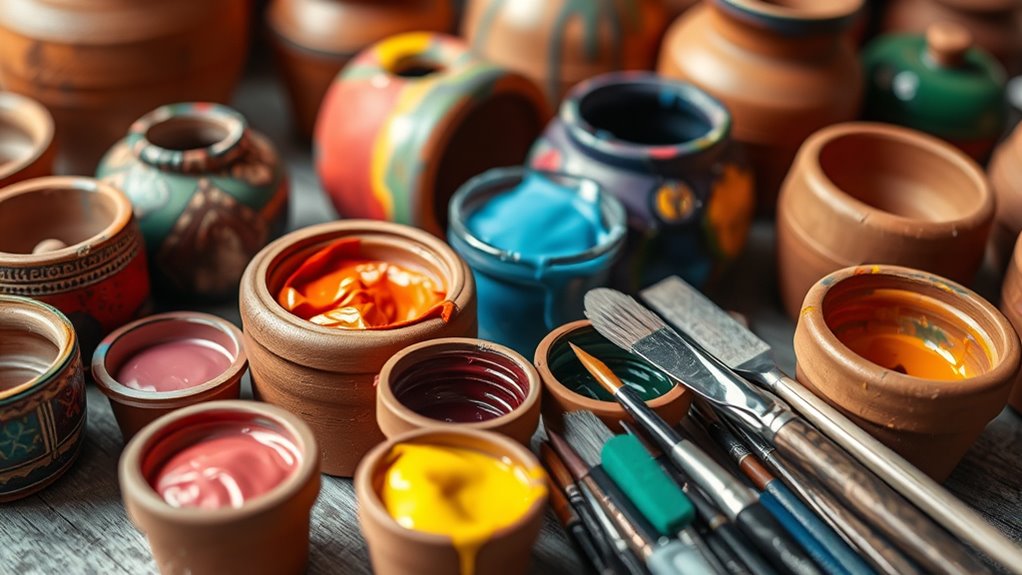
Selecting the right paints and tools is essential to achieve a vibrant and durable design on your terracotta pots. You want paints that stick well, resist weather, and offer rich color. Acrylic paint is a top choice because it adheres nicely and dries quickly. As for tools, use fine brushes for detailed work and sponges for blending or background coverage. Here’s a quick visual:
| Paint Type | Suitable Tools | Finish |
|---|---|---|
| Acrylic | Fine brushes, sponges | Matte or glossy |
| Spray Paint | Spray nozzles, masking tape | Smooth, even |
| Outdoor | Weather-resistant brushes | Durable, vibrant |
Choose quality paints and tools to guarantee your design lasts and looks professional.
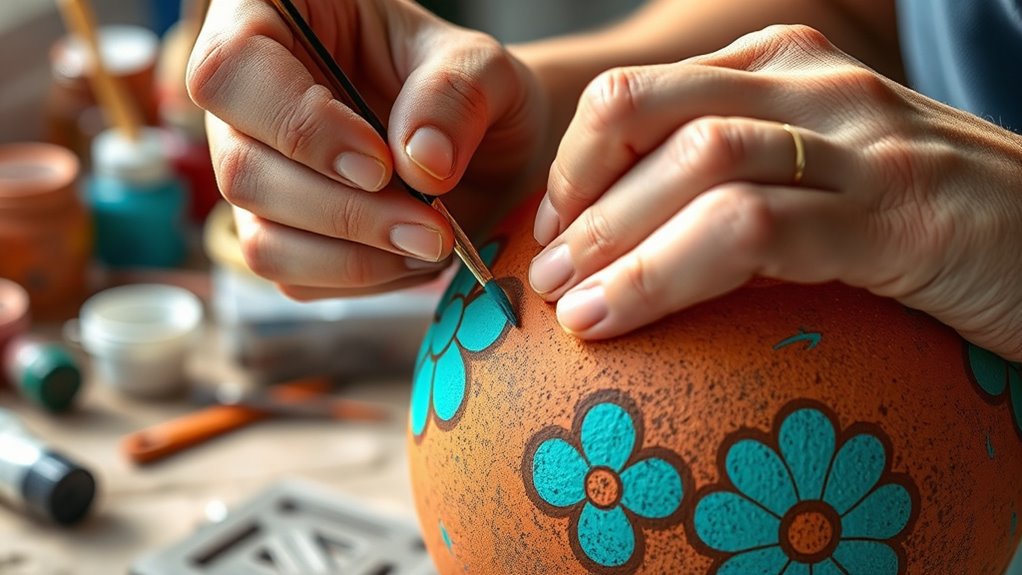
Techniques for Painting and Creating Patterns
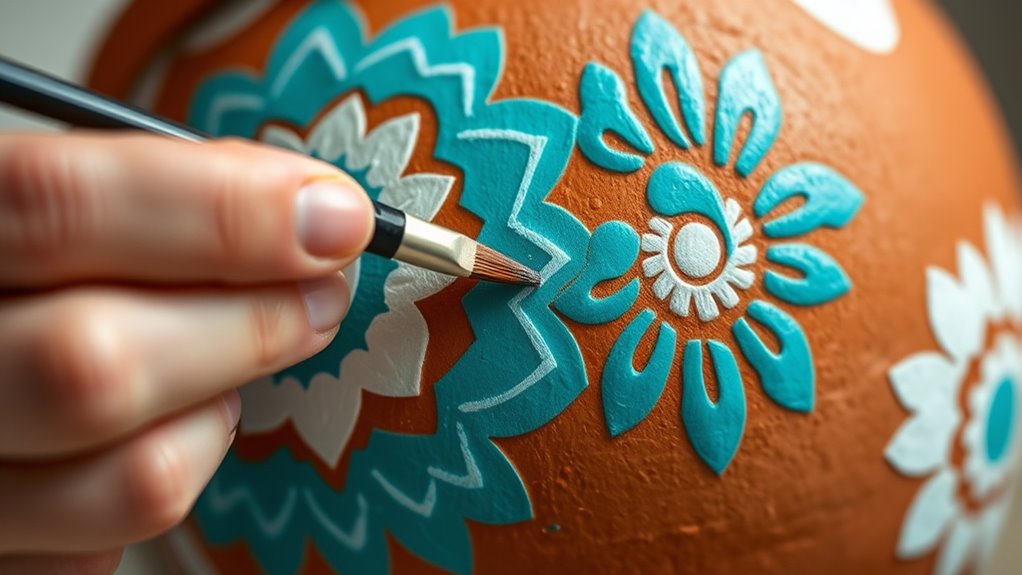
Mastering various painting techniques and pattern creation methods can transform your terracotta pots into stunning works of art. You can use simple brush strokes, sponging, or even stippling to add texture and depth. Tape can help you create clean, geometric lines, while freehand painting allows for more organic designs. Stencils are perfect for adding intricate patterns without much effort. Combining different techniques, like layering colors or blending shades, creates dynamic effects. To make your patterns stand out, consider using contrasting colors or metallic accents. Remember, practice makes perfect—start with small designs before tackling larger or more complex patterns. With these techniques, your terracotta pots will become eye-catching pieces that showcase your creativity and style.
Adding Details and Finishing Touches

Once you’ve completed your main designs, adding small details can elevate your terracotta pots from ordinary to extraordinary. Use fine brushes or paint pens to add highlights, shadows, or tiny accents that enhance your artwork. Dots, lines, or delicate patterns can bring depth and interest, making your design pop. Consider using metallic or glitter paints for a touch of sparkle, but apply sparingly to avoid overpowering your original design. Take your time, and step back periodically to assess your work from a distance. Small adjustments, like emphasizing certain areas or adding subtle shading, can make a huge difference. Remember, these finishing touches are your chance to refine and personalize your piece, giving it a polished, professional look.
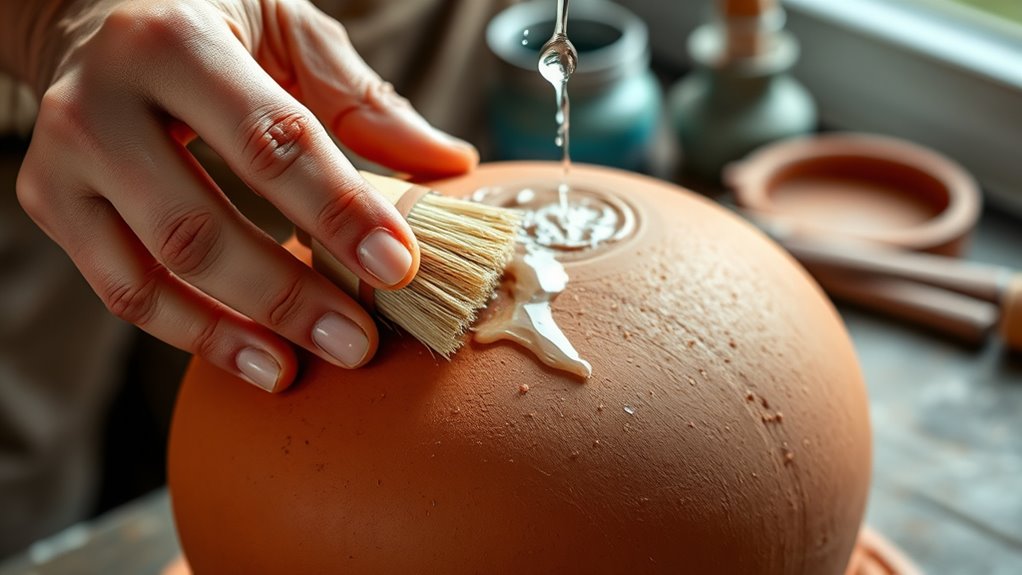
Sealing and Protecting Your Painted Pots
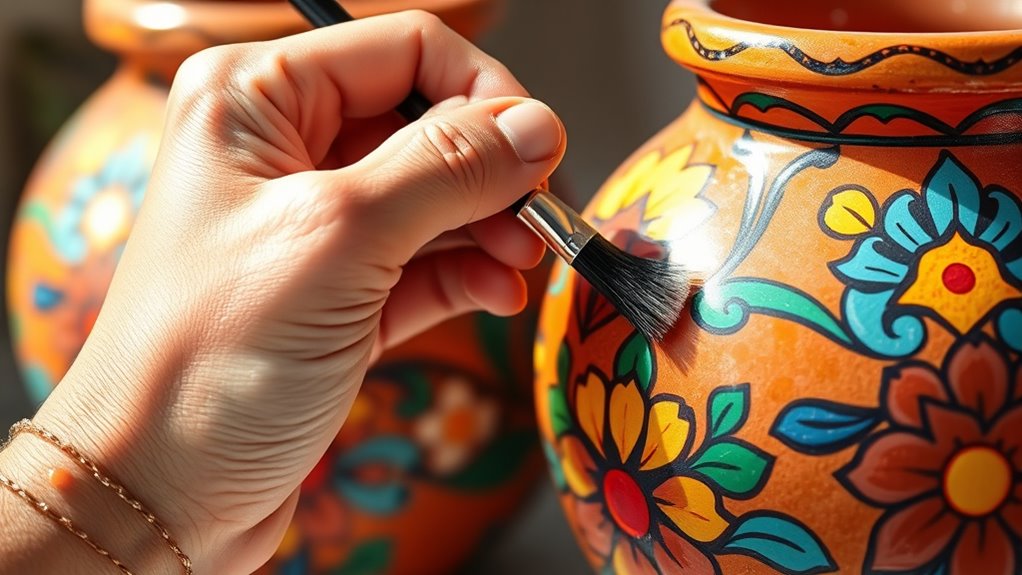
After finishing your painted terracotta pots, sealing and protecting your artwork is essential to guarantee it lasts. A good seal prevents paint from chipping, fading, or cracking over time. Start by choosing a clear, waterproof sealant suitable for outdoor use if your pots will be outside. Apply it evenly with a brush or spray, ensuring full coverage without excess buildup. Allow the sealant to dry completely before handling or placing the pot outdoors. This step preserves your design and enhances durability. Remember, proper sealing also makes cleaning easier and keeps your artwork vibrant longer. To visualize, think of sealing as an invisible shield that safeguards your creative effort and keeps your pots looking professional. Take your time to ensure an even, thorough application for the best results.
Tips for Maintaining and Displaying Your Artwork
To keep your painted terracotta pots looking their best, regular maintenance and thoughtful display are key. Clean them gently with a soft cloth to remove dust and dirt. Avoid harsh chemicals that could damage your artwork. Position your pots in well-lit spots, but avoid direct sunlight to prevent fading. Use stands or brackets to showcase your designs prominently. Proper placement not only highlights your work but also protects it from damage. Here’s a simple guide to help:
| Tip | Action | Benefit |
|---|---|---|
| Regular cleaning | Wipe with a damp cloth | Maintains vibrancy and prevents dirt buildup |
| Proper placement | Display in shaded areas | Preserves colors and prevents fading |
| Use protective coatings | Reapply sealant as needed | Ensures longevity of your artwork |
| Handle with care | Lift from the base | Avoid chipping or scratching |
| Rotate periodically | Change display locations | Keeps your display fresh and protected |
Frequently Asked Questions
What Types of Paint Are Best for Outdoor Terracotta Pots?
When choosing paint for outdoor terracotta pots, you want something durable and weather-resistant. Acrylic paints are a great option because they stick well and resist fading. For extra protection, seal your painted pots with a clear outdoor sealer to guard against moisture and UV rays. Avoid oil-based paints, as they can crack or peel over time. Using the right paint guarantees your pots stay vibrant and beautiful outdoors.
How Long Does Painted Terracotta Last Outdoors Before Needing Touch-Ups?
While your painted terracotta pots face the elements, their vibrant colors tell a story of resilience. Typically, outdoor paint lasts about 1-3 years before you notice needing touch-ups. Harsh weather, sun, and rain gradually wear down the paint, so check periodically. To extend their vibrancy, consider sealing your paint with a clear outdoor sealant, helping your pots stay colorful and protected longer, despite nature’s relentless touch.
Can I Use Spray Paint on Terracotta Pots?
Yes, you can use spray paint on terracotta pots, but you should prepare the surface first. Clean the pot thoroughly, remove any dirt or dust, and let it dry completely. For best results, apply a primer designed for porous surfaces like terracotta. Shake the spray can well, hold it about 6-12 inches away, and spray in light, even coats. This helps guarantee a smooth, durable finish.
Are There Eco-Friendly Paint Options Suitable for Terracotta?
Imagine giving your garden a green heartbeat—eco-friendly paints make that possible. Yes, there are environmentally safe options like water-based, plant-based, and natural mineral paints perfect for terracotta. These choices guarantee your pots stay vibrant while protecting the planet. You can confidently create beautiful, sustainable projects, knowing you’re making a positive impact. Eco-friendly paints prove that caring for the earth and your creativity go hand in hand.
How Do I Fix Mistakes or Smudges During the Painting Process?
If you make mistakes or smudges while painting, don’t worry. You can carefully use a damp cloth or a small brush to gently wipe away the errors before the paint dries. For stubborn smudges, lightly sand the area once dry or apply a bit of paint remover designed for terracotta. Take your time, work patiently, and you’ll achieve a clean, professional look on your pot.
Conclusion
With patience and creativity, your painted terracotta pots will bloom like a garden in full blossom. Remember, each brushstroke is a step toward turning a simple clay pot into a work of art that reflects your unique style. Keep experimenting and enjoy the process—your masterpiece is a reflection of your passion. When you nurture your skills, your pots will stand as vibrant symbols of your artistic journey, proof that beauty grows where you nurture it.