
To set up great photos for your handmade items, start with natural light near a big window, avoiding harsh midday sun. Use simple, neutral backgrounds like white paper or fabric to make your products pop. Position your items at the best angle and keep your setup consistent for a professional look. Adjust your camera settings for clarity and experiment with lighting tools like softboxes if needed. Keep practicing—more tips ahead can help you create stunning images that attract buyers.
Key Takeaways
- Use natural light near large windows or soft artificial lighting to ensure authentic color and even illumination.
- Select simple, neutral backgrounds like white paper or fabric to highlight handmade products.
- Position products at the best angle to showcase craftsmanship and detail clearly.
- Maintain consistent lighting and background setups for a cohesive brand appearance.
- Adjust camera settings such as aperture and focus to enhance image clarity and professional quality.

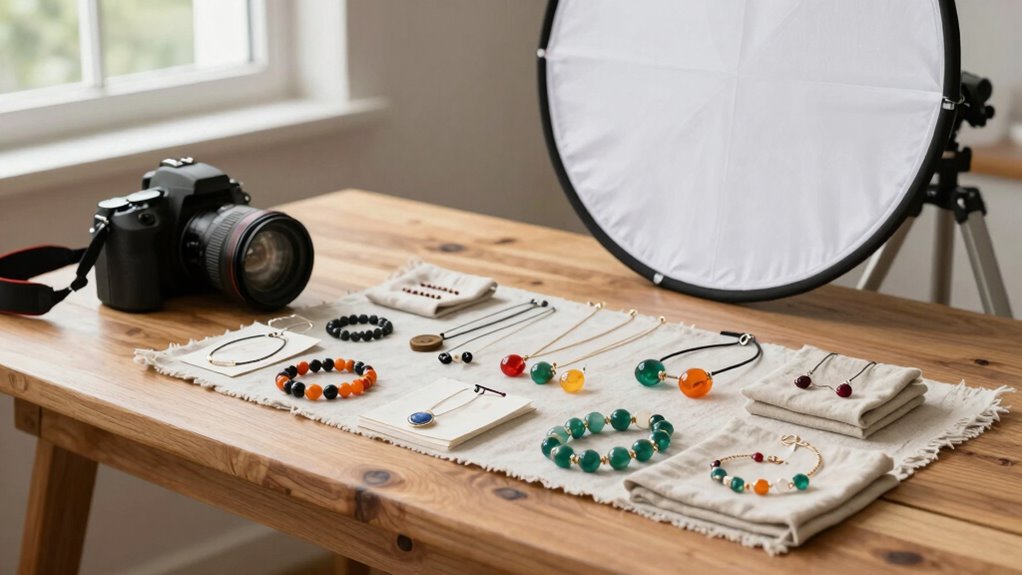
When it comes to selling handmade items online, high-quality photos can make all the difference in attracting customers and boosting sales. Your photos are often the first impression potential buyers will have of your creations, so it’s vital to get the lighting and background right. Proper lighting techniques are key to showcasing your work’s true colors and details. Natural light is usually the best choice—find a spot near a large window where sunlight floods in softly. Avoid harsh midday sun, as it can create strong shadows and wash out your items. Instead, aim for early morning or late afternoon light, which is gentler and more flattering. If natural light isn’t enough or isn’t available, invest in softbox lights or ring lights. These provide even, diffused illumination that reduces shadows and highlights your craftsmanship without glare or harsh reflections.
Background selection is equally important because it helps your product stand out and looks professional. A cluttered or distracting background can divert attention away from your handmade item. Simple, neutral backgrounds work best—think plain white, black, or muted tones—so the focus remains on your work. You can use a clean piece of paper, a fabric backdrop, or a dedicated photography board. For a more creative look, consider textured backgrounds like wood or stone, but keep them subtle so they don’t overshadow the product. When choosing a background, also think about background consistency—using similar backdrops for your entire product line creates a cohesive look that reinforces your brand identity. Additionally, understanding lighting techniques can significantly enhance your product photos and make them more appealing. Paying attention to product positioning ensures your items are showcased at their best angle and in a way that appeals to customers. To further improve your photos, consider experimenting with different camera settings such as aperture and shutter speed to achieve optimal clarity and focus. Moreover, practicing consistent lighting setups can help you produce uniform and professional-looking images across your entire collection.
product photography softbox lights
As an affiliate, we earn on qualifying purchases.
As an affiliate, we earn on qualifying purchases.
Frequently Asked Questions
What Camera Settings Are Best for Product Photography?
For product photography, set your camera to a focal length of around 50mm to avoid distortion. Use a narrow aperture, like f/8 or f/11, to guarantee sharpness throughout the product. Choose camera angles that highlight your item’s best features, typically eye level or slightly above. Keep your ISO low for clarity, and use a tripod for stability. These settings help produce clear, professional-looking images that showcase your handmade products effectively.
How Do I Choose the Right Background for My Items?
You should choose a background that complements your items through color coordination, ensuring it highlights your products without overpowering them. Consider background textures like smooth paper, fabric, or natural elements to add visual interest, but keep them simple enough not to distract. Test different options, and select a background that enhances your item’s details and vibe, making it appealing and professional for your online shop.
What’s the Ideal Lighting Setup for Small Products?
Did you know 93% of top sellers use natural light for their product photos? To achieve the ideal lighting setup, position your small products near a window with plenty of natural light. Use light diffusers, like sheer curtains or white sheets, to soften harsh shadows and create an even, flattering glow. This setup highlights your items’ details and colors, making your listings more appealing and professional.
How Can I Reduce Glare and Reflections on Shiny Surfaces?
To reduce glare and reflections on shiny surfaces, use diffuse lighting to soften harsh light spots. Position your light sources indirectly or through a diffuser to spread light evenly. Additionally, attach a polarizing filter to your camera lens; it helps cut down reflections and glare. Adjust the filter’s angle until reflections diminish, giving your product a clean, professional look without unwanted shiny spots.
What Editing Tools Are Recommended for Enhancing Product Photos?
Sure, because who doesn’t love spending hours perfecting every hue? For enhancing product photos, you should try color correction tools to get those colors just right. Filter application can add a creative flair or fix lighting issues instantly. Programs like Adobe Lightroom or Photoshop are excellent choices. They let you tweak brightness, contrast, and saturation, giving your photos that professional, polished look that’ll make your handmade items irresistible to buyers.
neutral background photography paper
As an affiliate, we earn on qualifying purchases.
As an affiliate, we earn on qualifying purchases.
Conclusion
With a simple setup and some practice, you can showcase your handmade creations beautifully without expensive equipment. Don’t let worries about perfect lighting or backgrounds hold you back—start small, experiment, and improve over time. Your unique products will shine through, attracting more customers and boosting sales. Remember, even professional photos begin with a few basics; your passion and creativity are what truly make your shop stand out. Just take that first step today!
ring light for product photos
As an affiliate, we earn on qualifying purchases.
As an affiliate, we earn on qualifying purchases.
camera tripod for product photography
As an affiliate, we earn on qualifying purchases.
As an affiliate, we earn on qualifying purchases.