
TL;DR
Moving your rig into a closet or small space reduces reflections and echo, but proper treatment and ventilation are key. Sealing gaps and strategic placement make a huge difference in sound quality and noise control.
Ever wondered why your recordings sound boxy or hollow, even after sticking up foam panels? The secret isn’t just about absorbing sound — it’s about where you place your treatments and how you manage noise leaks. Most creators focus on foam, but the real magic happens with proper placement and understanding the difference between dampening and soundproofing.
If your goal is a quiet workspace or professional-sounding recordings in a tiny closet, you’ll want to master these practical strategies. From moving the rig into another room to sealing gaps and choosing the right materials, this guide will give you clear, actionable steps for making your closet a sound-friendly haven.
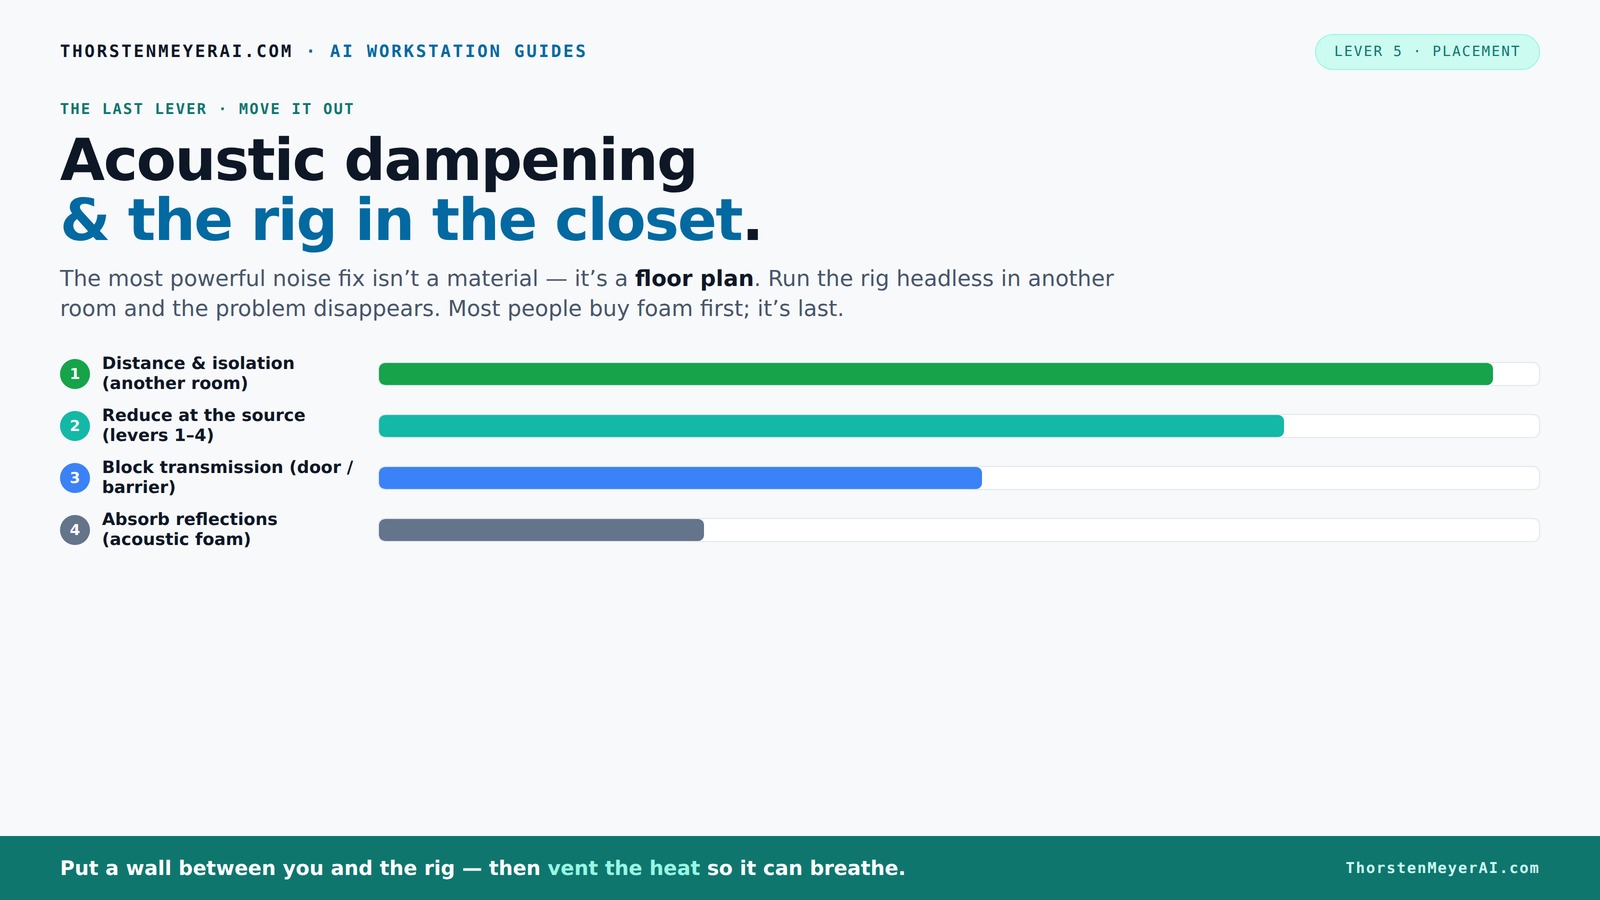
Acoustic dampening
& the rig in the closet.
The most powerful noise fix isn’t a material — it’s a floor plan. A rig you can’t hear because it’s in another room beats any amount of foam. Tap the approaches in Part 1 to see what actually works.
(another room)
(levers 1–4)
(door / barrier)
(acoustic foam)
Contain the noise, not the heat
Key Takeaways
- Moving your rig into a separate room or closet drastically reduces noise and reflections, often more than foam alone.
- Ventilation is critical in closet setups — ensure hot air can escape to prevent heat buildup and noise spikes.
- Use strategic placement of acoustic panels — behind the mic, on side walls, and ceiling — to tame echo and improve clarity.
- Sealing gaps around doors and outlets is essential for minimizing sound leakage and maximizing treatment effectiveness.
- Bass traps and thicker panels are necessary in small spaces to control low frequencies and prevent muddiness.

Focusound 52 Pack Acoustic Foam Panels 1" x 12" x 12" Sound Proof Foam Panles Soundproofing Noise Cancelling Wedge Panels for Home Office Recoding Studio with 300PCS Double-Side Adhesive
Soundproofing - Acoustic foam panels triangular grooves structure for better noise absorption, helps to reduce and absorb unwanted...
As an affiliate, we earn on qualifying purchases.
As an affiliate, we earn on qualifying purchases.
Why Moving Your Rig Is the Easiest Way to Cut Noise and Echo
The biggest win for quieting your setup isn’t about fancy foam or expensive barriers — it’s about distance. If you can put your rig in another room or closet, you instantly cut noise and echo by a huge margin. Think of it like turning down the volume of your own machine by simply putting walls between you and it.
This works especially with AI workstations or voice-over setups, where your computer or GPU rig doesn’t need to be on your desk. Just a strong network connection and a bit of ventilation, and your workspace stays silent while the noise roars in the other room.
For example, I moved my GPU server into a spare closet. Over a wired connection, I record vocals right next to my desk without hearing a hint of the machine’s hum. It’s a game-changer.

ATS Acoustics Home Office Residential Acoustic Treatment Room Kit Sound Absorbing Acoustic Panel 8 Pack for 120-200 Sq Ft (Linen)
8 Piece Kit contains 6 wall panels and 2 ceiling panels, each panel is sized 24" x 48"...
As an affiliate, we earn on qualifying purchases.
As an affiliate, we earn on qualifying purchases.
The 'Rig in the Closet' Setup — Why Ventilation Is Non-Negotiable
Placing a powerful, heat-generating machine inside a closet can be a quiet dream — until it turns into a hot mess. Without proper airflow, trapped heat will make your rig throttle, fans scream, and noise levels rise — defeating the purpose of a closet setup.
Active ventilation is your best friend here. Install a quiet exhaust fan or create passive vents that let hot air escape and cool air enter. Some builders even add ducted cooling or thermostat-controlled fans for optimal temperature control.
For example, I set up a small intake vent and a quiet exhaust fan in my closet. It keeps the ambient temperature stable even after hours of heavy use, preventing throttling and noise spikes. Check out this guide for in-depth ventilation tips.

MAXTID Large Door Draft Stopper for Bottom of Doors 36” Under Door Sweep Noise Blocker Black Gap Stoppers Adjustable Doors Seal Sweep Guard Draft, Window Breeze Stoppers, Home Essentials Gadgets
Large door draft stopper foam is 2 inches in diameter, which is larger than most sellers' foam and...
As an affiliate, we earn on qualifying purchases.
As an affiliate, we earn on qualifying purchases.
Dampening vs. Soundproofing: What Your Closet Really Needs
Many assume acoustic foam is a magic bullet for silence. It’s not. Acoustic foam primarily reduces echoes and reflections inside a small space, making your voice clearer and less ‘boxy’ — but it does little to stop sound from leaking out or coming in.
Soundproofing involves sealing gaps, adding dense barriers, and reducing structure-borne noise. For example, weatherstripping around the closet door and sealing outlet gaps can cut sound leakage dramatically.
In my own closet booth, I layered foam panels on the walls to tame reflections and added draft stoppers around the door to seal sound leaks. It’s a perfect combo for clarity and privacy.

Sound Addicted - Studio Monitor Isolation Pads suitable for 6.5, 7 and 8 Inches Large Speakers | Reduce Vibrations and Fits most Stands - Pair | SMPad 8
SMPad 8 is made out of the highest quality acoustical foam (50kg/m^3 density).
As an affiliate, we earn on qualifying purchases.
As an affiliate, we earn on qualifying purchases.
Where to Place Acoustic Treatments for Best Results
Placement is everything. The first reflection point — usually behind the mic or on the wall directly opposite — should get treatment first. This reduces harsh early reflections that muddle your voice.
Next, treat the side walls to prevent flutter echo and harshness. Ceiling panels help because sound bounces back from above, especially in small closets. The floor benefits from rugs or carpets, which absorb sound and prevent bouncing.
For example, I placed foam panels directly behind my microphone, added side wall panels, and used a thick rug on the floor. The result? Clearer vocals with less echo and a more natural sound.
How to Tackle Low-End and Bass Issues in Small Spaces
Small closets tend to develop boomy bass and standing waves because of parallel walls and tight corners. Acoustic foam alone struggles with low frequencies, which need thicker, denser treatment.
Adding bass traps in the corners and thicker panels on the walls can help tame low-end buildup. For example, I installed foam bass traps in the corners of my closet, which reduced muddiness and made vocals sound fuller and more balanced.
According to recent DIY trends, understanding and treating low frequencies is key in small spaces. Check out this article for more bass treatment tips.
Sealing Gaps and Reducing Sound Leakage in Your Closet Booth
Even the best treatment won’t help if sound leaks through gaps. Cracks around the door, outlets, or vents act like tiny speakers broadcasting your noise.
Use weatherstripping, acoustic sealant, or even heavy blankets over gaps to seal these channels. For example, I added weatherstripping around my closet door and hung a thick curtain in front of it, which cut down noise bleed significantly.
This step makes your treatment much more effective and keeps sound from disturbing others or escaping your space.
Simple DIY Tricks to Improve Your Closet Soundproofing
Don’t overthink your closet setup. Simple, inexpensive fixes often work best. Use moving blankets, foam panels, or even thick towels to cover walls and door gaps. Mounting panels with thumbtacks or tape is easy and effective.
For example, I taped foam panels on the ceiling and hung a blanket over the door. This instantly improved sound absorption and reduced noise leaks without a big investment.
Check out [this](https://thorstenmeyerai.com/low-noise-pc-cases-airflow/) guide for more DIY ideas and materials.
Frequently Asked Questions
What’s the difference between acoustic dampening and soundproofing?
Acoustic dampening reduces echoes and reflections inside a space, making sound clearer. Soundproofing blocks sound from leaking in or out, often involving sealing gaps and adding dense barriers. Combining both gives the best results.Where should I place acoustic panels in a closet booth?
Start by placing acoustic panels strategically with the wall behind your mic, then treat side walls and the ceiling. Add a rug or blanket on the floor. This placement targets primary reflection points and reduces echo, improving clarity.Do I need bass traps in a small closet?
Yes. Small spaces often have bass buildup due to parallel walls. Corner-mounted bass traps help tame low frequencies, preventing muddiness and making your recordings sound fuller.How thick should acoustic panels be for voice recording?
Typically, 2-4 inches thick panels are enough to absorb mid and high frequencies well. For low frequencies, thicker or specialized bass traps are more effective.How do I reduce sound leaking through the closet door?
Seal gaps with weatherstripping or acoustic sealant, and add a heavy curtain or blanket in front of the door. These steps cut down on sound escaping and improve overall noise control.Conclusion
Your closet can become a surprisingly effective vocal booth or AI workstation with smart placement and treatment. Focus on moving your rig away, sealing gaps, and treating key reflection points. The result? Crisper recordings and a quieter workspace.
Remember: the best soundproofing isn’t just foam — it’s strategic, layered, and tailored. So, pick your closet, seal your gaps, and tune your space. Your ears will thank you.