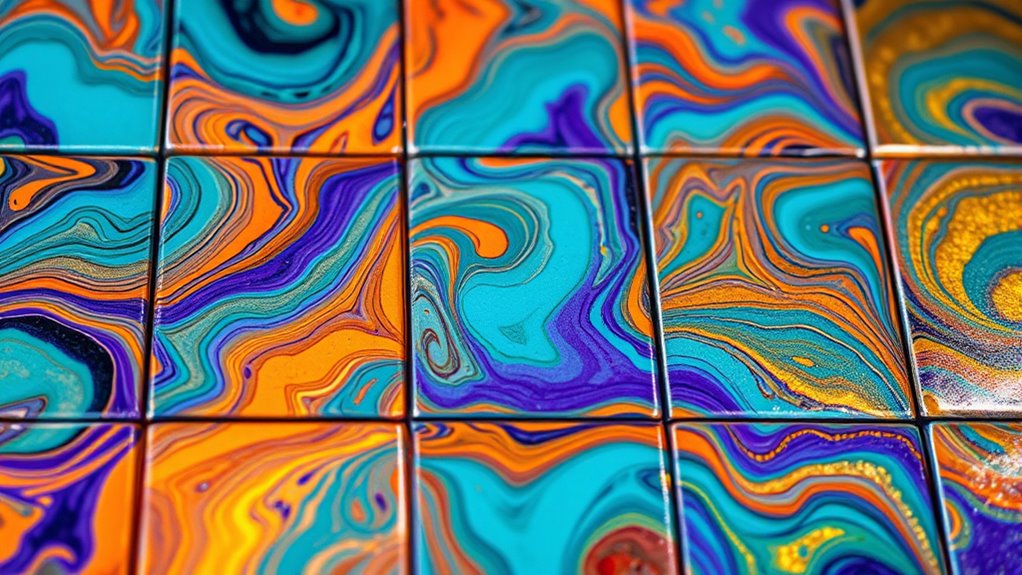

To create alcohol ink tiles, start by choosing a smooth surface like ceramic or glossy paper. Drop alcohol inks onto the surface and use air, brushes, or blending tools to move the colors and create abstract, organic patterns. Layer and bleed the inks for depth, then let your design dry completely. Once dry, seal your artwork with a clear sealant to protect and enhance the colors. Keep exploring to discover more tips and techniques for stunning results.
Key Takeaways
- Choose high-quality, porous ceramic or tile surfaces suitable for alcohol inks.
- Apply alcohol inks using techniques like blending, layering, and dropping alcohol for organic patterns.
- Allow the inks to dry completely, typically 15-30 minutes, before handling or sealing.
- Seal the finished tiles with a compatible, high-quality sealant such as spray or brush-on polyurethane or resin.
- Work in a well-ventilated area, applying thin coats and allowing each to dry thoroughly for a durable finish.

Creating alcohol ink tiles is a fun and versatile way to bring vibrant, abstract art into your space. When you start, you’ll notice how the colors blend seamlessly, creating mesmerizing patterns and effects that are unique to each tile. The key to achieving stunning color blending lies in your control of the alcohol inks and your technique. You can layer and manipulate the inks by adding drops of rubbing alcohol, which dilutes the colors and helps them flow and mix effortlessly. As you work, you’ll see how the inks spread and merge, forming organic shapes and vibrant gradients. Experimenting with different color combinations will allow you to discover your signature style, whether you prefer soft transitions or bold contrasts. Additionally, understanding the properties of alcohol inks can help you better predict how the colors will behave during your process.
Once you’ve finished creating your design, it’s essential to *contemplate* tile sealing. Sealing your alcohol ink tiles not only protects your artwork but also enhances the vividness of the colors. After the inks dry completely—usually within 15-30 minutes—you’ll want to apply a high-quality, clear sealant. Make sure to use a sealant suitable for tiles and compatible with alcohol ink, such as a spray or brush-on polyurethane or a resin coat. Applying a sealant creates a protective barrier against moisture, scratches, and fading, ensuring your artwork remains vibrant over time. Before sealing, clean your tiles gently with a soft cloth to remove any dust or residue, and then follow the manufacturer’s instructions for the best results.
When sealing, work in a well-ventilated area and apply thin, even coats. Avoid over-saturating the surface, as thick layers can cause the ink to smudge or run. Allow each coat to dry thoroughly before applying the next to build a durable, glossy finish. Once sealed, your alcohol ink tiles are ready to be displayed or incorporated into various projects, such as coasters, wall art, or decorative panels. The sealing process makes your artwork more resilient and easier to clean, so you can enjoy your vibrant creations without worry.
Frequently Asked Questions
Can Alcohol Ink Tiles Be Used Outdoors?
Yes, alcohol ink tiles can be used outdoors, but their outdoor durability depends on proper sealing and UV resistance. You should apply a high-quality, UV-resistant sealant to protect the vibrant colors from fading caused by sun exposure. Keep in mind that alcohol inks are inherently less UV resistant, so regular resealing and choosing outdoor-specific products will help your tiles withstand weather conditions and maintain their beauty over time.
What Type of Sealant Is Best for Alcohol Ink Tiles?
If you want your alcohol ink tiles to survive the apocalypse (or just a rainy day), go for a clear, outdoor-rated sealant like epoxy or UV-resistant acrylic. These sealant options boost durability, making your art weatherproof and vibrant for years. Remember, durability considerations are key—choose the wrong sealer, and your masterpiece might fade faster than your New Year’s resolutions. Seal it right, and enjoy your resilient, stunning tiles!
How Long Does It Take for Alcohol Ink to Dry?
Alcohol ink typically dries within 1 to 2 hours, but drying time can vary depending on environmental factors. If you work in a humid or cold environment, it may take longer, while a warm, dry space accelerates the process. To guarantee your design is fully dry, wait at least 24 hours before sealing or handling your tiles. Always check the ink’s appearance before proceeding to avoid smudging.
Are Alcohol Ink Tiles Dishwasher Safe?
Like a knight’s armor, alcohol ink tiles aren’t dishwasher safe. You should avoid harsh cleaning methods, as durability concerns mean the ink can fade or peel with water and detergents. To keep your tiles vibrant, gently wipe them with a soft cloth and mild soap. If you need a deeper clean, use a damp cloth—never submerge the tiles in water—to prevent damage and preserve their vivid colors.
Can I Create Custom Shapes With Alcohol Ink Tiles?
Yes, you can create custom shapes with alcohol ink tiles. To do this, you can use custom shape techniques like masking or stenciling, which allow you to design personalized patterns and shapes on the tiles. You might also cut the tiles into specific forms or apply adhesive stencils to achieve intricate designs. These methods help you add a unique touch and make your tiles truly one-of-a-kind, enhancing your design personalization.
Conclusion
Now that you know how to create stunning alcohol ink tiles, you’re ready to unleash your creativity. Did you know that the global art supplies market is expected to reach $33 billion by 2026? That’s a huge industry filled with endless possibilities! So, grab your inks and tiles, and start experimenting. With a little practice, you’ll craft unique pieces that showcase your personal style—embrace the process and enjoy every colorful moment!