
To get smooth breaks and reduce waste in stained glass cutting, focus on proper scoring with a sharp, steady tool, and apply gentle, consistent pressure. Use support tools like running pliers to control force and prevent jagged edges. Prepare your glass by cleaning it thoroughly before cutting and plan your layout carefully to minimize scrap. With the right techniques and practice, you’ll improve your precision and efficiency—keep exploring to master these skills fully.
Key Takeaways
- Use a sharp, high-quality glass cutter to ensure clean, precise score lines for smooth breaks.
- Support the glass with tools like breaking pliers or runnning pliers to control force and prevent waste.
- Carefully follow pattern lines and keep the glass surface clean for accurate cuts and minimal mistakes.
- Practice scoring with consistent pressure and develop a steady hand to achieve cleaner, more controlled breaks.
- Re-score and gently tap along the score line or use a grinder to refine edges and reduce glass waste.
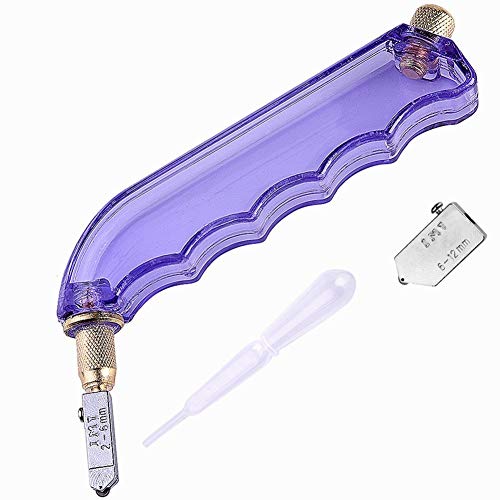
IMT Pistol Grip Oil Feed Glass Cutter Tungsten Carbide, Professional Stained Glass Cutting Tool with 2 Replaceable Head and Oil Reservoir- 2mm-12mm
- Ergonomic Pistol Grip: Reduces wrist fatigue and enhances control
- Heavy-Duty Construction: Iron head with tungsten carbide wheel for durability
- Long-Lasting Blade: Cuts over 20,000 meters, 30x longer than standard
As an affiliate, we earn on qualifying purchases.
As an affiliate, we earn on qualifying purchases.
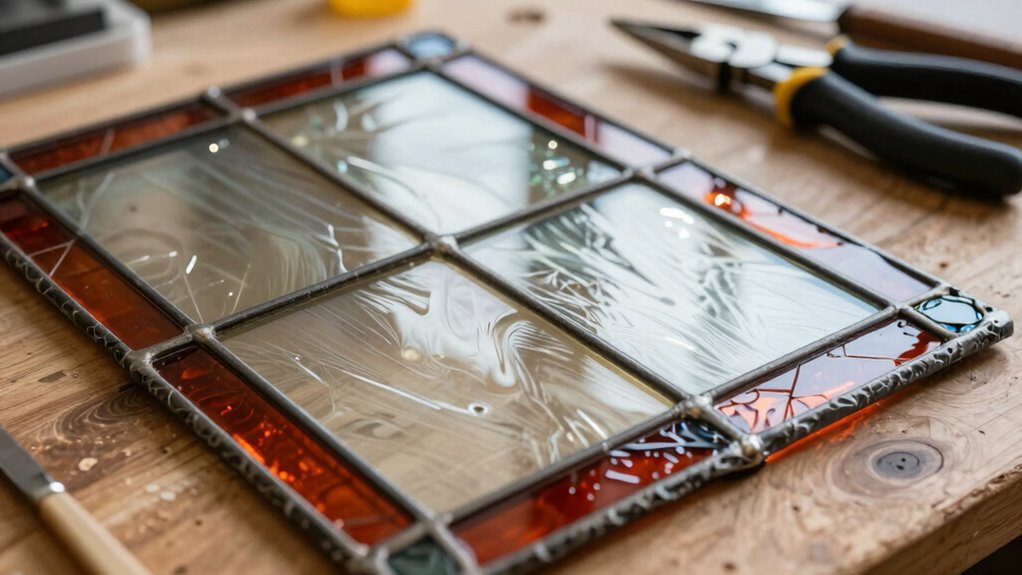
Why Smooth Glass Breaks Are Crucial in Stained Glass Projects

Smooth glass breaks are essential in stained glass projects because they help guarantee clean, precise cuts that fit together seamlessly. The glass texture plays a significant role here; a smooth break ensures edges are even and manageable, making assembly easier. When your glass breaks smoothly, you can better match colors because the edges won’t chip or crack, preserving the integrity of your chosen hues. This precision allows you to create intricate designs with tight joints and consistent color transitions. A clean break also reduces waste, saving you money and effort. Additionally, practicing proper cutting techniques can improve your overall cutting accuracy, leading to better results in your stained glass work. Proper handling and sharpening of your tools contribute to achieving smooth breaks, which are crucial for professional-looking outcomes. Understanding how to control the break line can significantly enhance your ability to produce clean, precise cuts, further elevating your craftsmanship. Skilled cutting not only ensures aesthetic quality but also minimizes the risk of accidental glass damage during the process. Moreover, learning about glass tempering can help you select the best types of glass for your projects, ensuring durability and safety. Ultimately, mastering smooth breaks enhances both the aesthetic quality and durability of your stained glass piece, ensuring that your colors align perfectly and your project maintains a professional, polished look.
How to Choose the Best Glass and Tools for Cutting
Choosing the right glass type and tools is essential for a successful stained glass project. You need to take into account the thickness and quality of the glass, as well as selecting sharp, reliable cutters and tools. Always prioritize safety and proper handling to avoid accidents and ensure clean cuts every time. Additionally, understanding proper tool handling techniques can significantly improve your results and safety during the process. Being familiar with safe cutting practices helps prevent mishaps and ensures precise, smooth breaks. Cultivating a sense of curiosity about techniques can help you discover new methods to enhance your craftsmanship and troubleshoot issues more effectively. Incorporating safe installation practices into your workflow further ensures that your finished work remains durable and safe for display or use. Developing a solid understanding of glass types and characteristics can also help you select the best materials for each project, leading to more consistent and professional results.
Glass Type Selection
Have you ever wondered how to pick the right glass for your stained glass project? Choosing the right type depends on your desired look and technique. Consider glass textures: smooth, frosted, or patterned, which affect how easy it is to cut and how the finished piece appears. Color options also matter; clear, opaque, or stained glass can dramatically change your design’s impact.
| Glass Texture | Suitable for |
|---|---|
| Smooth | Precise cuts, clean lines |
| Frosted | Diffused light, softer appearance |
| Patterned | Unique designs, textured effect |
| Color Options | Best Use |
| Clear | Emphasize shapes and lines |
| Opaque | Hide flaws, add privacy |
| Stained | Vibrant, artistic effects |
Essential Cutting Tools
To achieve clean, accurate cuts in your stained glass project, selecting the right tools is essential. Your choice depends on the glass texture and desired cutting speed. A high-quality glass cutter with a sharp wheel allows for smooth, consistent scores, especially on smooth or textured glass. For intricate designs, a running plier helps make precise breaks along scored lines. Additionally, a glass breaking plier offers controlled pressure, reducing waste and uneven edges. When choosing tools, consider these factors:
- Compatibility with glass texture for clean cuts
- Ease of controlling cutting speed
- Durability and comfort during use
- Proper tool maintenance ensures longevity and optimal performance. Maintaining your tools regularly enhances their effectiveness and safety during use. Selecting the appropriate cutting techniques can also improve your overall results and reduce material waste. Incorporating connected tools and smart adjustments can further refine your cutting process for more consistent results. Incorporating ergonomic handle designs can also reduce fatigue and improve precision during extended cutting sessions.
Using the right combination guarantees you get smooth breaks without wasted glass, making your stained glass work more efficient and precise. Proper selection of cutting tools is crucial for achieving professional results and minimizing material waste.
Safety and Handling
Ensuring safety while handling stained glass and cutting tools is essential to prevent injuries and achieve the best results. Always wear protective gear, including safety glasses and gloves, to shield yourself from sharp edges and glass shards. Use the right tools designed for stained glass to guarantee precise cuts and reduce accidents. When you’re finished, follow proper disposal methods for scrap glass to keep your workspace safe and clutter-free. Dispose of broken or cut glass in sturdy, puncture-proof containers, and never leave sharp pieces lying around. Handling glass carefully minimizes the risk of cuts, while selecting the appropriate tools makes your work safer and more efficient. Proper tool selection and safety practices are crucial for successful stained glass projects. Incorporating attention to detail during handling ensures all safety measures are effectively followed. Prioritizing safety and proper disposal keeps your stained glass projects enjoyable and injury-free. Additionally, being aware of vetted safety guidelines helps maintain a secure working environment at all times.
Preparing Your Glass for Accurate, Clean Breaks

Before you start cutting, it’s essential to prepare your glass properly to achieve accurate, clean breaks. Proper preparation guarantees your glass pattern lines are precise and your cutting speed is controlled. To do this effectively:
- Use a steady hand to follow your glass pattern exactly, avoiding jagged or uneven lines.
- Adjust your cutting speed—slow enough to stay accurate, but not so slow that the glass overheats.
- Ensure your glass surface is clean and free of dust or fingerprints, which can cause slips or uneven breaks.
How to Score Glass Correctly for Smooth Breaks

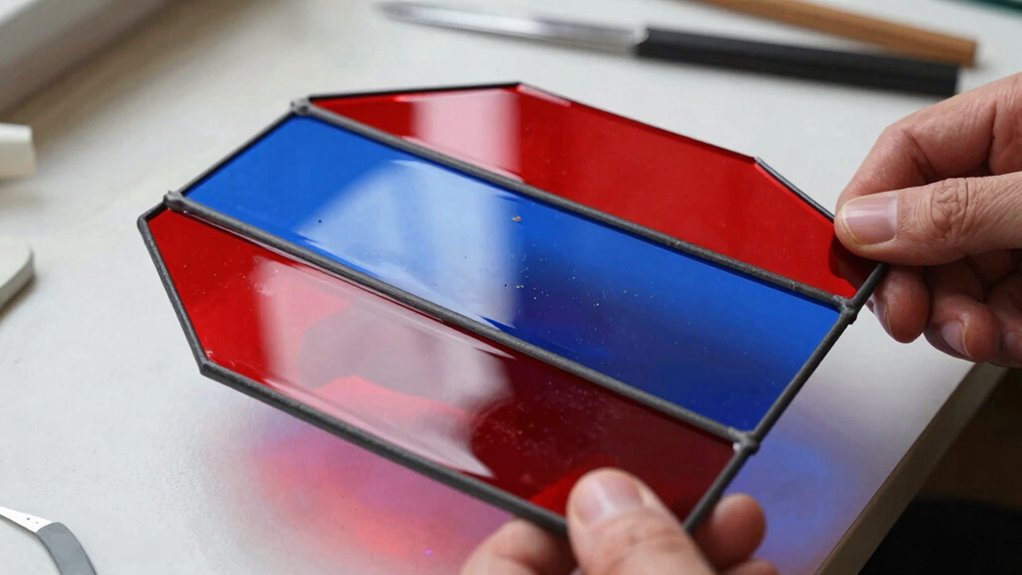
Achieving a smooth break in your stained glass starts with scoring the glass correctly. First, select a suitable glass texture; smoother textures are easier to score, while textured ones may require more pressure. Use a sharp, consistent glass cutter and apply even pressure along your marked line. Keep your score straight and steady to ensure a clean break. When it comes to color matching, scoring accurately helps preserve the integrity of each piece’s hue, preventing unnecessary waste. Be mindful of the glass’s surface; scoring over irregular textures can cause jagged edges. Practice makes perfect—maintain a steady hand and focus on making a single, confident score line. Proper scoring sets the foundation for a smooth, controlled break without damaging the glass or wasting material. Proper technique in scoring is essential for achieving optimal results and minimizing waste. Additionally, understanding how wood movement can affect your work can help you develop more precise scoring techniques, especially when working with different glass types.
Applying Gentle Pressure for Perfect Breaks

To achieve clean breaks, you need to apply gentle, consistent pressure along the scored line. Using support tools like pliers or breaking pliers helps control the force and prevents uneven cracks. With practice, you’ll develop a steady hand that guarantees each break is precise and smooth. Additionally, understanding the right breaking technique can significantly improve your results. Embracing a creative approach often leads to more consistent and satisfying cuts, reducing wasted glass and enhancing your craftsmanship. Being aware of proper safety measures is also essential to protect yourself during the process. Incorporating exfoliation with glycolic acid can further refine your skills by promoting smoother, more controlled cuts. Exploring smart tools like automated glass cutters or digital guides can also assist in achieving more accurate and efficient results.
Consistent Pressure Technique
Applying gentle, consistent pressure is crucial for making clean, precise cuts in stained glass. Maintaining pressure consistency helps you control the cut and prevents unwanted cracks. Focus on your cutting rhythm; a steady, even pace ensures smooth breaks and reduces glass waste. To develop this technique:
- Keep your hand steady and avoid sudden movements
- Maintain a consistent speed throughout the cut
- Use long, controlled strokes rather than short, choppy ones
- Understanding glass properties can help you anticipate how different types of glass will respond to your pressure, resulting in more accurate cuts. Additionally, being aware of waterpark amenities can inspire you to create more fluid and seamless cuts, just like the smooth flow of water in lazy rivers and wave pools.
Use of Support Tools
Support tools are essential for applying gentle, even pressure when cutting stained glass, as they help you control the glass during the break and prevent unwanted cracks. Using the right support tools ensures your glass breaks cleanly along the scored line. These tools include pliers, running pliers, or specialized break tools designed for glass cutting. They provide stability and leverage, making the process smoother. Here’s a quick comparison:
| Tool Type | Best Use | Tip |
|---|---|---|
| Running Pliers | For straight breaks | Apply steady pressure |
| Nippers | For small adjustments | Use gently to avoid chips |
| Hand Pliers | For controlled pressure | Support glass evenly |
| Breaker Tools | For larger pieces | Use with gentle force |
| Clamp Devices | Securing glass during cut | Keep steady, avoid slips |
Choosing the right support tools helps you master glass cutting effortlessly.
Using Heat and Cold to Control Glass Breakage

Using heat and cold strategically can considerably reduce the risk of glass breakage during cutting. By carefully applying thermal expansion and contraction, you can control where the glass breaks, leading to cleaner cuts. For example, gently heating the glass along a scored line makes it expand slightly, easing the break process. Conversely, cooling the glass quickly can cause contraction, helping to direct the break. This technique mimics glass tempering methods, where controlled heating and cooling strengthen the glass or induce predictable fractures. Remember, always handle heat sources carefully to avoid uneven stress.
Consider these tips:
- Use a heat gun or warm cloth to warm the glass along the score line.
- Apply cold water or an ice pack to induce contraction.
- Practice patience to achieve clean, smooth breaks without stress fractures.
Common Mistakes Causing Jagged Edges (and How to Fix Them)

Using a dull blade can cause uneven, jagged edges and make your cuts difficult. Incorrect technique, like applying too much pressure or rushing, also leads to rough edges. Additionally, failing to support the glass properly can result in cracks and uneven breaks, so always guarantee your glass is well-supported throughout the process.
Dull Blade Effects
A dull blade is one of the most common causes of jagged edges when cutting stained glass. When your blade lacks sharpness, it struggles to cut smoothly, resulting in uneven edges that waste glass and require extra smoothing. To prevent this, regularly check your blade’s sharpness and replace it when it becomes dull. Dull blades increase the force needed, making cuts less controlled and more prone to jaggedness.
Consider these tips:
- Keep blades sharp by honing or replacing them frequently
- Use the correct blade for stained glass
- Avoid applying excessive pressure during cuts
Incorrect Cutting Technique
Have you ever noticed jagged edges after cutting stained glass? This often results from incorrect technique. When you press too hard or use an uneven stroke, you create uneven stress on the glass, leading to jagged edges instead of smooth breaks. Rushing through the cut or applying inconsistent pressure can also cause irregularities. To fix this, focus on maintaining a steady hand and consistent pressure throughout the cut. Use a smooth, continuous motion rather than jerky or hesitant movements. Ensure your glass cutter is sharp, and don’t press too hard—let the wheel do the work. Proper technique minimizes stress on the glass, reducing jagged edges and waste. Mastering these steps helps you achieve cleaner, more professional-looking cuts every time.
Inadequate Glass Support
One common mistake that leads to jagged edges is not properly supporting the glass during cutting. Without adequate support, the glass can flex or shift, affecting the glass tension and causing uneven breaks. Using a stable, flat cutting surface helps maintain control and reduces wobbling. To improve support:
- Use a cutting mat or a thick, sturdy surface to keep the glass steady.
- Support the glass with your hand or a guide to prevent flexing.
- Ensure the glass is fully supported along its edges to minimize tension points.
This prevents unwanted movement, ensuring cleaner cuts. Remember, proper support helps distribute tension evenly, reducing the risk of jagged edges and wasted glass. A stable setup is key to achieving smooth, precise breaks every time.
Tips to Save Glass and Cut Costs

To save glass and cut costs in stained glass projects, you should focus on precise planning and efficient use of materials. Start by selecting glass with the right transparency for your design, which helps avoid unnecessary purchases and reduces waste. Pay attention to glass transparency, ensuring you don’t buy more than needed or end up with mismatched pieces. When choosing glass, consider color matching carefully; sticking to a cohesive palette minimizes the need for extra pieces and corrections. Organize your cuts to maximize each sheet, minimizing scrap. Measure twice, cut once, and plan your layout meticulously. This approach not only conserves glass but also streamlines your workflow, saving you money and ensuring your project stays within budget.
How to Practice Your Glass Cutting Skills Effectively

Practicing your glass cutting skills is the best way to improve accuracy and reduce waste, ultimately saving you money on your projects. To do this effectively, set up a dedicated space with good studio organization. Keep your glass storage neat so you can easily access different types and colors, which encourages regular practice. Focus on precision by trying different cutting techniques on scrap glass before working on your main project. Use a ruler and cutting guide for consistent results. Remember to clean your tools regularly to maintain sharpness. Practicing daily, even for a few minutes, helps build confidence. Organizing your workspace minimizes distractions, making it easier to refine your skills and avoid costly mistakes.
Troubleshooting Difficult Breaks and Fixing Imperfections
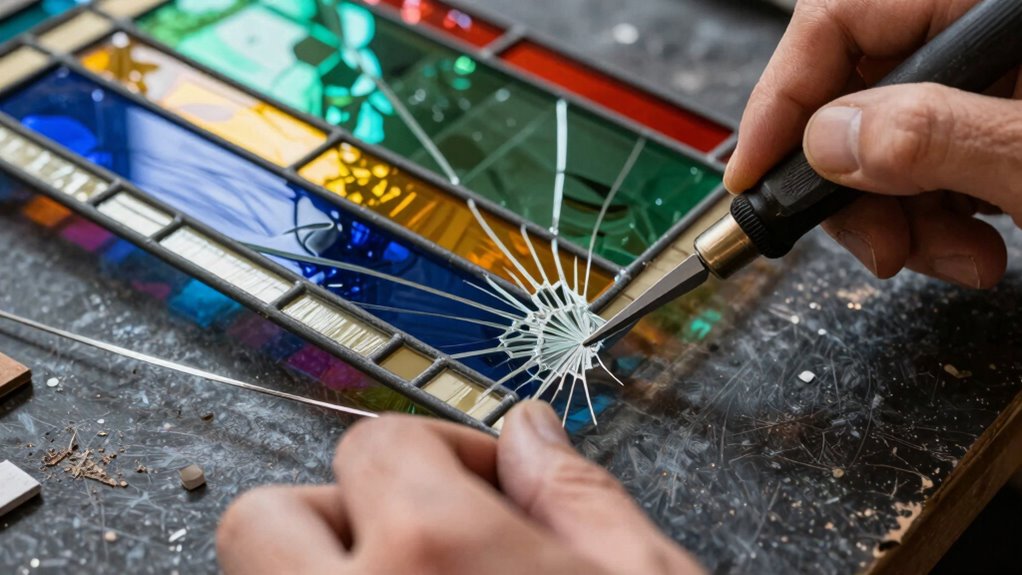
Have you ever struggled with difficult breaks or noticed imperfections in your stained glass pieces? Troubleshooting these issues starts with understanding your glass design and how it reacts to scoring. If a break doesn’t go as planned, try gently tapping along the score line to encourage a cleaner break. For imperfections like jagged edges or uneven breaks, use a glass grinder to smooth the area, ensuring your color matching remains consistent. Sometimes, glass may chip or crack unexpectedly; in those cases, carefully re-score and re-break, taking your time. Remember, patience is key. Adjust your technique based on the glass type and thickness. With practice, you’ll develop a better feel for handling difficult breaks and fixing imperfections, resulting in more precise, beautiful stained glass pieces.
Frequently Asked Questions
What Safety Gear Should I Wear When Cutting Stained Glass?
When cutting stained glass, you should wear protective gloves to shield your hands from sharp edges and eye protection to prevent glass shards from injuring your eyes. Make sure your gloves fit well and are cut-resistant. Always wear safety goggles or glasses to safeguard your vision. Staying protected minimizes accidents, helping you work confidently and safely, so don’t skip these essential safety gears during your stained glass projects.
How Do Different Glass Types Affect the Cutting Process?
Did you know that glass hardness varies considerably? Softer glass, like plate or flashed glass, cuts easily with standard tools, while harder types, such as tempered or fused glass, require specialized cutting tools. The glass type directly affects your cutting process—softer glass needs gentle pressure, whereas harder glass demands precise, often diamond-tipped tools. Choosing the right tools guarantees clean breaks and minimizes waste, making your project smoother and more efficient.
Can I Reuse Broken Glass Pieces for Other Projects?
Yes, you can reuse broken glass pieces for other projects by recycling glass and upcycling materials. Carefully clean and sort the shards, then incorporate them into mosaics, jewelry, or mixed media art. Upcycling not only reduces waste but also adds unique textures and colors to your work. Always wear protective gear and handle sharp pieces with care to guarantee safety while repurposing broken glass for creative projects.
What Are the Best Storage Practices for Cut Glass?
You should store your glass carefully by using labeled, sturdy containers or divided trays to keep your glass organized and prevent scratches or breakage. Keep different colors or types separated, and store them in a cool, dry place away from direct sunlight. Proper glass storage involves consistent organizing glass, so you can quickly find what you need for your projects and avoid wasting time searching through clutter.
How Does Glass Thickness Influence Scoring and Breaking Techniques?
Glass thickness directly impacts your scoring and breaking techniques because thicker glass has greater strength and requires more scoring pressure. When you work with thicker glass, you need to apply consistent, firm pressure to create a clean score line. Thin glass, on the other hand, is more delicate and needs gentle scoring. Adjust your technique accordingly to make certain clean breaks and minimize waste, especially with varying glass strengths.
Conclusion
Mastering smooth glass breaks can reduce waste by up to 30%, saving you money and effort. With the right tools and techniques, you’ll achieve cleaner cuts and stunning stained glass designs. Remember, practice makes perfect—don’t be discouraged by setbacks. Keep refining your skills, and you’ll soon cut confidently. Every successful break brings you closer to creating beautiful, professional-quality stained glass pieces that showcase your craftsmanship and creativity.